F-Stop Chart Infographic / Cheat Sheet
by Alex W.
For those of you still struggling to get to grips with aperture, we bring to you our handy F-Stop Chart Infographic / Cheat Sheet.
Many of you will have grasped the basics of aperture from our Exposure Triangle explanation, but getting your head around f-stops can be a real sticking point for many beginner photographers.
Sometimes, nothing can compete visual learning, so we've put together this easy-to-understand infographic illustrating how changing the aperture can effect our final image.
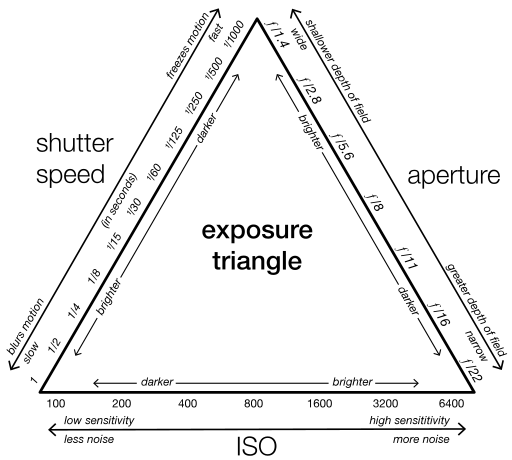
Here it is! Refer back to our F-Stop Chart as we explain a bit more about apertures below, save it for future reference, print it out. Basically, do whatever you want with it!
You can also find our Shutter Speed Chart Infographic here!
Contents
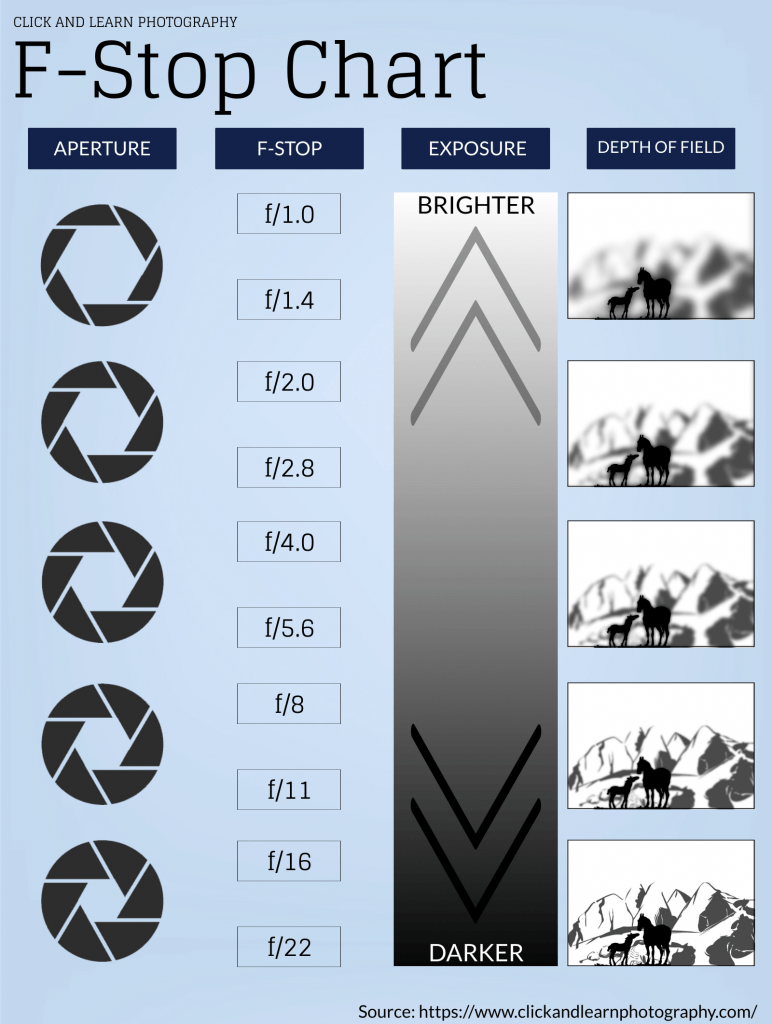
Aperture / F-Stop Chart
Aperture and F-Stops
You'll probably have heard this corner of the Exposure Triangle referred to as a number of things, such as aperture, f-stop, f-numbers.
Not to worry! We'll clear up any lingering confusion in this section.
What is aperture in photography?
The aperture is the opening inside your lens (the lens diaphragm) that allows light to pass through your lens and hit the camera sensor.
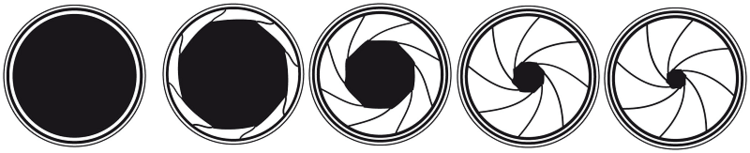
This term refers to the actual physical component in your lens. The bigger the aperture is able to open, the more light that your sensor can collect.
As you can see on the left hand side of the F-Stop Chart above, wider aperture = brighter image.
What are F-stops?
F-stops differ slightly from aperture and refer to our way of measuring the size of the aperture opening. F-stops are represented by f-numbers, and the higher the f-stop number the smaller the aperture is and vice-versa.
One of the most confusing aspects for beginner photographers to wrap their heads around is that a lower f-stop number = a bigger aperture.
Now, there's a lot of math surrounding this that you don't really need to know, but the takeaway lesson is that f-stops aren't referring to whole numbers, but to fractions.
The "f" actually stands for focal length, so the physical diameter of the aperture is measured like this:
focal length / f-stop = aperture diameter in millimeters.
For example, if you're using that old favorite the 50mm prime at an f-stop of f/1.8 the diameter of your aperture would be:
50 / 1.8 = 27.78mm
Math lesson over! All you really need to remember is that a smaller f-stop equals a wider aperture.
What Does an F-stop Do On a Camera Lens ?
In photography, a stop is a unit of measurement to quantify the overall exposure of an image.
So, when we change our aperture by a full stop, we either halve or double the amount of light reaching the sensor (providing other settings remain the same.)
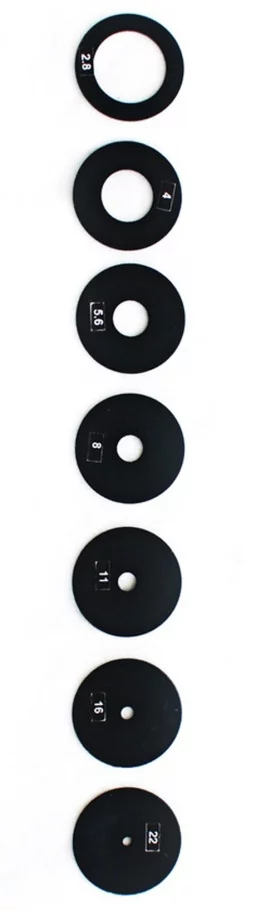
These full stops are below, although note that most of the time you can change your aperture in increments of 1/3 stops.
The F-stop, also known as a stop, a f-number or a relative aperture, is a setting on the camera lens that determines the size of the opening in the lens at any given time. With a specific F-stop value it is possible to obtain an appropriate exposure for photographic material under certain conditions.
F-stops are measured in one-third f-stop increments starting at f/1.0 or as T-stops, which are an exact measure of the amount of light entering the lens instead of the values that appear on the current lenses. F-stops exist to show each time an increase or decrease by one setting doubles or halves the amount of light entering the lens, or conversely, doubles or halves the amount of light needed for proper exposure.
The f-number (f/#) is therefore an expression of relative aperture. A larger f/# means a smaller aperture opening and vice versa. The standard sequence starts at f/1.0 as the largest number and then continues as a sequence of halving the previous opening. Every time you go one stop down on the aperture scale, you either double or cut in half the amount of light going through your lens and onto the camera sensor.
For example: If I'm using an aperture of f/8 then this is actually half as much light as it was at the f/5.6 and double the amount of light as compared to f/11, thus I'm closing down the aperture by one stop. If you would be using an aperture of f/16, this is half as much light as at f/11 and twice the amount of light as at f/8 so by using your aperture two stops down from f/8 you are letting in twice as much light.
In addition to controlling the amount of light entering the lens, aperture also controls depth-of-field (the distance from foreground to background that is acceptably sharp). A large opening will result in a very small depth-of-field and a small opening will result in a large depth-of-field.
Shutter speed, ISO and f-stop are usually considered the three pillars of exposure every photographer should understand. They work together to create an exposure triangle that determines how much light will be captured by your camera's sensor. Learning about these concepts is crucial to creating well exposed images.
Commonly Used F-Stops
f/1.0 > f/1.4 > f/2 > f/4 > f/5.6 > f/8 > f/11 > f/16 > f/22 > f/32
How to Change the F-Stop on Your Camera?
Many photographers want to know how to adjust the F-stop on their camera. The F is actually a measurement of light that is let into your lens and eventually onto the sensor, which then makes an image after it has passed through all those little glass pieces inside your lens. So you can see how important it is for this number to stay as low as possible. This number has a major effect on how much of your picture is in focus and what the depth of field will be.
The first thing we need to know is what each F stop allows through. I will try my best to explain it in an easy understandable way. The numbers in photography stand for how many times the lens iris is open when taking a picture. An F-stop is also called an F number which is why you see people call out the f-stop of their lens sometimes.
The first stop allows half of your light through the lens. The second stop allow half of what is left in the last one. And so on. So you can see that each time you go down a stop, you are dividing your light by two, thus letting less power onto your sensor. Remember that our sensor only sees black and white not colors like our eyes do, so it can't see light in the same way. So to the sensor, an f-stop is like closing a door halfway through.
So what can you do with all these great pieces of information? Well imagine that your subject is out of focus and you want to sharpen it up without changing your distance from it, then you could easily go down a stop from there and the subject will come into focus. This is how macro shots usually get their amazing depth of field.
The same thing can be done for a rear element that has been out of focus. Yes you could change your distance to it and most likely be able to bring it in focus, but changing F-stops may be an easier way. When my camera does not autofocus correctly, I change the F-stop until my subject looks like it is in focus and then readjust my distance to compensate for this change.
So now that you know how to keep your subject in focus or how to increase the depth of field on one part of your subject, we need to know another thing. Most lenses cannot go past a certain F-stop number and still focus correctly. Most consumer grade lenses made today can only shoot at an F-stop of 8 and higher, but there are quite a few fantastic lenses out there that will only let you shoot as low as 3.5 or lower.
These very handy lenses are used by many professionals and even some amateurs because it allows them to shoot in extremely low light situations such as weddings or late evening shots at sports games. The lens is wide open so it let's a lot of light through and the subject can be brought into focus fast. It also reduces the amount of noise you will get on your final image because a lot less light needs to be collected.
These lenses are not cheap and usually the only ones with a low F-stop number will be prime lenses. The main reason for this is the lens has been designed from the ground up as a low light lens with little regard to how it handles other things such as color or contrast. I have owned 2 lenses that did not go lower than 3.5 and could not get enough light for my taste, but yet they were great lenses to shoot with at night time because of the fast focusing abilities.
So now that you know what F-stops are all about let's get to how to change them on your camera. As I said before, all cameras cannot handle low F-stop numbers so you need to know what your specific camera will allow through. Auto focus lenses usually have an external ring on them that can be turned to increase or decrease the amount of light getting into the lens. Most photographers leave their cameras in auto focus mode and just adjust this ring to fit their needs.
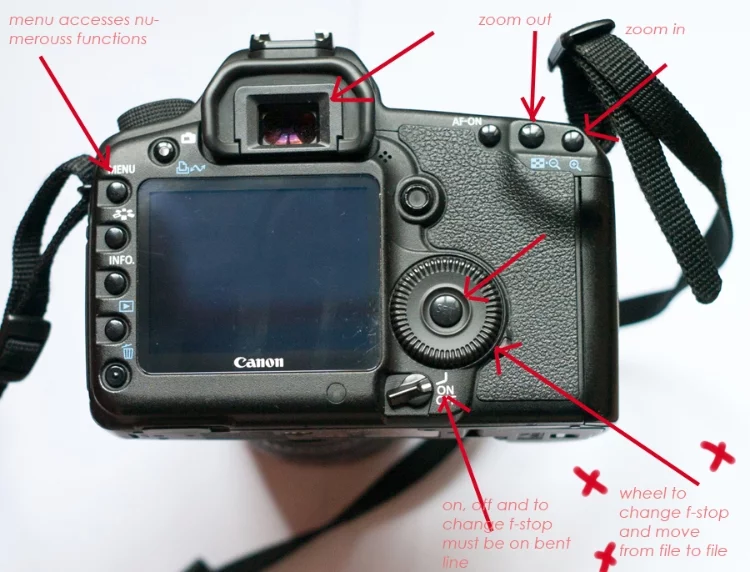
So now Open up your camera's manual and see what F-stops it will do on its own. I know my XTi can only go as low as 2.8 but that is plenty for most situations, so I never changed it even though I was aware of this setting. If you need to change this number, push your iso button (Which is usually located on top of your camera) and while still holding it down, turn the wheel that controls the F-stop.
This will bring you to a screen with numbers on it which represent different F-stops. I need to get my camera down to at least 2.8 so that is what I have pushed. Then just change the number to whatever you need. Your camera will still think it is set in Auto Focus, but this setting tells the light meter how much light needs to enter through your lens in order for you to get a correct image.
Some camera's offer up-front F-stops while others do not. Your camera may have a button on the top that you push which then gives you more options for changing F-stops. The XTi I own, does this so it will be slightly different than other cameras.
Another thing to consider is if your camera has a "full manual" setting or not. When using my DSLR I am usually in "A" or "P" mode. A is the auto setting and P is for Program mode which tells the camera that I want it to use a specific F-stop but will let me control everything else. This is usually the way most cameras are set up unless you have a full manual setting on it. We will look more into that later.
The last thing you will need to do is set up your ISO to its lowest setting if it has one. The reason here is that the lower the image quality, the less noise you will get. This should be adjusted by pressing down your ISO button while turning your wheel at the same time (the one that changes F-stops).
This is a shot at ISO 100. As you can see there is a lot of noise going on and it does not look as clear as some other shots I have taken. This is all because the F-stop was set to 4.5 on this camera from the factory. You can use software to reduce noise but you really should not have to as it is not necessary.
This shot was taken at ISO 100 but the F-stop was set to 1.8 which is a low number on most cameras and gives me a much cleaner image with less noise going on. If you find you are getting a lot of noise in your images, try turning down your iso first before changing any other F-stop settings.
Now that you have seen what different F-stops will do for you, let's look at controlling your camera to allow the use of these lower numbers. Here is where most people get confused when it comes to controlling their camera in manual mode. Your wheel that changes the F-stop also controls many other settings as well. Because of this some people get confused as to whether they are changing the F-stop or another setting on their camera.
How Does Aperture Affect My Photography?
Now we get down to the nitty gritty of exactly what changing aperture can do to our images.
There are two main things to consider when choosing an f-stop number: Exposure and Depth of Field.
Shutter Speed and ISO
Aperture, shutter speed, and ISO make up the three corners of the Exposure Triangle.
That means that when one of these settings is changed, one or both of the others must also be changed to maintain the same level of exposure.
It might sound complicated, but it's actually pretty simple. If you stop down your aperture by one stop (eg, changing your f-stop from f/8 to f/11), you must then either double your ISO value (eg ISO-100 to ISO-200) or double your shutter speed (eg 1/30 second to 1/15 second) in order to maintain the same exposure.
This is why fast lenses , which are lenses with a wide maximum aperture, are so expensive and sought after. The wide maximum aperture means a faster potential shutter speed, which allows you to handhold the camera even in low light situations.
Depth of Field
I'll spare you any more boring science, but as you can see from our F-Stop Chart, a wider aperture (smaller F-Stop number, remember?) results in a shallower depth of field.
A shallower depth of what?
Depth of field refers to the amount of an image that is in focus. Variables such as focal length, distance to subject, subject to background distance all impact the overall depth of field, but by far the most influential is the aperture your lens is set at.

As the Aperture Chart shows, a wide aperture results in a shallow depth of field (DoF), while stopping the aperture down increases the DoF.
What level of depth of field you're actually aiming for depends on the individual image and your photographic preferences, but just remember this: If you want that creamy out-of-focus background use a small f-stop, and if you want as much as possible in focus use a large f-stop.
For instance, many wedding and portrait photographers love using a shallow DoF because of the gorgeous separation it can give between the subject and the rest of the world. Meanwhile, most landscape images (although definitely not all) benefit from a large DoF.
There we go! Hopefully our explanation, along with the F-Stop Chart, has cleared up any lingering confusion surrounding aperture and given you a better idea of how you can use it creatively.
Good luck and have fun!
Read More for F-Stop Chart Related
- Ultimate Guide to Travel Photography Gear
- 5 Must-Have Nikon Lenses to Add to Your Arsenal
- 5 must have Canon lenses
- 11 best external hard drives for photographers
 |
 |
 |
 |

About Alex W.
Alex is the owner and lead writer for Click and Learn Photography. An avid landscape, equine, and pet photographer living and working in the beautiful Lake District, UK, Alex has had his work featured in a number of high profile publications, including the Take a View Landscape Photographer of the Year, Outdoor Photographer of the Year, and Amateur Photographer Magazine.
Thoughts on "F-Stop Chart Infographic / Cheat Sheet"
|
|
|
|
Learn Photography
You can Get FREE Gifts. Furthermore, Free Items here. Disable Ad Blocker to receive them all.
Once done, hit anything below
|
|
|
|