Introduction to Adobe Lightroom – From Capture to Completion
by Alex W.
If you're shooting in RAW, you'll soon realise that editing your photographs is almost a prerequisite in order to get the best out of your files. RAW files, by their very nature, are much flatter than JPEGs due to the lack of editing taking place inside the camera, so to take full advantage of the range of data captured in a RAW file we need to undergo some post-processing.
This can seem like a daunting task to the beginner photographer, but there is no program I recommend more than Adobe Lightroom. The advantages of using Lightroom are endless, and despite also having Photoshop at my disposal I find myself going through my whole post processing workflow in Lightroom alone 90% of the time.
However, it can take some getting used to. When you first open Lightroom you see multiple tabs and an array of sliders, but it's really not as scary as it looks. Using this guide you can allay some of that fear and start progressing your editing skills.
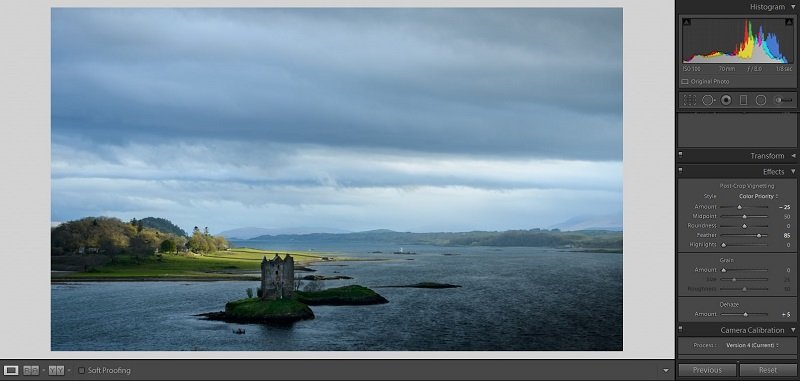
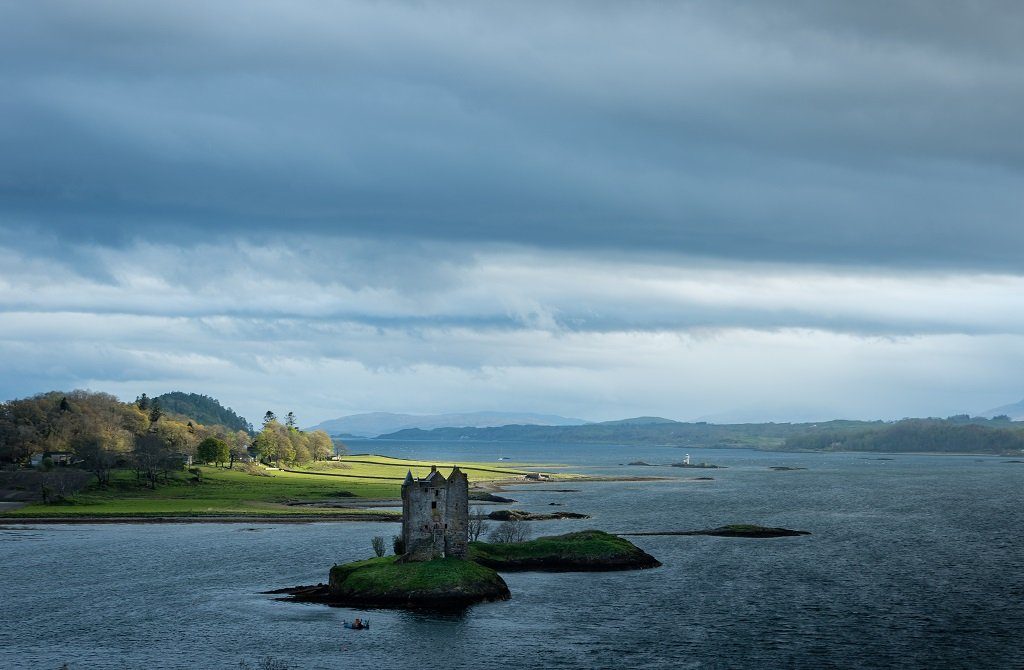
You can even come along with us on our Adobe Lightroom workflow. Just sign up to our newsletter below to receive the free, unedited RAW file of the completed image above! This is an image of Castle Stalker in the Scottish Highlands, taken with a 70-200mm lens mounted on a Nikon D800, set to full manual mode.
Disclaimer: The image on offer is the sole property of the photographer, and must not be published without the express written consent of the copyright holder.
Contents
After you've read this, head over to this page to receive five completely free Lightroom presets to help speed up your editing workflow and then learn how to install Lightroom presets here.
What is Adobe Lightroom?
Adobe Lightroom is editing program that wears many hats, and because of it's multi-functionality is can be used throughout your entire post-processing workflow.
To put it simply, Lightroom is a image cataloguing and editing program that allows you to both organise and optimise your photographs. As you would expect it integrates seamlessly with Adobe Photoshop, but unlike it's bigger brother it is completely non destructive in it's editing.
This is because your original image is left untouched by Lightroom, with the edits you apply acting as an overlay rather than actually altering the pixels in your file. This is a huge advantage because you can apply as many edits as you like, all of which are completely reversible. It allows you to edit without the fear of ruining your original image.
What's more, because of it's extensive cataloguing capabilities you can actually take an image all the way from your camera's SD card to the finished product without ever leaving Lightroom.
If you want to acquire Adobe Lightroom please consider using this affiliate link to do so. It comes at no extra cost to you but allows the continued upkeep of this site to go ahead.
You Might Like… Top Photography Accessories for Under £50
Getting Started with Adobe Lightroom
The first thing you need to start using Adobe Lightroom is some photographs, and fortunately getting images from your computer or SD card into Lightroom is a very straightforward task.
Importing Images into Lightroom

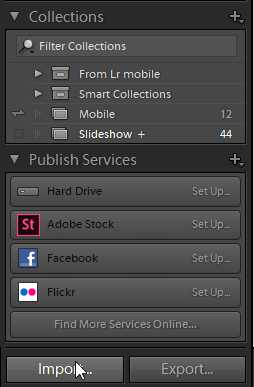
Firstly, navigate to the Library tab in the top left of your screen, as shown in the image above. Now it's simply a case of clicking "Import Photos" at the bottom left (as shown on the right.) This opens the Import menu, which has a number of options. A snapshot of that screen is shown below, but I urge you to follow along in your own Lightroom window.
Firstly, you want to be on the "Add" tab at the top; This adds your photos to the Lightroom catalogue without moving them around on your hard disk. Now, on the left hand side you'll find your entire hard drive available to browse through. This is where you select which images you want to import. After you have the desired photos selected you can move over to the right hand side of the window:
- Build Smart Previews - This is an incredible tool for those of you who travel a lot or store your photos on separate devices. When checked it allows you to edit your photos in Lightroom even when the original hard drive containing the photos is disconnected, and then once the original drive is reconnected the file automatically updates. Check this box.
- Don't Import Suspected Duplicates - Automatically greys out duplicate photos from your selected images. Useful if you store many photos in the same place and don't want to manually sift through them. Check this box.
- Make a Second Copy To… - This allows you to import your photos directly from your SD card, all while making a backup of the original photos at the file directory of your choice.
- Add to Collection - If you have Lightroom Collections set up you can add your imports to them. So, if you shoot multiple genres of photography you can have a Collection for each one, and add each import to the corresponding Lightroom Collection on import.
- Apply During Import - This is where you can apply certain edits to your photos while importing, which I usually avoid. However, you can also add metadata and keywords on import, which is useful for adding copyright information and organising your photos with keywords.
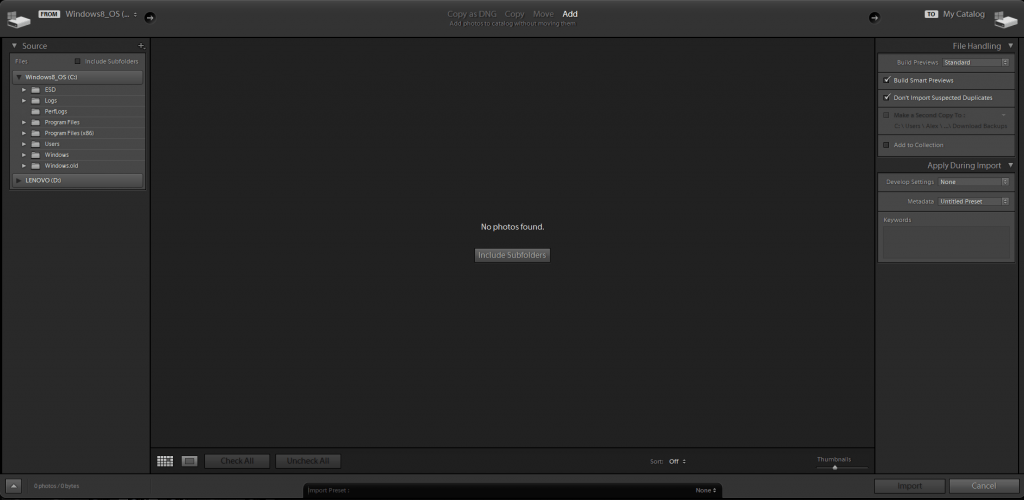
Now, simply click Import. Don't worry; you don't have to go through all that during every import. These settings are saved, and to be honest I haven't touched my Import settings for well over a year!
After Import
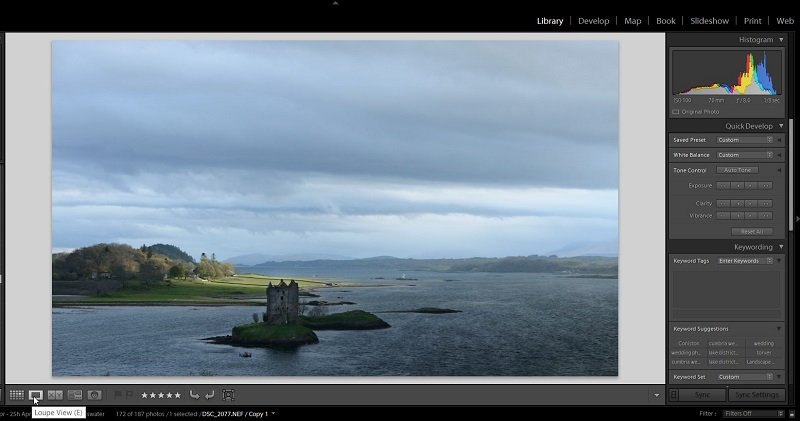
Once the import has finished you're well on our way. At the bottom of your screen you will see a bar of your imported images, which will also be showing as a grid view on the main part of the window. I usually switch this to the "Loupe View" as shown in the screenshot, which displays the image selected at the bottom in all it's glory.
Note - You can change which folder of images you're viewing on the left hand side of the window.
You can do many things to your imported photos from the Library panel, and once you're more comfortable with Lightroom you can start utilising the huge amounts of keyboard shortcuts to make your workflow quick and smooth. Here are a few simple ones to get you started:
- X Key - Rejects the current photo, allowing you to bulk delete rejected photos later on. The U Key unflags these images if you made a mistake, whilst the P key flags them (which can be used to flag standout images for later)
- F Key - Gets rid of all the distracting panels of Lightroom and shows the current image full screen.
- C Key - Changes to Compare view, display two images side by side to help you with those tough decisions.
- Numbers 1-5 - Quick and easy rating system, ranging from 1 star to 5 stars. Just a hint, if you're rating something as 2 stars you may as well delete it now!
Moving to the Develop Module
Now that you've had a look around the Lightroom Library we can get started on actually editing an image. This is where the fun really starts, but as always it can look daunting and complicated at first. We'll take you through it step by step though!
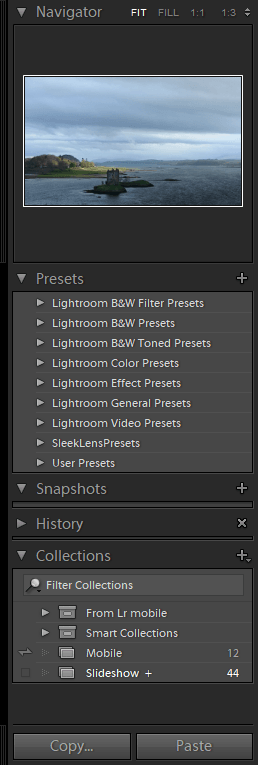
Navigator - Starting from the top left you will see a miniature version of your selected image. This is where you can choose the zoom level on the main screen. "Fit" is the current display, 1:1 zooms in to full magnification and allows you to analyse very small areas in your image, and 1:3 is a less extreme level of zoom that is useful for localised adjustments later on.
Presets - Moving down the left hand side you have the Presets section. There are a number of preloaded editing presets that you can explore, and you can even create presets of your own or purchase some online. I generally take each photo as it's own and stay away from presets, but some photographers love them!
Snapshots - This allows you to create little digital bookmarks during the editing process. If you've reached a crossroads where you're not sure what to do next, create a snapshot and try the adjustment out. If you don't like it simply click the snapshot and it will instantly revert to the settings of that snapshot. Very useful if you like to experiment.
History - Remember when I said that everything in Lightroom was non-destructive? This is where you can test that out. You can do the most extreme edits imaginable to your image, but by simply going to the History panel you can take your image back to whichever point you want. This includes every single adjustment you've made to the image, so you really can't go wrong with Lightroom!
Note - Before heading to the editing settings, note the little "Y|Y" box at the bottom of the main window. This allows you to compare the before and after photos side by side.
You Might Like… Ultimate Guide to Landscape Photography Pt 1
Adobe Lightroom Develop Settings
The right hand panel is where all the magic happens in the Develop module, and it's about time we got cracking with that! We'll discuss each tool and slider briefly here, but the best thing you can do is experiment - That's the only way to truly understand what each slider does.
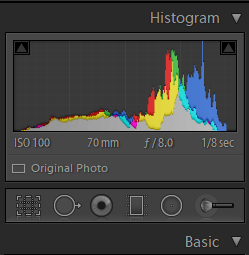
Histogram and Local Adjustment Tools
We discussed how to use the histogram in our Ultimate Guide to Landscape Photography. If you want a more in depth discussion I urge you to look there, but in quick and simple terms it displays the distribution of light in your photograph. If you move the Exposure slider up, the histogram will move to the right and vice versa. Below the histogram you can see your camera settings displayed.
Just above the Basic section you will see a row of tools. From left to right these are: Crop, Spot Removal, Red Eye Correction, Graduated Filter, Radial Filter, and Adjustment Brush. These are best left until later, but they are all different ways of editing specific sections of your image.
Lightroom's Basic Panel
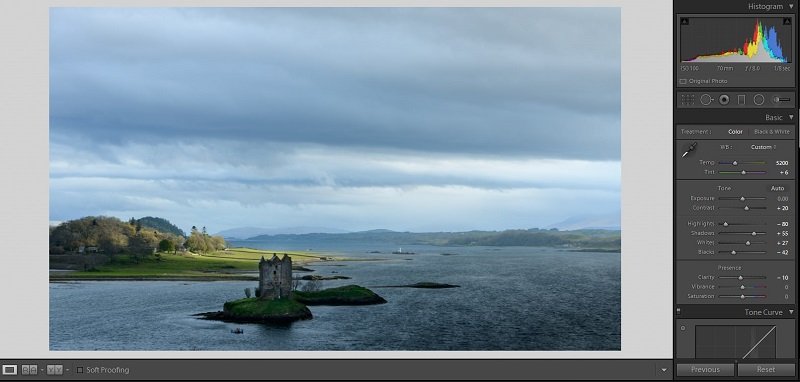
Now we can finally go ahead and look at some of the actual adjustment tools. The basic panel is where the most noticeable changes will take place, and it's good to have at least a vague idea of what you want to convey in your final image before you start. Do you want dark and moody or light and cheerful? Punchy and high contrast or a more washed out and retro feel?
Get an understanding of these tools below, and then take a look at how our RAW file is coming along at the bottom.
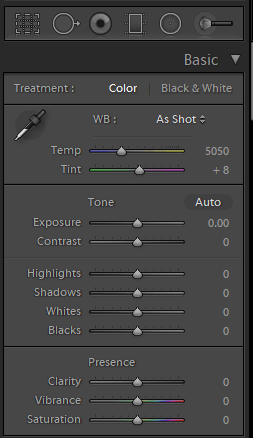
WB (White Balance) - We've already talked about white balance here, but provided you're shooting RAW you will be able to make a full array of adjustments to it in post processing too. Adjusting the WB changes the colour temperature of the image, and is usually used to make the colours more natural. Not all light sources emit the same 'colour' light, with the sun, moon, flashlights, and street lamps all giving off vastly different types of light. Try a few of the presets from the drop down menu, choosing one that corresponds to the conditions the photo was shot in, and then make small adjustments using the slider.
Exposure - This adjusts the overall brightness of the image. I tend to skip this setting at first and come back to it after I've finished working on the rest of the Basic panel.
Contrast - Many of the good images you see have a healthy dose of contrast, which is just the difference between the light and dark parts of the photograph. Increasing the contrast brightens the light areas and darkens the shadowed areas. Again, I leave this until the rest of the basic panel is complete.
Highlights - Adjusting the Hightlights slider affects only the very brightest areas of your image. It's often used to bring back the detail in an overexposed sky, because the sky is always brighter than the land and therefore to capture a correctly exposed shot the sky often ends up slightly overexposed. Reducing the highlights slider can save this.
Shadows - The opposite to the Highlights slider. The Shadows refer to the darkest pixels in your image and can be used to either further darken the shadowy areas of the image or to brighten them up and bring some detail back. The highlights and shadows both refer to a small range of pixels at either end of the brightness spectrum, which is slightly different from the Whites and Blacks below.
Whites - This is where I tend to start with an image. The whites are similar to the highlights, but they cover a wider range of tonal values, and therefore adjusting the Whites slider affects a greater portion of the image. If you're going for a high contrast image, try pressing the 'Alt' key and moving the Whites slider until you see a tiny amount of white appear through the black. Stop there - You've just set your white point.
Blacks - Blacks are to Whites as Shadows are to Highlights. Do the same again, pressing the 'Alt' key and moving the Blacks slider to the left until some colours start to appear through the white screen. That's your black point, and just by adjusting these two sliders your image is likely to be improved. Now go back and change your highlights, shadows, exposure, and contrast until you like what you're seeing.
Clarity - This is a dangerous slider, and I advise you to use it with caution. The clarity slider is basically micro-contrast, which gives the effect of sharpening edges. However, many photographers boost it to the right far too much, which gives and unnatural and rather unsightly effect. This is especially true for portraits. Try keeping your adjustments to below 20 points either way.
Vibrance and Saturation - Again, many photographers get tempted by these colourful sliders. Don't be one of those who push out sickeningly saturated images though. I very rarely touch these sliders, instead letting my contrast adjustments bring out the natural saturation within an image.
Tone Curve and HSL Panels
Heading down the right hand side, next we come to the Tone Curve section. Now, this is a very useful tool in it's own right, but as a beginner I would recommend having a play with it but generally skipping past it until you're a bit more comfortable with the program. For the sake of completion, this allows you to precisely fine tune contrast in specific sections of your image.
The HSL panels are quite useful to the beginner, although it's imperative that they are used sparingly. HSL stands for Hue, Saturation, and Luminance, and each one of these can be adjusted throughout the eight different colour channels:
Hue - As you probably already know, colours all blend into one another. Red turns to orange before blending into yellow and then green and so on. This is what the Hue slider is for; you can alter the actual colours of each channel. For example, by moving the yellow slider you can make the yellows in your photos appear more of a green colour.
Saturation - I've already advised you to skip over the saturation slider back in the Basic Panel, but here it can be of some use. Again, it must be used sparingly, but if you want to bring certain colours within your image up a small amount just select the appropriate colour and increase the saturation a little.
Luminance - As the name suggests, the Luminance sliders effect how bright each colour in your image appears. This can be used for tasks such as brightening the eyes in a portrait photograph or for darkening down a blue sky.
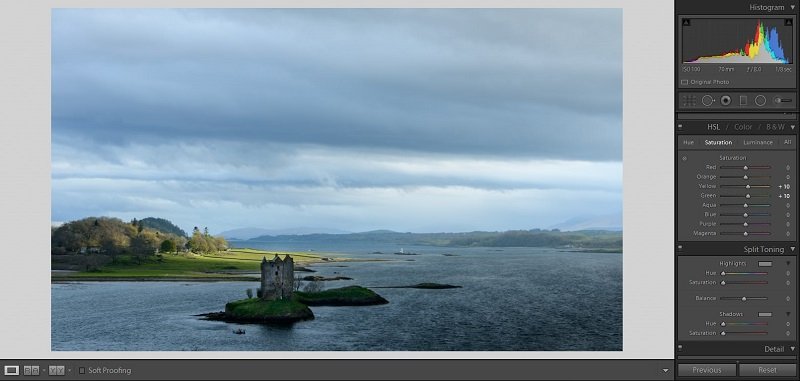
Split Toning and Detail Panels
Much like the Tone Curve, Split Toning is a very powerful tool in the right hands. Explaining how to use it is another matter entirely though, and rather than walk you through it it's probably best if you just experiment.
The basic premise is that you can choose a colour for both the Highlights and the Shadows, and then by moving the Saturation slider you can start to introduce the selected colour into the image. The Balance slider is used to adjust where the line between highlights and shadows is drawn. This is often used to add an extra mood into an image, whether it be a warm, earthy tone or a cool blue tone. Experiment and have fun!
Now, onto the Detail section. This all looks very complicated, but is actually a breeze to work through:
Sharpening
- Amount - The amount of sharpening applied to the edges of your image. I tend to never go higher than 70 to avoid the 'crunchy' look associated with over sharpened images.
- Radius - This is the size of the sharpening area around the edges in your image. A value of 1.0 means that sharpening is applied to one pixel around the edges. A higher value results in thicker edges; I tend to leave this on the default setting.
- Detail - This slider effects which edges that Lightroom chooses to sharpen. A small value means that only the largest edges will be sharpened, whereas a higher value will sharpen even the smallest edge in your image. Keep this under 50, otherwise you start sharpening areas of noise.
- Masking - Using the masking tool you can actually choose to avoid sharpening certain areas of the image. Hold down "Alt" and move the slider, and the white edges represent which parts of the image will have sharpening applied. Useful when you're trying to purposefully avoid sharpening out of focus areas.
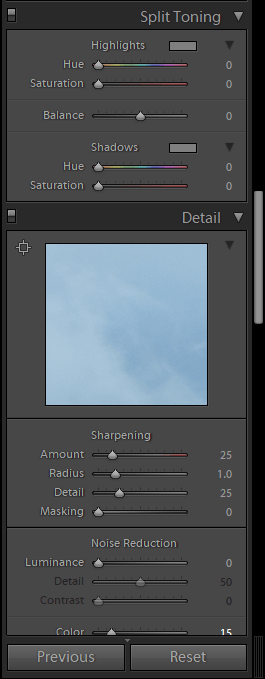
Noise Reduction
- Luminance - Luminance noise is the main type of noise you will encounter, and this slider deals with that. To be honest, if you're shooting at the Base ISO of 100 or 50 I actually leave this slider off. There is no need for noise reduction when there's no noise after all. However, if the ISO is higher I'll push the slider up, but never over a value of 30. After that some important detail within the image is lost. As with every tool - Use it sparingly.
- Detail - This controls the threshold for what is classed as luminance noise. A higher value leaves more detail in the image but may fail to remove all the noise, whereas a lower value will be more effective at removing the noise but will remove some detail in the process.
- Contrast - Similar to the detail slider but with contrast instead. A higher value will keep contrast high but miss some of the noise removal, whereas a lower value is more effective at removing noise but will significantly reduce the contrast in the image.
- Color - Colour noise is slightly different to luminance noise, in that is produces multicoloured pixels in an area of the image that should be a flat colour. Lightroom automatically sets this slider at 25, and that's what I tend to leave it at unless shooting at a high ISO value. You can afford to be a little more heavy handed with this slider, but don't overdo it too much.
- Detail - Exactly the same as it's namesake in the Luminance panel.
- Smoothness - Adjusting this slider avoids an unsightly mottling of coloured pixels during the noise reduction process.
Our demonstration image needed very little in the way of alterations here. We increased the Sharpening Amount to 65 and set the Masking to 37 to avoid applying sharpening to the sky. All noise reduction was left as the default settings due to the low ISO used during capture.
Finishing Touches - Lens Correction and Effects
We're almost done now. It's time to add those little final touches to your image. After you've applied every adjustment you will probably want to go back and make some other tweaks, and don't be afraid to do that! Remember, everything in Lightroom is non destructive, so add as many little touches as you see fit!
Lens Corrections
Every lens has it's own set of characteristics, and because they are effectively arrangements of glass projecting light onto a sensor they do have their drawbacks. These drawbacks are well known by Lightroom though, and they can be digitally resolved with a few clicks of the mouse. Tick both boxes in this section, and if Lightroom doesn't automatically recognise your lens simply select it from the drop down boxes and move on. We're done with this section.
Skip past the Transform panel as well. This is a more advanced tool that we'll cover in a future article, but it can be used to fix technical issues such as converging vertical lines (due to the camera being tilted upwards for example.)
Effects
There are three different effects in this panel, and each one can be used very effectively. This really is the finishing touch, because I always leave the final panel alone. The Camera Calibration panel is specific to each camera, and allows you to set your camera profiles that are available within your camera. Have a play around with these and find which one you prefer.
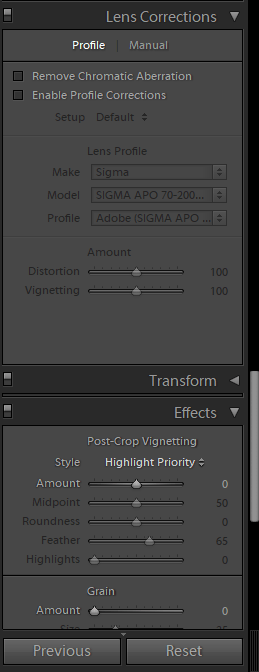
Post-Crop Vignetting
- Style - Here you have three options available to you. Highlight priority imitates a traditional lens vignette, Color priority retains more natural colours into the vignette and has nice, smooth shadows, and Paint Overlay simply adds a black or white overlay to your image when you add the vignette. I tend to opt for one of the former two options.
- Amount - Does what it says on the tin: Moving this to the left increases the intensity of a black vignette, and the other way adds in a retro white vignette.
- Midpoint - Changing this alters where your vignette will actually begin. A higher value will constrain the vignette to the very corners of your image, whereas a low value will bring the vignette right into the middle of the frame.
- Roundness - Again, this is fairly self explanatory. Changing this alters whether your vignette appears rounded or slightly square.
- Feather - This is used to change the transitional area for the vignette. A higher feather will make for smoother gradients into the darkened or lightened vignette, whereas a low value will show an abrupt and obvious vignette.
- Highlights - Moving this slider up will retain the highlights in your image, even in areas that are under the influence of the vignette.
Grain
- Amount - This is a control used to add a film grain effect to your image. It can be very effective in creating a retro, dated look and reintroduces the romance of film photography. The Amount slider simply controls how much grain is present.
- Size - Very self explanatory; changing this alters how big each 'grain' is.
- Roughness - Again, not much to say for this one. It controls how rough your grain appears.
Dehaze
This is a fairly new control to Lightroom, and is very useful in the right hands. It's a way to cut through things such as atmospheric haze and bring out distant detail in your image. Think of it as Clarity on steroids. Use it sparingly, and you can add a lot of drama into your images. It's incredibly good at resolving detail in night skies as well.
You Might Like… 10 Tips to Take Your Pet Photography to the Next Level
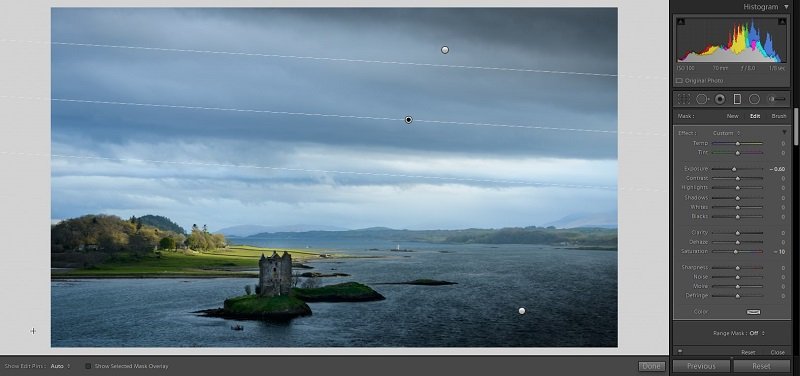
Final Local Adjustments
We have worked our way through the Develop settings now and applied all of our global adjustments. Now is the time to go back and make any more localised adjustments to improve the image using the tools at the top of the panel. This allows us to fine tune the image to our specifications - bringing further attention to the best parts of the scene.
Exporting Images from Adobe Lightroom
So by now you've imported your photos, applied a selection of carefully thought out and appropriate edits, but what do you do now? The photo is still in RAW format and stuck in Lightroom.
You need to export that file, with all edits applied, to a more convenient format. After that you're free to publish or print that image wherever you want. Happy days!
We've written a detailed article on the best export settings for Lightroom here, but below is a quick rundown of the most important settings.
Start the process off by navigating to File > Export in the top left corner. This will open up the Export window, where you can set specific settings for your exported image.
Once you've decided on all these settings you can save them as a User Preset, speeding up the export process for any future images. Now, let's run through the Export window:
Export Location
This is similar to many software programs out there. All you need to do is decide where you want your exported image to go, navigate to that folder using the 'Choose…' button, and click Select.
You can also change what Lightroom does when it encounters a file with the same name. I always leave this on "Ask what to do" to avoid any unexpected deletions.
File Naming
Again, this is fairly self explanatory. You can choose multiple different naming extensions from the drop down menu and then input custom text if you want. Basically, just choose a name for your image and move on.
File Settings
Things get slightly more advanced here, but it's still nothing too complicated. This is the section where you will select the end quality of your image and it's format. In the end, this all effects the quality of the final file and the size. I have mine set to:
- Image Format - JPEG
- Quality - 100
- Color Space - sRGB
- Limit File Size To - Unchecked
This isn't because I export and upload all of my images in their highest resolution, but more because it's more accurate to resize using the next section…
Image Sizing
This is where you can select the exact requirements for your image, starting by checking the "Resize to Fit" box
This makes a dropdown box available to select, where you can choose whether you want to resize based on the width, height, longest edge, megapixels, and various others. Once you have selected that then you can specify the dimensions in pixels, inches, or centimetres in the box below. Here are a couple that I use:
- Resize to Fit: Unchecked, Resolution: 300 pixels per inch - I use this for my full quality exports, where I want the highest resolution image available to me.
- Resize to Fit: Long Edge; 2048 pixels; Resolution: 300 pixels per inch - This is for social media ready images, with 2048 pixels offering the best compromise between quality and compression on most social media websites.
Output Sharpening
This option allows you to add extra sharpening to your image as it exports. It's fairly self explanatory - Use 'Screen' for images to be published online, and 'Matte Paper' or 'Gloss Paper' for images going to print.
I tend to err on the side of caution with the Amount option, going for Standard or Low to avoid any chance of oversharpening. After all, we've already sharpened our image in the Develop module.
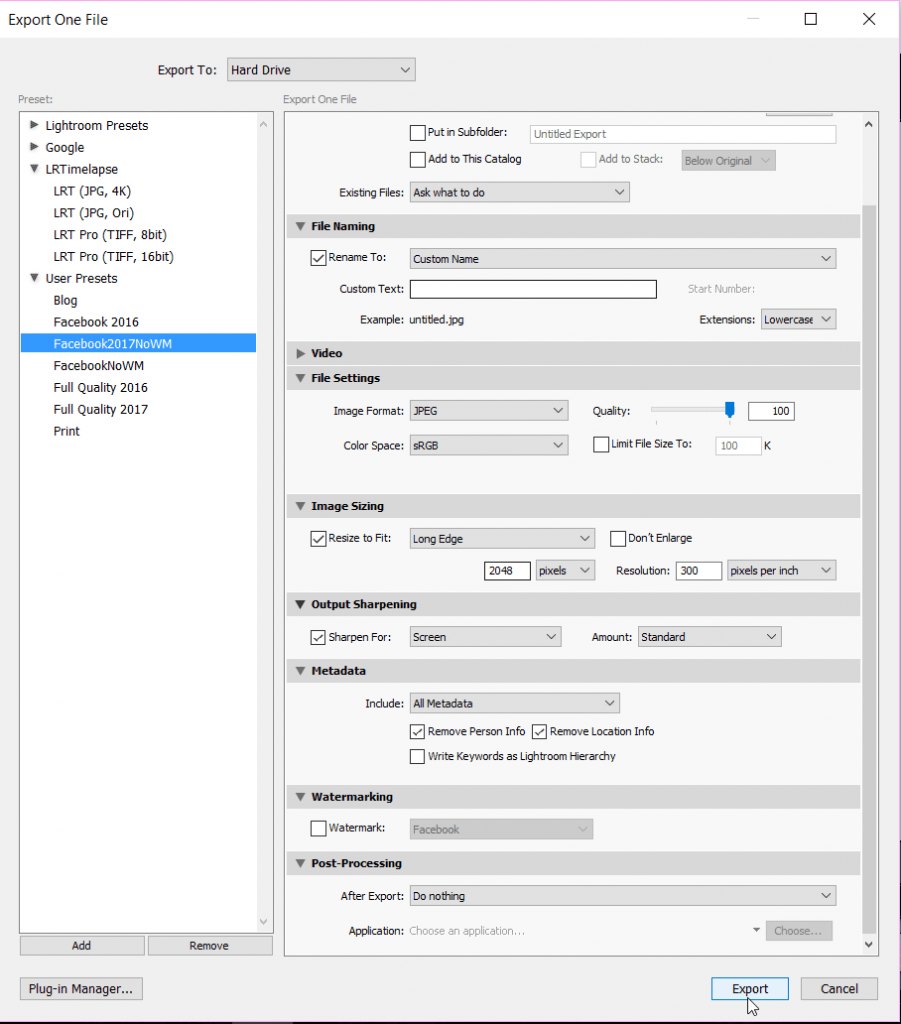
Metadata
I have this set to Include All Metadata, and that exports all the information regarding the image along with the actual image.
What this means is that you can find out what camera, lens, and settings an image was taken on. In addition, if you have input your copyright information during the Import section, this data is also exported and allows you to prove an image is yours if it is ever used without your permission.
Watermark
Here is where you can add a watermark overlay onto your image. I personally don't add a watermark, but I know many photographers who prefer that added level of protection so it's just a matter of personal opinion.
Post-Processing
Here is where you can automate various processes after the export. For example, if you plan to take this image into Adobe Photoshop after the export then you can select that from the dropdown box and it will do so automatically.
If you are done with processing the image, like I often am, then just leave this section blank and click the Export button. Job done.
The fully edited image is now sitting in your specified folder waiting for whatever your next step is, and you have completed your very first Adobe Lightroom edit! This gets much quicker and smoother as you familiarise yourself with the software, and eventually it will become second nature to you.
You Might Like… Behind the Lens with Anton Gorlin
Conclusion
Bear in mind that this is a very basic workflow focusing on taking an image from your camera to a stage where it's ready to be viewed on screen.
Lightroom holds far greater potential than this for those willing to learn. There's four whole tabs you never even touched during that process, along with a host of other offerings within the Develop module that we bypassed.
Those things are all ready and waiting for the eager learner. However, what I've taught you here is more than enough to kick your photography up a level and get you exploring the world of post processing.
The next step is signing up to our email newsletter to receive your five free Lightroom presets (along with a free ebook) to further enhance your editing workflow!
Read More…
- The Orton Effect - What is it and How to Create it?
- Ultimate Guide to Forest Photography
- Behind the Lens with Matt Holland
- DSLR vs Mirrorless - Which System Works for You?
 |
 |
 |
 |

About Alex W.
Alex is the owner and lead writer for Click and Learn Photography. An avid landscape, equine, and pet photographer living and working in the beautiful Lake District, UK, Alex has had his work featured in a number of high profile publications, including the Take a View Landscape Photographer of the Year, Outdoor Photographer of the Year, and Amateur Photographer Magazine.
Thoughts on "Introduction to Adobe Lightroom – From Capture to Completion"
|
|
|
|
Learn Photography
You can Get FREE Gifts. Furthermore, Free Items here. Disable Ad Blocker to receive them all.
Once done, hit anything below
|
|
|
|