Lightroom Export Settings Explained – Best Lightroom Export Settings for Web and Print
by Alex W.
Adobe Lightroom makes up a massive part of my and many other photographers’ workflow, but one part of the process seems to get overlooked far too often – Lightroom Export Settings.
We’ve already discussed them briefly in our Introduction to Lightroom, but the importance of the Export Settings means that they deserve a standalone article.
Here, we’ll delve into the best Lightroom export settings for web and print use and explain each option as clearly as possible.
Explaining the Lightroom Export Process
Because of the extremely broad scope of Lightroom’s functionality, actually saving the edits you’ve made to your images isn’t as easy as just Right Click -> Save As…
There is a process that you must go through to actually save your final, edited image, just like there is a process for getting your RAW files into Lightroom itself.
This export process allows you to customize that final image output, offering you control over key aspects such as the resolution, file name, metadata, color space, watermark and final sharpening.
These options may seem complicated and inconsequential, but believe me when I say they can have a big impact on your final image.
Anyway, let’s dive right in at the start of the Lightroom Export process.
Lightroom Export Setting Options
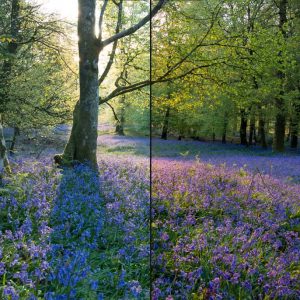
Let’s imagine you’ve just spent some time editing an image in Lightroom, perhaps even using one of our excellent Forest Photography Lightroom Presets (shameless plug).
Speaking of which, you can find out how to install Lightroom presets right here.
Hard work completed, you’re now ready to save the final image. This is our starting point.
Begin the Lightroom Export process by clicking File -> Export on the top menu. You can also right click on the image in question and select export that way, or you can use the keyboard shortcut Ctrl + Shift + E.
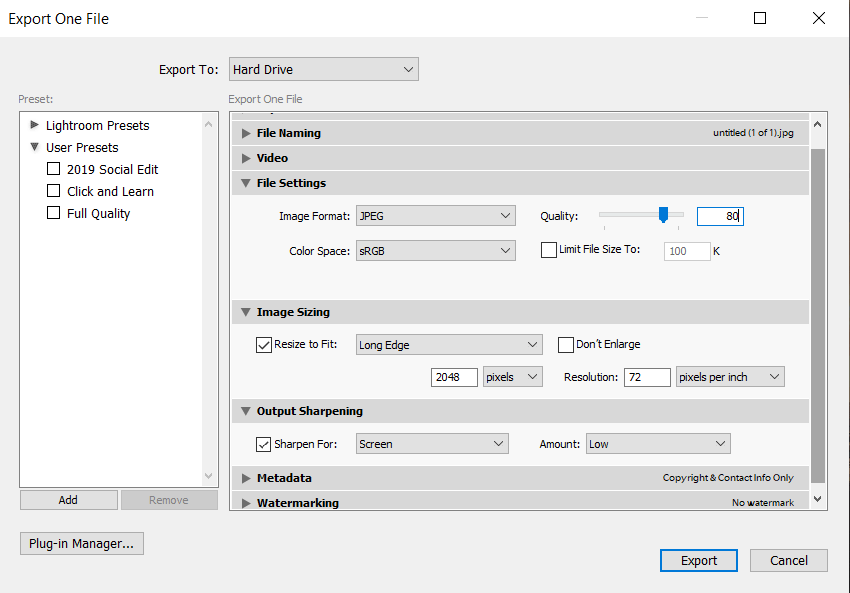
Lightroom Export Panel
This brings up the Lightroom Export Panel popup, where you’re presented with a plethora of options to decide on before your final image is ready for publication.
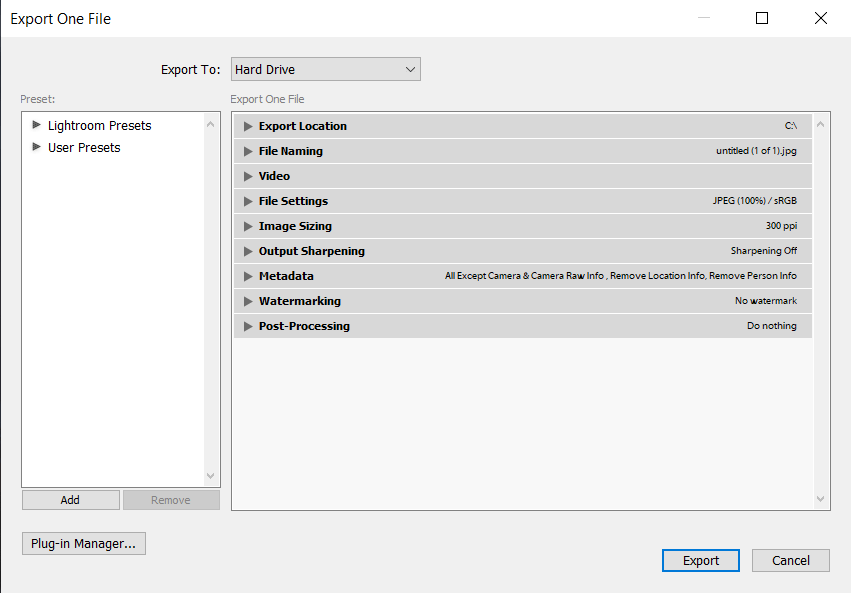
Now, let’s take a look at what each of these options actually does:
Export Location
As you might have guessed, this is the option that defines where your final image will be saved.
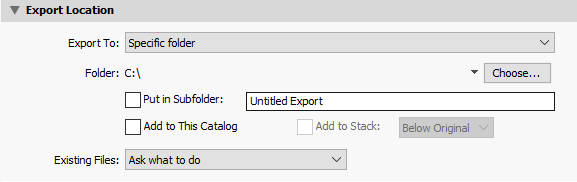
All you need to do is click the “Choose…” button, navigate to the folder where you want your image to be saved, and click “Select”.
You can also change what Lightroom does when it encounters a file with the same name. I leave this on the default setting to avoid any unwanted deletions.
File Naming
This is fairly straightforward too – it’s simply the file name of your final exported image.
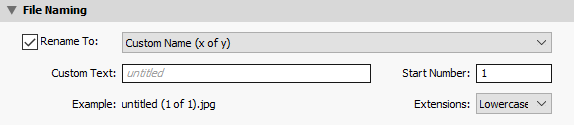
You can select a number of different formats, some of which are very helpful for sequencing when you’re exporting a large set of images.
You can also choose to have the date included in the final name by default, or you can bypass all that and just choose your own bespoke file name for each image.
Video
If you’re a videographer as well, here is where you can choose the Video Format and the export quality.
For us plain photographers, we can skip this step and move on.
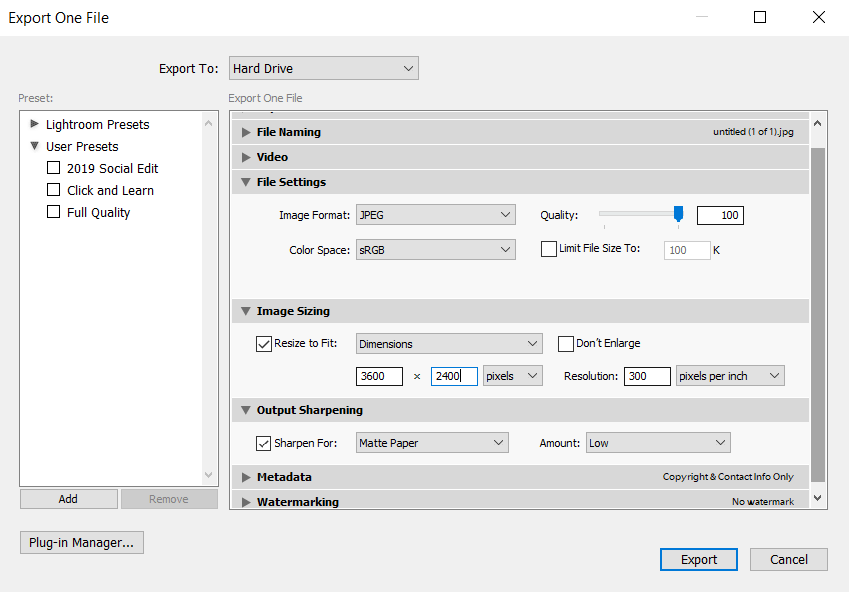
File Settings
Things get slightly more advanced here, but it’s still nothing to be afraid of. However, the File Settings section is a very important part of the process and it plays a big part in the quality of your final image.
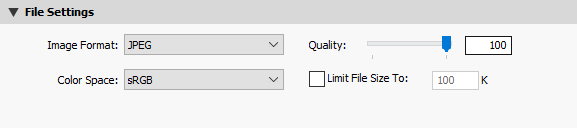
Image Format – You can select from a number of different formats for your final image. JPEG will be the best option in most cases (including web use), but sometimes you might require a different format.
Color Space – When in doubt, use sRGB. It’s the most universal and widely used color space so will provide the most consistent results across web and print. If anything (such as a printing lab) requests a different color space, just go back and re-export the image.
Quality – I leave this on 100 by default. We can make more precise adjustments to the final outcome in the next stage, so there’s not much need to change this.
Limit File Size To – In most cases we can leave this unchecked, although if you’re uploading to a website that has specific file size limits then this comes in handy.
Image Sizing
This is one of the most important parts of the Lightroom Export process and one that can really have an impact on the final quality of your image once it’s uploaded online or printed out.

If you’re simply wanting a full quality image saved to your hard-drive, then you can uncheck the “Resize to Fit” option and move on. However, if you’re planning on printing or uploading the image then we have some work to do.
Dimensions – You can choose a number of options from this dropdown, including specifying the exact dimensions of the image. I always use “Long Edge” here in order to retain the aspect ratio of my edited image.
Don’t Enlarge – Tick this box. Enlarging an image to dimensions greater than the original image allows will decrease image quality.
Pixels – You can change this to other measurements such as inches or centimeters, but for web use especially ‘Pixels’ is the best option. This will depend on what your plan for the image is – Different values suit different uses, and we’ll delve into them a bit later.
Resolution – Pixels per inch (ppi) is the industry standard measurement. 300ppi is the ideal resolution for printed photos and is the maximum that most consumer printers can handle, while 72ppi is the best option for web use.
Output Sharpening
The act of compressing an image results in an unavoidable loss of sharpness, and here is where we recover some of that lost detail.

Lightroom’s output sharpening tends to be quite heavy handed though, so err on the side of caution. The final medium is selected from the dropdown menu (Screen, Matte Paper or Glossy Paper) and I leave the Amount set to Low.
Metadata
This is where you select what metadata you want to be included in the final image. This can include location information (if your camera records it), camera settings and contact information.
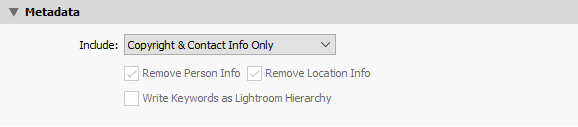
I tend to choose the Copyright & Contact Info Only option, which excludes location data from the metadata.
Watermarking
If you want to add a watermark to your image, this is where you can do so. You can either use Lightroom’s default Simple Copyright Watermark or create your own within Lightroom.

I personally don’t like watermarks, and as such leave this box unchecked. That’s just personal preference though.
Post-Processing
Finally, you can choose any additional actions you want to take place upon completion of your export.
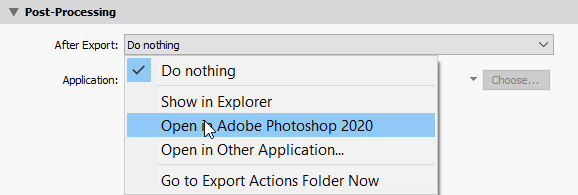
For example, you could automatically open the image in Photoshop, or simply open it in your file browser to view the final image.
Or, if you’re finished with the image (as I often am), you can leave it set to Do Nothing and click the Export button.
Lightroom Export Presets
You might think that going through all these options every time you want to export an image gets tedious… And you’d be right.
That’s why they invented Lightroom Export Presets!
If you find yourself using identical export settings for many of your images, you can simply click the “Add” button on the left panel to create an Export Preset.

As you can see above, I have a range of my most commonly used presets ready to go. One for social media uploads, one for full quality image exports and another for images used on Click and Learn Photography.
You can create as many of these as you like. For example, a wedding photographer might want an Export Preset for the first proof images, one for the full quality digital images, another for any prints the client orders and a final one for social media uploads.
Best Lightroom Export Settings for Web
In the modern world, the vast majority of our edited images end up online, so getting the Lightroom Export Settings correct for web use is important if you want to show the full potential of your shots.
The main areas you need to focus on here are the File Settings and the Image Sizing categories.
File Settings for Web Use
Image Format and Color Space can be left as JPEG and sRGB in the vast majority of cases. It’s Quality we’re most interested in.
We want as small a file size as possible but without sacrificing too much in the image quality department. In my experience, a setting of around 80-85 is the best compromise.
Image Sizing for Web Use
I always use the Long Edge option for resizing, check the Don’t Enlarge box and have the Resolution set to 72ppi.
The actual pixel dimensions vary depending on where exactly I’m uploading, because different websites have different requirements.
Basically, what we’re trying to avoid here is having the website compress our image, and to achieve that we need to use specific pixel dimensions. Here are the dimensions to avoid harmful compression on some of the more popular sites out there:
- Facebook – 720px, 960px or 2048px
- Instagram – 1080px for square and landscape, 1350px for vertical orientation.
- Twitter – 1024px
- Blog – This is a compromise between image quality and loading speed. I go for between 900 and 1500.
Using those image dimensions should help you avoid the majority of the harmful compression when uploading images. Compression is always going to happen on social media, but the more we minimize it, the better quality our images will be.
Finally, I go into the Output Sharpening section and choose Screen and Low.
Best Lightroom Export Settings for Print
If you don’t already, I would highly recommend you print some of your favorite images onto actual paper rather than just confining them to your backlit screens.
Printing is the final step in the creation of an image, and a well printed image adds a certain quality that’s just impossible to recreate on a screen.
Anyway, printing is an artform unto itself. We’ll get into that at a later date. For now, here are some important settings to remember when exporting images for print.
Note: Different printers and printing labs have different specifications when it comes to image formats and color space. Check before you print!
File Settings for Print
Again, image format and color space can vary, but using JPEG and sRGB is recommended where possible.
Many people claim that sRGB is inferior to Adobe RGB because it offers a small gamut of colors, but the fact is that the difference is almost negligible to the human eye and the universal support and consistency of sRGB makes it my preferred choice.
Image Quality should be set to 100.
Image Sizing for Print
Here we want the Resolution set to 300ppi where possible and the Don’t Enlarge checkbox ticked.
The actual dimensions depend on the size of the print you’re producing, and a bit of calculation is required. Just multiply the pixels per inch by the size of the print in inches. For example, let’s say I want a 12×8 inch print at 300ppi:
300ppi x 12 inches = 3600px wide
300ppi x 8 inches = 2400px high
If your image resolution isn’t high enough, you either need to reduce the pixels per inch (decreasing quality) or reduce the size of your print.
Output Sharpening for Print
Select either Matte Paper or Glossy Paper depending on what type of paper you’re printing on, and then use the Low setting to avoid Lightroom’s aggressive oversharpening.
Read More…
Ultimate Guide to Landscape Photography Ebook
10 Tips to Help You Become a Better Photographer
Best External Hard Drives for Photographers
Why I Moved from Nikon to Fuji
 |
 |
 |
 |

About Alex W.
Alex is the owner and lead writer for Click and Learn Photography. An avid landscape, equine, and pet photographer living and working in the beautiful Lake District, UK, Alex has had his work featured in a number of high profile publications, including the Take a View Landscape Photographer of the Year, Outdoor Photographer of the Year, and Amateur Photographer Magazine.
Thoughts on "Lightroom Export Settings Explained – Best Lightroom Export Settings for Web and Print"
|
|
|
|
Learn Photography
You can Get FREE Gifts. Furthermore, Free Items here. Disable Ad Blocker to receive them all.
Once done, hit anything below
|
|
|
|