Photography in Banff National Park – Tips for the Traveling Photographer
by Alex W.
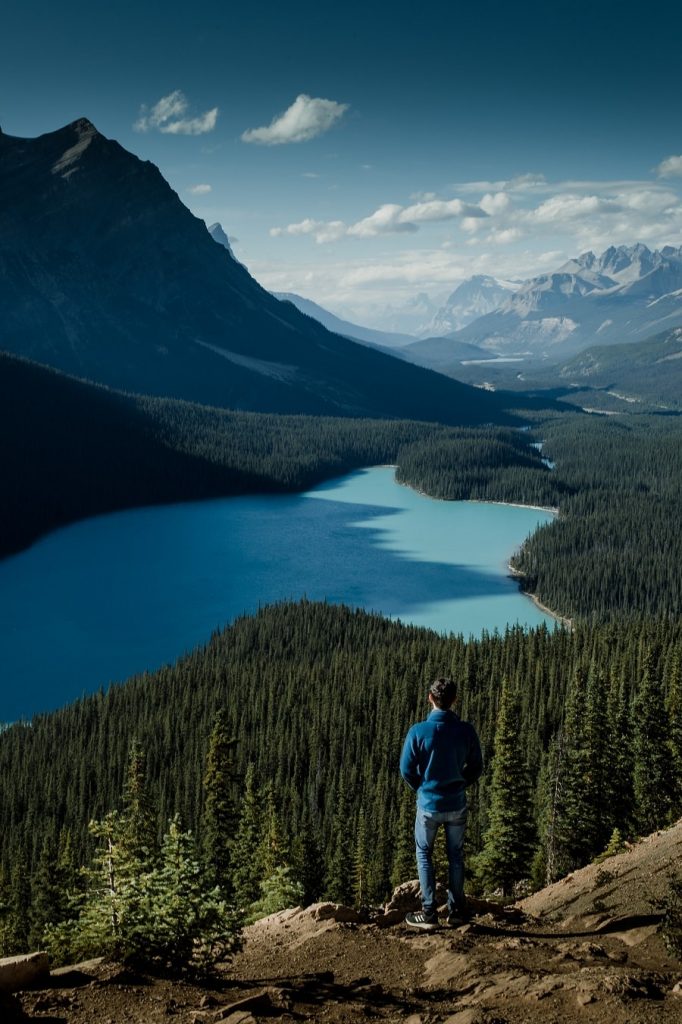
Put simply, Banff National Park is a slice of heaven tucked within the Rocky Mountains. And as far as dream destinations go for the traveling photographer, it’s hard to beat a trip for photography in Banff.
If you’ve spent any amount of time online, you probably already know the park is spectacular. Striking alpine lakes, enormous, snow-capped mountains, lush valleys – Banff has it all. And, to top it off, the park is also incredibly accessible and diverse.
So, whether you’re a novice adventure photographer, an avid landscape shooter, a career wildlife photographer or simply someone who wants to take some shots while out hiking in Banff, photography in Banff is the perfect place to hone your skill and snap stunning photos.
There’s an endless amount of potential in the park, so to help kickstart your travel plans we put together some helpful tips on where and when to photograph this crowned-jewel of the Canadian Rockies.
Banff is all about the beauty of nature, so get up to speed by reading our Ultimate Guide to Landscape Photography before you head out there!
Contents
Photography in Banff National Park – Top Spots to Shoot
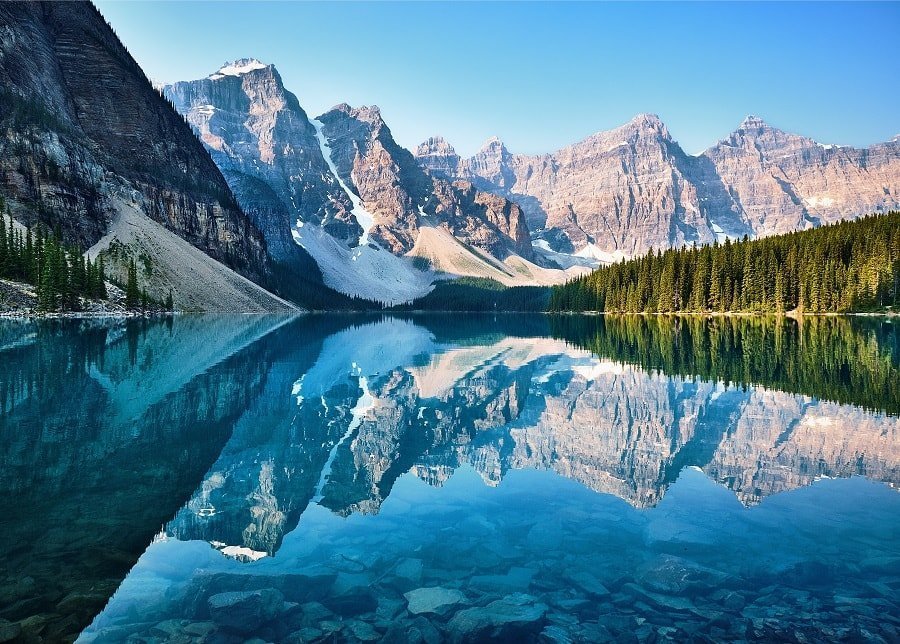
Moraine Lake
If it were possible for a lake to be photographed to death, Moraine Lake would be the first death by shutter. This lake is extremely popular amongst photographers and tourists.
But the lake’s fame is not for naught – On a calm, clear morning, the snow-capped Valley of Ten Peaks, draped in a subtle pink hue, idyllically reflect from vibrant, turquoise waters of Moraine Lake. It’s a landscape that appears to be plucked straight from a Bob Ross painting, and so even if you’ve seen 1,000 photographs of the lake, it’s a place that is sure to leave you awestruck and inspired.
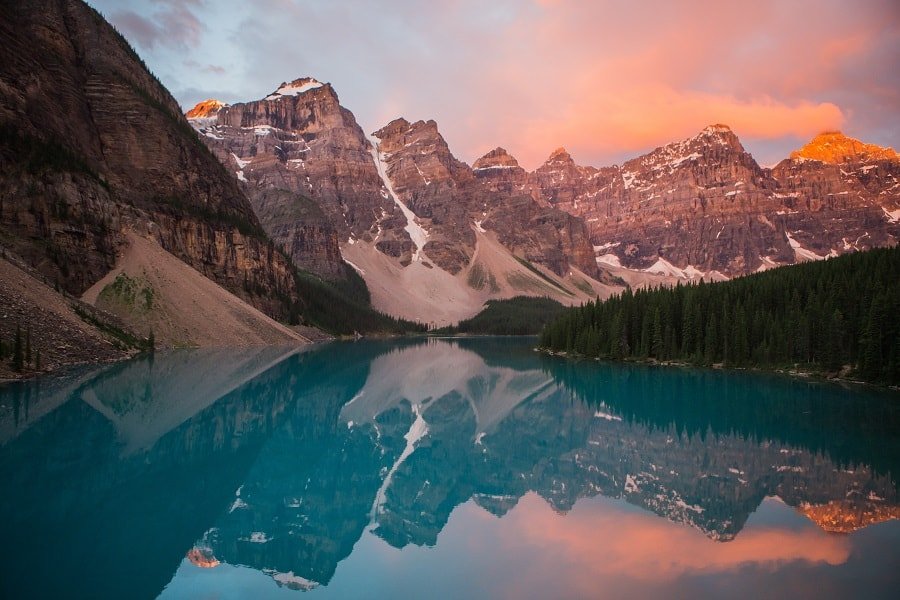
In terms of effort vs. reward, this location is hard to beat. A quick trek up the infamous Rock Pile Trail will take you to arguably the most iconic, postcard-worthy capture of the Canadian Rockies. To escape the crowds, consider renting a canoe and paddling to the opposite side of the lake to search for unique perspectives or taking a stroll along the Moraine Lakeshore Trail. Just make sure you arrive before sunrise – the parking lot fills up fast!
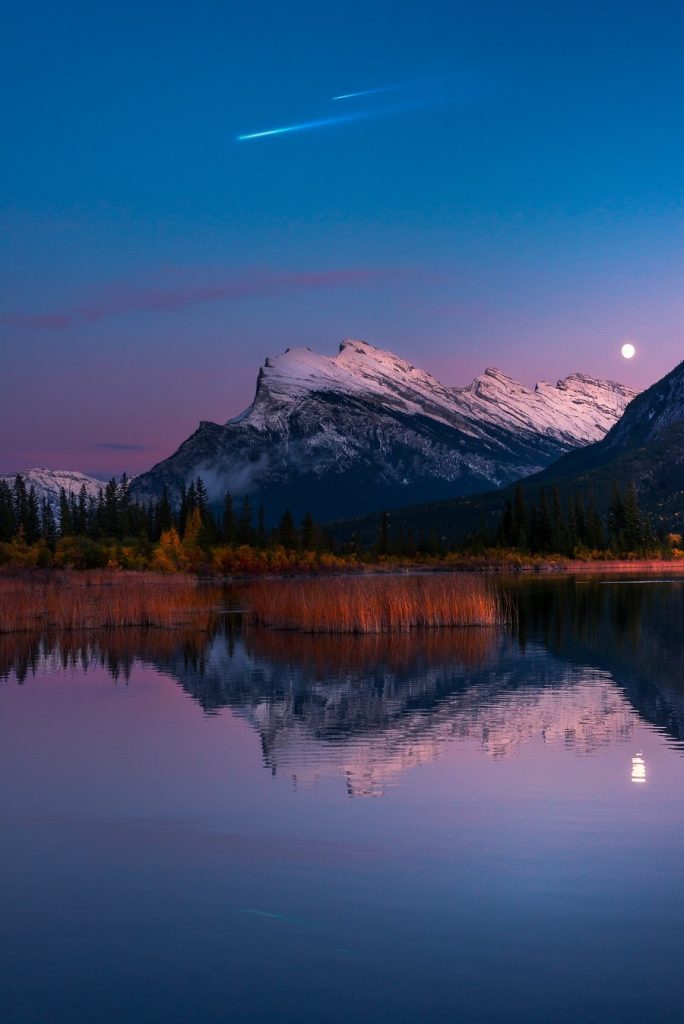
Vermillion Lakes
There’s no shortage of stunning, crystalline lakes to photograph in Banff, and Vermillion Lakes is no exception. Just a stone’s throw from town, Vermillion Lakes offers early-risers a stunning reflection of not only one, but two Canadian Rocky monoliths – Mount Rundle and Sulfur Mountain.
This group of lakes (yes, there’s more than one!) sit in a beautiful marshland in the Bow River Valley and offer a variety of interesting foregrounds and compositions. The lakes are easily accessible via the scenic Vermillion Lakes Drive, which meanders along the shoreline of the lakes. And, thanks to Parks Canada, there are plenty of well-maintained benches and footpaths along the drive to sit, admire, or capture this idyllic landscape.
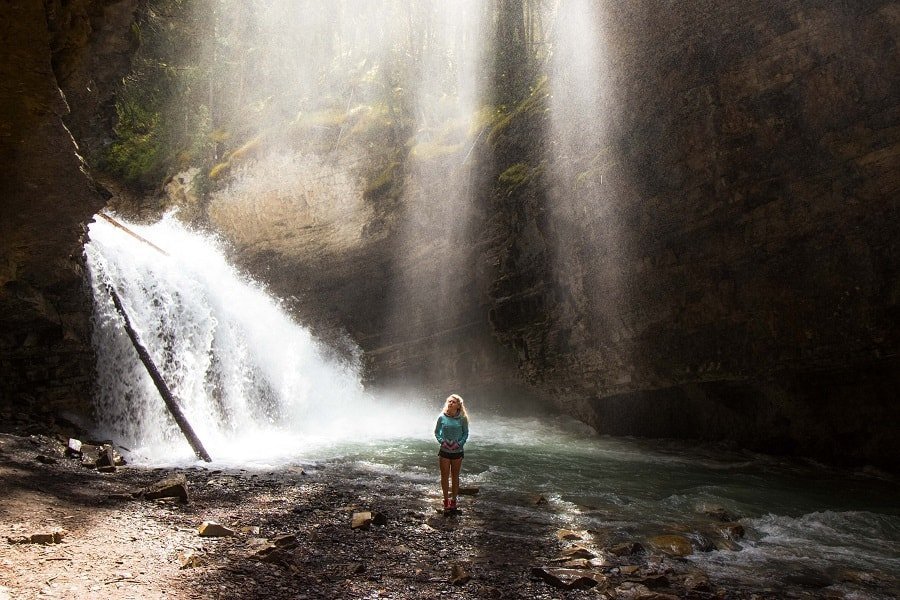
Johnston Canyon
Renowned for its otherworldly limestone cliffs, cascading waterfalls, and cliffside catwalks, Johnston Canyon is another must-see, all-seasons adventure that navigates through an impressive canyon carved out by Johnston Creek. There are several photo-worthy spots along the Johnston Canyon Trail, including two stunning waterfalls – Upper and Lower Falls. In fact, the footpath itself, which hugs the limestone walls of the canyon, makes for a spectacular subject, particularly at dusk or dawn.
You may notice photographers hiking off-trail on a series of ‘natural’ trails that lead to the canyon floor. A not-so-secret cave made famous on social media can be found along one of these footpaths. However, this area has recently been closed by Parks Canada to prevent further erosion and damage to the ecosystem. This restriction could be lifted as early as November, but you’ll want to check in with park officials before traveling off the designated trail in this area.
Remember to check out our Ultimate Guide to Waterfall Photography for some tips and tricks to capture the best of Johnston Canyon!
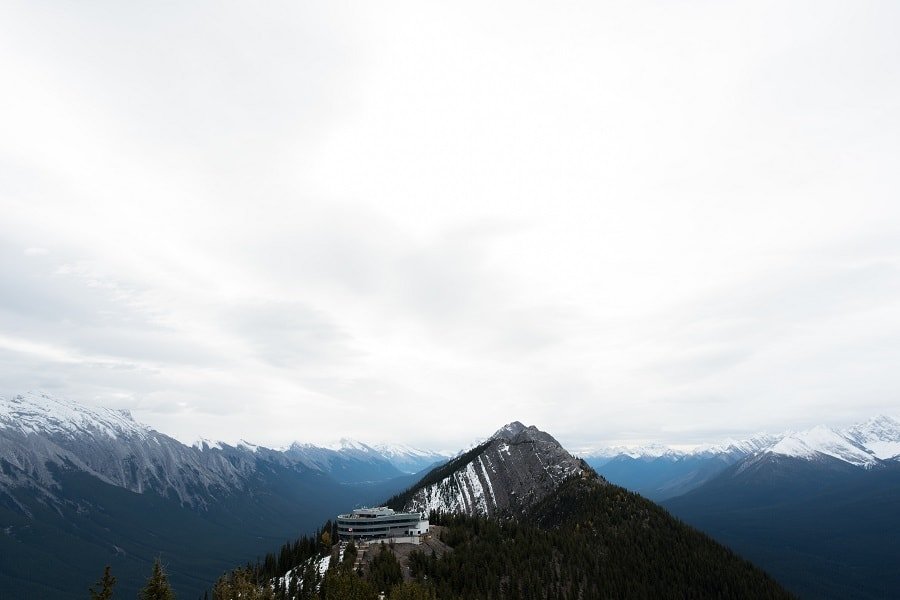
Sulphur Mountain
Sometimes you have to pay to play, but we think the views from the top of Sulphur Mountain are priceless (well, sort of). For a reasonable fee ($58-68 CAD), you can cruise above the treeline in the Banff Gondola to sweeping, panoramic views of six impressive mountain ranges and the surrounding Bow Valley.
Or, if you prefer to earn your view, you can take the Sulphur Mountain trail, which zigzags its way up the summit ridge. Either way, you’re guaranteed jaw-dropping views in every direction. Just be sure that if you packed a telephoto lens, you haul it up the mountain with you – these unobstructed alpine views are ideal for a long-distance lens.
Peyto Lake
If you’ve ever browsed through images of Banff, chances are you’ve stumbled across photos of a fox-shaped alpine lake that looks like it was poured directly from a bottle of Arctic Blue Gatorade.
Surrounded by the incredible Waputik Range and a seemingly endless sea of trees, Peyto Lake is a Rocky Mountain icon and a photographer’s dream. The lake isn’t exactly a secret, so if you arrive after sunrise, you’ll almost certainly cross paths with hoards of tourists. However, most tourists will stick to snapping selfies from the main viewing platform.
The hidden gem in this area, particularly for photographers, is a little further off the beaten path at Bow Summit. After reaching the Peyto Lake viewing platform, continue on an interpretive trail that will take you about a mile further up the mountain. There will be several spur trails and incredible views along the way, so don’t be afraid to stop to scope out unique perspective or compositions of the lake.
Pro Tip: Visit later in the evening to photograph Peyto at sunset. Not only is notoriously beautiful, chances are you’ll only have to share the view with a few hundred mosquitos (oh yeah, pack bug spray).
Morant’s Curve
Looking for a lesson in patience? We have you covered.
Morant’s Curve is not only popular among photographers, it was actually made popular by a photographer. Nicholas Morant, a staff photographer for the Canadian Pacific Railway snapped photos from this infamous viewpoint during the 20th century.
Morant’s Curve is spectacular for a number of reasons. For starters, the bright red freight trains captured winding through the mountainside follow a natural bend in the river below. Framed against towering summits and pristine valleys, the Canadian Pacific convoy makes this landscape feel timeless.
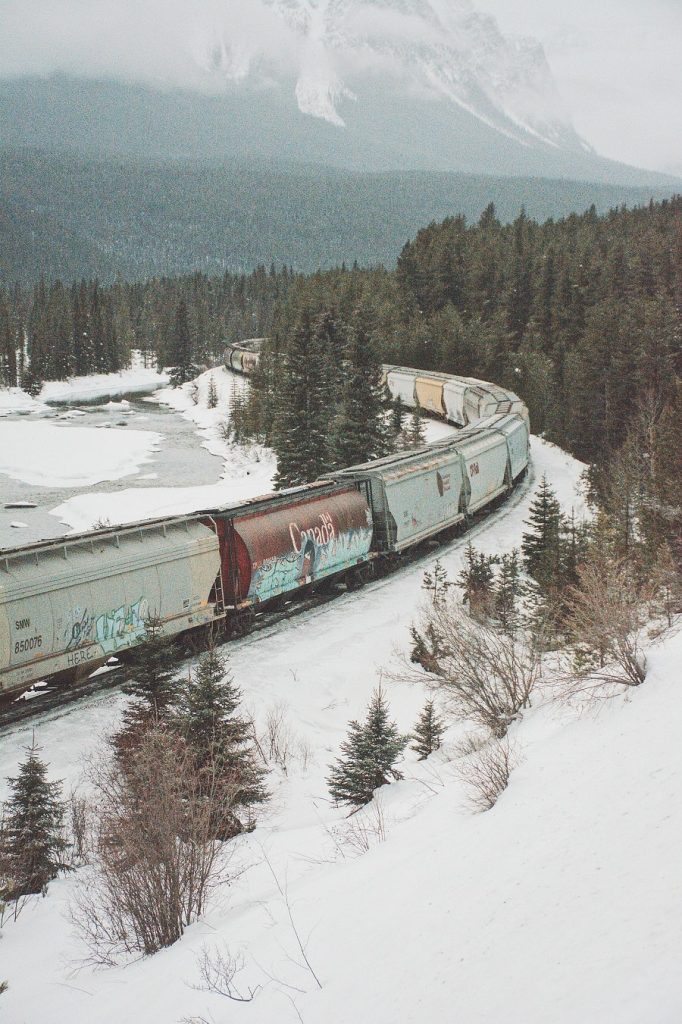
And let’s not forget, patience. One of the best things about Morant’s Curve is that there are no train schedules to follow.
So, if you’re looking to catch the train weaving through the trees, you’ll have to sit and soak in all of the Canadian Rocky goodness for a while. Real bummer, right?
Scenic Drives in Banff National Park
Roll the windows down, turn on your favorite tunes, and go for a drive. There are few other places in the world where the drive is just as awe-inspiring as the destination. It would be a serious photography faux pas to travel to Banff without driving at least one (or all) of the park’s scenic roads – particularly Icefields Parkway.
Icefields Parkway is a 142-mile (230 kilometer) highway that travels through the heart of the Canadian Rockies, connecting Banff and Jasper National Parks. The highway is dotted with hiking trails, scenic overlooks, alpine lakes, waterfalls, and highlights the grandeur of the surrounding peaks and valleys.
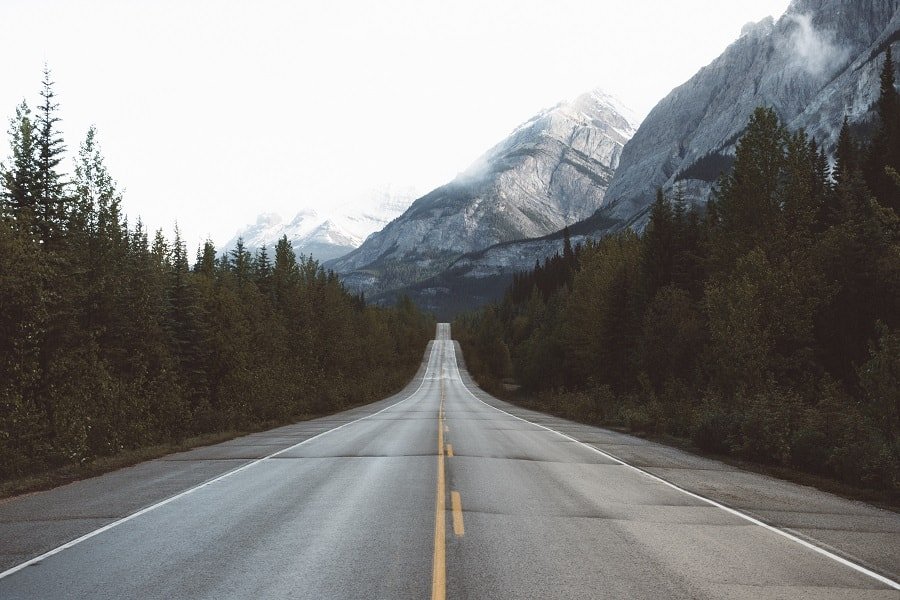
Some of the locations we already mentioned are along the Icefields Parkway, but there are plenty of other sights and landscapes worth photographing, including Herbert Lake, Athabasca Glacier, and Athabasca Falls.
If you’re looking specifically to photograph wildlife in Banff, you might also consider driving Bow Valley Parkway, a wildlife corridor frequented by bears, elk, and even wolves.
Off the Beaten Path
Accessibility in the park can be a blessing and a curse. It’s amazing to be able to photograph stunning landscapes with little to no effort. However, it’s likely that you’ll have to either share the view with others or work harder to come up with an exciting composition.
If you’re looking for more of an adventure, consider heading into the backcountry for a few days or strapping on your boots and trekking up a challenging trail – the further you walk, the fewer folks you’ll see, and the more likely you are to come away from Banff with that unique shot we all crave.
A few trails that are famous for stunning scenery and photo opportunities include the Plain of Six Glaciers, Larch Valley, East End of Rundle, and Mt. Edith Circuit.
When to Visit Banff National Park
There’s never really a bad time to head off and photograph Banff, because each season is special for its own reasons. But what you’re hoping to capture will influence the best season for you.
Summer – July – August
Pros
- Longer days allow for extra time to explore
- Weather is warmer a little more predictable
- Alpine lakes are fully thawed and more vibrant than ever
- Access to popular destinations, like Moraine Lake, and higher elevation hikes are accessible
Cons
- This is the busiest season, so you won’t find a lot of peace and quiet in the park
- Accomodations can be hard to come by unless you book well in advance
- Higher demand means a higher price tag for hotels and facilities
- Sunset can linger until 10 p.m. and the sun is back up at 5 a.m., so if you’re hoping to beat the crowds you should also be prepared to lose some sleep.
Winter – December – March
Pros
- The park transforms into a winter wonderland, offering a blissful winter-scape that is well worth photographing.
- Days are much shorter, making it a little easier to wake up for stunning sunrises and stay out until sunset.
- You can hang out on frozen lakes and photograph methane gas bubbles trapped beneath Vermillion Lakes or Abraham Lake.
- Less visitors and crowds.
- More affordable.
- More likely to experience the Northern Lights
Cons
- Weather is very unpredictable and may cause unexpected road closures.
- Some areas of the park are inaccessible to vehicles, including Moraine Lake and Athabasca Glacier.
- It’s really, really cold.
- Higher elevation areas will require some expertise in backcountry, winter travel due to avalanche risk.
Fall/Autumn – September – November
Pros
- Prime time for photographing Alberta’s iconic golden larch trees as they paint the landscape vibrant shades of orange and yellow.
- Most roads are still clear of snow, making this a great season for scenic drives.
- As a ‘shoulder season,’ Fall isn’t nearly as busy or expensive as summer months.
- There’s still a potential to witness the Northern Lights.
Cons
- Winter storms and poor weather conditions, particularly in October and November, are a possibility.
- Access to some hiking areas and scenic vistas may be closed for the season
- Temperatures are starting to decline quickly
Spring – April – June
Pros
- The best season for capturing wildflowers, depending on the year
- You can still photograph snow-capped summits and winter landscapes, but it’ll be a bit warmer and sunnier than winter months.
- Far less crowds and more affordable.
Cons
- There will more than likely still be quite a bit of snow and ice throughout the park
- Lakes may still be partially or fully frozen
- Several scenic drives and activities may still be closed for the season
Recommended Gear
As the infamous photo adage goes, the best camera is the one you have with you – and nowhere is this more apparent than in Banff National Park.
The Canadian Rockies are dynamic, dramatic, and diverse, catering flawlessly to the uninhibited creativity of a photographer. It might actually be harder to take a lousy photograph than a good one.

So, whether you’re snapping photos with an iPhone, lugging around a fancy DSLR, prefer catching candids of apex predators with a 400 mm, or want to set up to catch the alpenglow over a cascade peak, there’s plenty of potential for any focal range, shooting style, or subject.
That being said, if you’re looking for tips on what to pack, rent, or even borrow, we have a few recommendations:
Lenses
Wide-Angle: Most photographers will reach for a wide-angle to capture the vastness and immersive qualities of a landscape. Focal ranges between 16mm and 35mm are generally the ‘sweet spot’ for capturing a generous amount of foreground and background, so if you’re hoping to capture the entire landscape, a wide-angle is a must.
Recommendation: Tamron 15-30mm f/2.8 Di VC USD G2
-

Tamron SP 15-30mm f/2.8 Di VC USD G2 Lens for Canon EF +...
- INCLUDES: Tamron SP 15-30mm f/2.8 Di VC USD G2 Lens for Canon EF + Tamron Tap-in-console For Canon + AirBag Packable Bag and Camera Insert + Altura Photo Mini Tripod with Pistol Grip + Altura Photo Rapid Fire Wrist Strap + Altura Photo Hard-Shell Case + Altura Photo Accessory Kit + 3 Sizes MagicFiber Microfiber Lens Pouch
- COVERING a versatile range of ultra wide-angle focal lengths, the Tamron EF-mount SP 15-30mm f/2.8 Di VC USD G2 enhances this wide zoom with sophisticated optics, focusing, and image stabilization.
Rating:

Telephoto: Most landscape or outdoor photographers will sing to the tune of a wide-angle lens, without giving the telephoto lens much thought. But a telephoto opens the doors to capturing impressive and authentic wildlife images, achieving awe-inspiring compression, or photographing the intimate details of those impressive, alpine summits.
Recommendation: Tamron 70-200mm f/2.8 Ci VC USD G2
-

Tamron SP 70-200mm f/2.8 Di VC USD G2 Lens for Canon EF...
- INCLUDES: Tamron SP 70-200mm f/2.8 Di VC USD G2 Lens + Tamron TAP-in Console for Canon + AirBag Packable Bag and Camera Insert + SanDisk 64GB C10 Ultra UHS-I SDXC Memory Card + Altura Photo Mini Tripod with Pistol Grip + Altura Photo Rapid Fire Wrist Strap + Altura Photo Hard-Shell Case + Altura Photo Accessory Kit + 3 Sizes MagicFiber Microfiber Lens Pouch
- A POPULAR TELEPHOTO ZOOM for a variety of shooting applications, this lens is characterized by its bright f/2.8 constant maximum aperture, as well as sophisticated optical and physical designs.
Rating:
If you want more lens recommendations, check out our Best Lenses for Landscape Photography article here. And no, this post isn’t sponsored by Tamron, we just love these two lenses!
Misc. Items
Extra batteries: For long nights snapping photos of the stars or those times when you don’t have time to head into town for a charge.
Polarizing Filter: To control reflections and add a little extra drama to cloudy skies or enhance colors.
Any long time reader of Click and Learn Photography will know how much we love polarizing filters!
Tripod: To achieve pin-sharp images, capture a long exposures of aquamarine rivers and cascading waterfalls, or to shoot in low light.
We recommend the Vanguard Alta Pro 2+ for most situations, but check out our Ultimate Guide to Buying a Tripod for more options!
-

Vanguard Alta Pro 2+ 263AB 100 Aluminum Tripod with Alta...
- MACC (Multi-Angle Center Column) for limitless shooting angles with firm hexagonal center column that offers one handed, effortless smooth operation and rapid set-up
- Position versatility - 3 section legs with 4 position angles - 20°, 40°, 60°, 80° and rock solid positioning - unique “locked” to “unlocked” twist leg lock system
Rating:
Waterproof Bag and/or Rain Cover: It’s not a matter of if the weather will change, it’s a matter of when. The weather in the Rockies is notoriously unpredictable. The last thing you want to do is get caught in the rain, wind, sleet, or snow with all of your gear. Bring a packable waterproof bag or a rain cover to protect your equipment and, while you’re at it, pack an extra jacket or two for yourself.
Photography in Banff, like anywhere else for that matter, isn’t quite as enjoyable when you’re soaked through to your skin and freezing cold!
If you’re in the market for a camera bag, click here for our handy guide on the Best Camera Bags for Photographers.

Read More…
Best DSLR Systems for Beginners
A Beginners Guide to Astrophotography
Ultimate Guide to Forest Photography
11 Best Budget Photography Accessories
 |
 |
 |
 |

About Alex W.
Alex is the owner and lead writer for Click and Learn Photography. An avid landscape, equine, and pet photographer living and working in the beautiful Lake District, UK, Alex has had his work featured in a number of high profile publications, including the Take a View Landscape Photographer of the Year, Outdoor Photographer of the Year, and Amateur Photographer Magazine.
Thoughts on "Photography in Banff National Park – Tips for the Traveling Photographer"
|
|
|
|
Learn Photography
You can Get FREE Gifts. Furthermore, Free Items here. Disable Ad Blocker to receive them all.
Once done, hit anything below
|
|
|
|