Behind the Lens: Photographer RJ Franklin on Technique and Creativity
by Alex W.
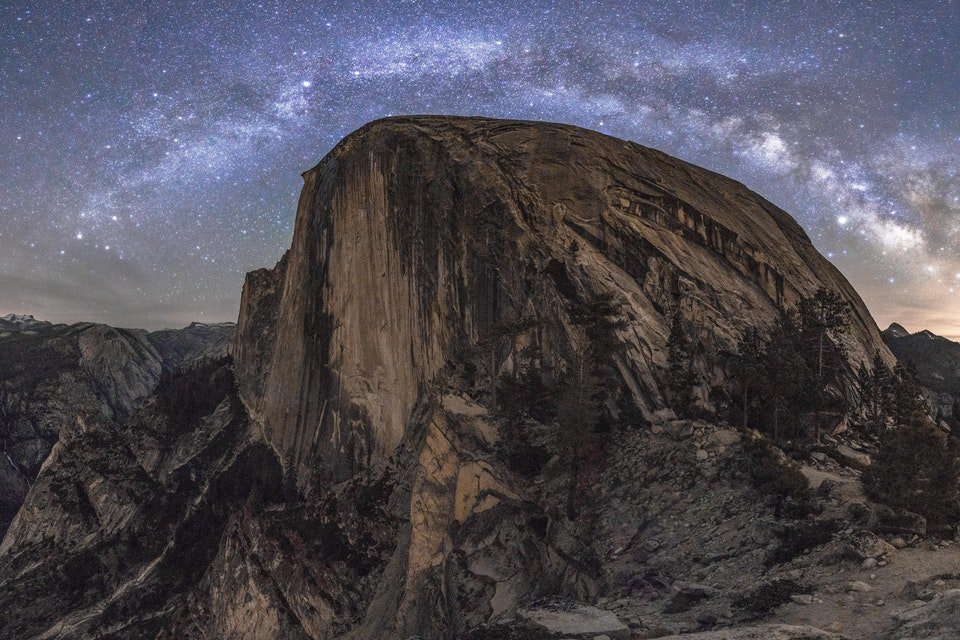
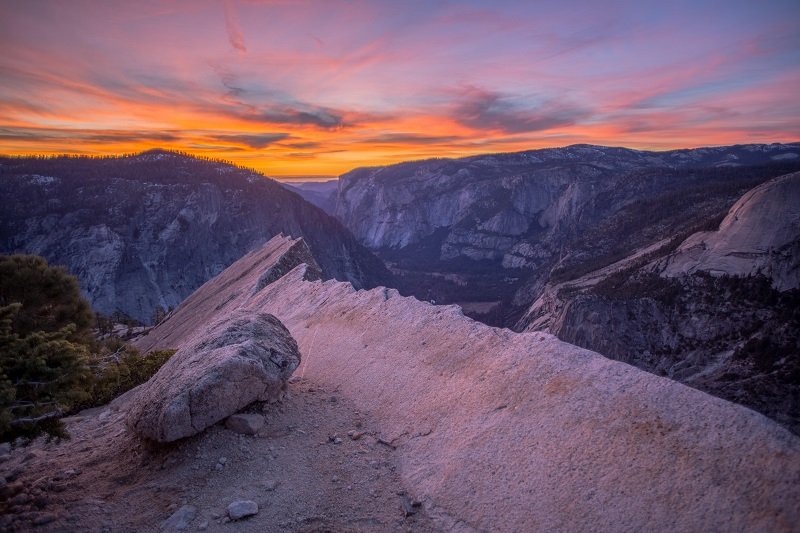
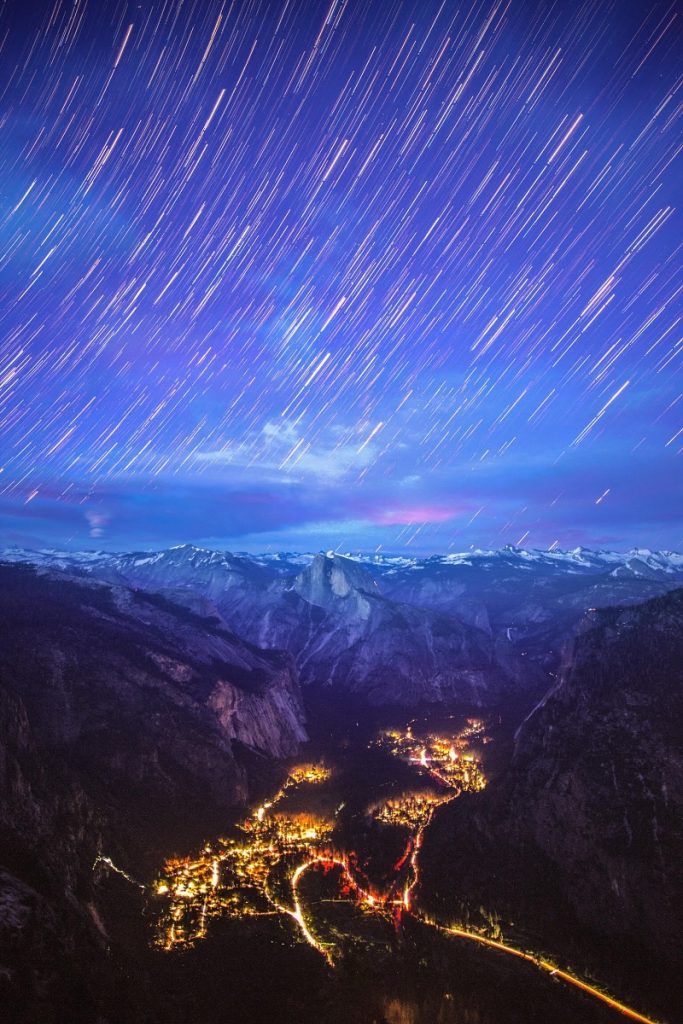
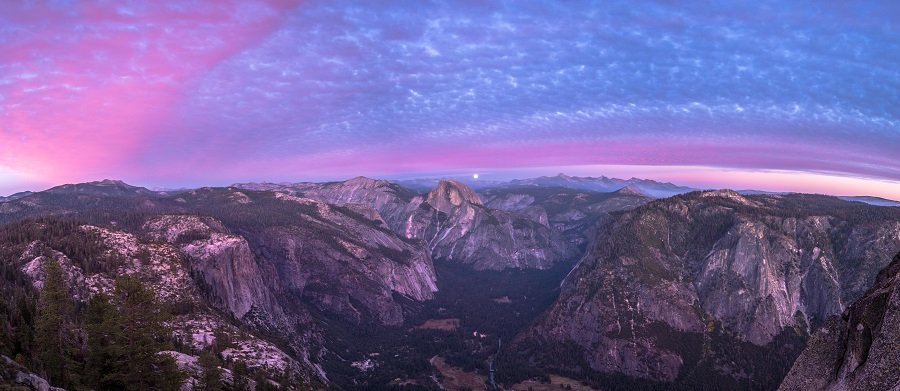
Last autumn, our team spent three nights camped at the base of Half Dome in Yosemite, waiting for the Milky Way to arc perfectly over the granite face. On the second night, the conditions aligned — and the resulting image reminded us why we chase these moments in the first place. That trip also introduced us to the work of RJ Franklin, a photographer whose mastery of landscape astrophotography techniques has shaped how we approach every night shoot since. Franklin's philosophy blends patience, technical precision, and a deep respect for natural darkness — principles that anyone serious about night and astrophotography needs to internalize.
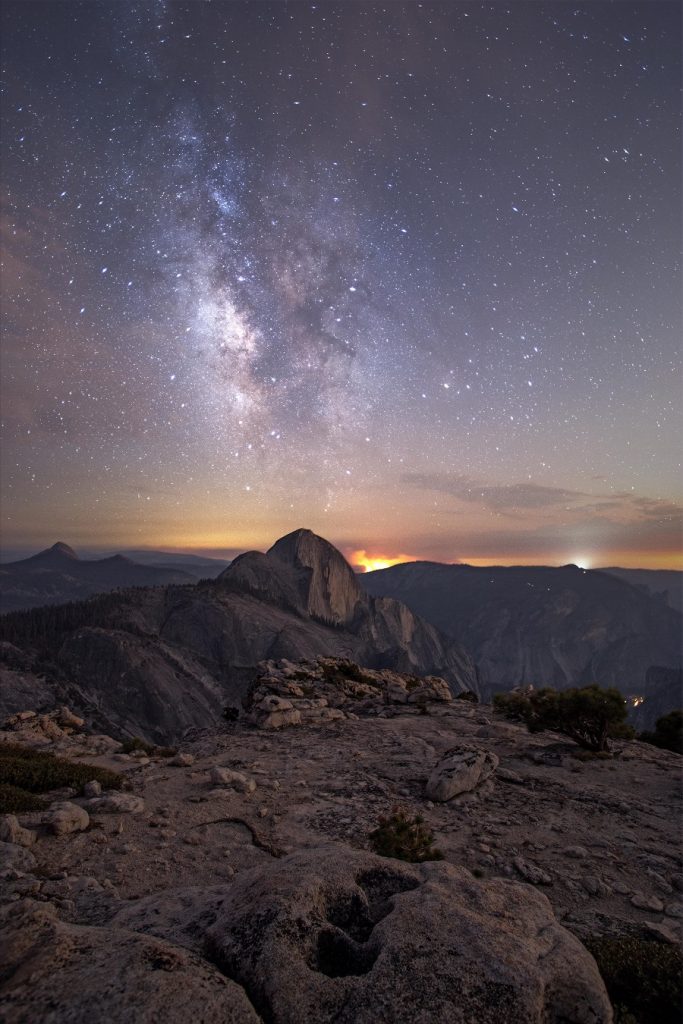
Franklin's images stand out because they never sacrifice the landscape for the sky. Too many astrophotography shots treat the foreground as an afterthought — a dark silhouette beneath a dazzling Milky Way. Franklin flips that script. His foregrounds carry as much weight as the stars above them, and that balance is something our team has worked hard to replicate in our own shooting.
In this piece, we break down the core landscape astrophotography techniques Franklin employs, compare gear setups, and offer practical guidance drawn from both his methods and our own field experience. Whether someone is planning a first night shoot or refining an advanced workflow, there is something here worth taking into the field.
Contents
- How RJ Franklin Approaches Landscape Astrophotography
- Rewards and Challenges of Shooting Under the Stars
- Building a Long-Term Astrophotography Workflow
- Gear Comparison for Night Landscape Photography
- From First Milky Way Shot to Advanced Compositions
- Landscape Astrophotography Techniques for Sharper Results
- When to Shoot — and When to Stay Home
- Frequently Asked Questions
How RJ Franklin Approaches Landscape Astrophotography
The Philosophy Behind the Frame
Franklin describes his process as "landscape-first astrophotography." The stars are the event, but the terrain tells the story. Our team noticed this immediately when studying his Yosemite portfolio — every composition has a clear foreground anchor, whether it's a granite boulder, a still lake, or a twisted pine. This philosophy aligns with what we covered in our landscape photography planning guide: the best shots start long before the shutter opens.
Franklin scouts locations during daylight hours, marks compositions with GPS pins, and returns after dark already knowing where to set up. He wastes zero time fumbling with framing at 2 AM.
Scouting and Seasonal Planning
Seasonal awareness is non-negotiable. The Milky Way's galactic core is only visible during certain months depending on hemisphere and latitude. Franklin plans entire trips around lunar cycles and galactic core positioning. Key considerations include:
- New moon windows — the darkest skies fall within 5 days of a new moon
- Galactic core season — roughly late March through early October in the Northern Hemisphere
- Light pollution maps — Franklin uses Bortle scale ratings to identify dark-sky locations
- Weather patterns — high-altitude sites often offer clearer skies but demand more planning
Rewards and Challenges of Shooting Under the Stars
What Makes Night Landscapes Worth the Effort
Night photography delivers images that most people never see with the naked eye. The camera reveals detail in the Milky Way, faint nebulae, and star colors that are invisible to unaided vision. There is also far less competition for unique compositions — most photographers prefer golden hour, which means anyone willing to shoot at 3 AM has entire iconic locations to themselves.
Franklin often mentions the meditative quality of night shoots. The silence, the cold air, the slow rhythm of long exposures — it forces a slower, more intentional approach to photography. Our team has found the same: night shoots consistently produce our most thoughtful compositions.
Common Frustrations and How to Handle Them
The downsides are real. Noise performance pushes even modern sensors to their limits. Focusing is difficult. Results are impossible to fully evaluate on a small LCD screen in the field. Common pain points include:
- Unexpected cloud cover rolling in after hours of setup
- Dew forming on the front element mid-exposure
- Star trailing at exposures longer than the 500 rule allows
- Battery drain in cold conditions — Franklin carries at least four fully charged spares
- Light pollution from distant cities bleeding into long exposures
Building a Long-Term Astrophotography Workflow
Developing Consistency Across Sessions
Franklin does not treat each shoot as a standalone event. He maintains a running log of settings, locations, moon phases, and results. Over time, this database becomes invaluable — he can reference what worked at a specific site under specific conditions and replicate it or build on it.
Our team adopted a similar system and noticed immediate improvements. A consistent workflow includes:
- Pre-shoot checklist — batteries, memory cards, lens heater, headlamp with red-light mode
- Standard base settings as a starting point (ISO 3200, f/2.8, 20 seconds for a 24mm lens)
- Post-processing templates in Lightroom that handle the initial noise reduction and white balance correction
- A shot log noting exposure details, ambient temperature, humidity, and Bortle class
Shooting in RAW is absolutely essential for night work. The latitude RAW files provide for shadow recovery and white balance adjustment is critical when dealing with high-ISO noise and mixed artificial light. Our RAW vs JPEG breakdown covers this in detail, but the short version is: JPEG throws away exactly the data most people need when processing night shots.
The best landscape astrophotography techniques are the ones practiced so often they become automatic — fumbling with settings in the dark is the fastest way to miss a clear-sky window.
Gear Comparison for Night Landscape Photography
Lenses and Camera Bodies
Franklin shoots with a full-frame mirrorless body and fast wide-angle primes. The gear matters, but he emphasizes that technique outweighs equipment every time. That said, certain specs make a measurable difference for night work. Understanding the exposure triangle is fundamental before investing in specialized gear.
| Feature | Budget Setup | Mid-Range Setup | Pro Setup (Franklin's Choice) |
|---|---|---|---|
| Camera Body | APS-C mirrorless | Full-frame entry-level | Full-frame flagship mirrorless |
| Lens | 18mm f/2.8 (crop) | 24mm f/1.8 | 14mm f/1.8 or 20mm f/1.4 |
| Max Usable ISO | 3200 | 6400 | 12800+ |
| Star Trail Limit (500 Rule) | ~18s at 18mm crop | ~21s at 24mm | ~25s at 20mm |
| Tracker Mount | Not needed | Optional (iOptron SkyGuider) | Dedicated (Sky-Watcher Star Adventurer) |
| Estimated Cost | $800–$1,200 | $2,000–$3,500 | $5,000–$8,000+ |
A star tracker mount is the single biggest upgrade for anyone moving beyond basic single-exposure shots. It compensates for Earth's rotation, allowing exposures of two minutes or more without star trailing. Franklin uses one for roughly 60% of his night work.
From First Milky Way Shot to Advanced Compositions
Beginner Foundations
Franklin's advice for newcomers is refreshingly simple: start with a single untracked exposure of the Milky Way and get comfortable with the dark. Most beginners overcomplicate night photography before mastering the basics. The essential first steps are:
- Find a Bortle 4 or darker location (use a light pollution map app)
- Set the lens to its widest aperture and focus manually on a bright star using live view at 10x magnification
- Start at ISO 3200, 20 seconds, and adjust from there
- Shoot test frames and check the histogram — the data should sit in the left third without clipping
Anyone who has mastered sunrise landscape photography already understands the value of arriving early and working with natural light transitions. The same discipline applies to night shoots — arriving at twilight allows time to compose before full darkness.
Advanced Stacking and Blending
Once single-frame captures feel routine, the next step is image stacking for noise reduction. Franklin typically captures 10–15 identical frames of the sky and stacks them in software like Sequator or Starry Landscape Stacker. This averages out random noise while preserving star detail, producing results that rival tracker-mounted single exposures.
For foreground-sky blending, Franklin shoots the landscape at blue hour (lower ISO, smaller aperture for depth of field) and composites it with a sky frame taken later that night. This is not the same as sky replacement — the sky is real, captured from the same tripod position. The foreground exposure simply benefits from better light conditions. Our take on the sky replacement debate draws a clear line between compositing real captures and dropping in fabricated skies.
Landscape Astrophotography Techniques for Sharper Results
Focusing in the Dark
Autofocus is unreliable in near-total darkness. Franklin relies exclusively on manual focus using live view magnification. His process is straightforward:
- Point the lens at the brightest visible star or a distant light source
- Engage live view and zoom to 10x magnification
- Rotate the focus ring until the star appears as a tight pinpoint — not a bloated blob
- Lock the focus ring with gaffer tape to prevent accidental shifts
Some modern mirrorless cameras offer focus peaking that works on stars, which helps confirm critical sharpness. Franklin still verifies with a test shot at 100% zoom on the rear LCD before committing to a full sequence.
Noise Reduction: In-Camera and In-Post
Franklin disables long-exposure noise reduction in-camera. The reason is practical: it doubles the capture time by shooting a dark frame after each exposure. For stacking workflows, this is unnecessary — the stacking process itself handles noise. In post-processing, he applies luminance noise reduction selectively, keeping star detail intact while smoothing gradients in the sky background.
When to Shoot — and When to Stay Home
Ideal Conditions
Not every clear night is a good astrophotography night. Franklin is selective, and our team has learned to be the same. The ideal conditions for landscape astrophotography techniques to produce their best results are:
- New moon or within 3 days — moonlight washes out faint stars and the Milky Way core
- Humidity below 60% — reduces atmospheric haze and dew risk
- Transparency ratings of "above average" or better on clear sky charts
- No wildfire smoke or high-altitude dust — these scatter light and reduce contrast
- Temperatures above freezing if possible — cold is manageable but adds battery and comfort challenges
Conditions to Avoid
Knowing when to stay home saves wasted trips and frustration. Franklin does not shoot during:
- Full moon or gibbous phases — the sky is simply too bright for deep-sky detail
- Nights with high cirrus clouds — thin clouds are invisible until they ruin a 25-second exposure
- Periods of heavy jet stream activity — atmospheric turbulence destroys star sharpness
- Locations with a Bortle rating above 6 — urban glow overpowers all but the brightest stars
Franklin puts it plainly: discipline with conditions separates photographers who produce consistent portfolios from those who have one lucky shot. Our team agrees entirely. The willingness to cancel a planned shoot and wait for better conditions is a hallmark of every serious night photographer we have worked with, including Frank Bell, whose interview covers a similar philosophy around patience and timing.
Frequently Asked Questions
What camera settings does RJ Franklin recommend for Milky Way photography?
Franklin's baseline is ISO 3200, f/1.8 or f/2.8, and a shutter speed calculated using the 500 rule (500 divided by focal length). From there, he adjusts based on ambient light conditions and desired noise levels. A wider aperture always gets priority over higher ISO.
Do landscape astrophotography techniques require a star tracker?
Not for getting started. Single untracked exposures of 15–25 seconds produce impressive Milky Way images with a fast wide-angle lens. A star tracker becomes valuable when pursuing image stacking with longer exposures or capturing deep-sky detail alongside landscape foregrounds.
How does Franklin handle foreground lighting in night landscapes?
He avoids artificial light painting whenever possible, preferring natural ambient light — residual twilight, faint moonlight from a thin crescent, or even starlight during long exposures. When light painting is necessary, he uses a warm-toned headlamp at the lowest setting and paints from the side to maintain natural-looking shadows.
What post-processing software works best for astrophotography?
Franklin processes in a combination of Sequator (for star stacking), Adobe Lightroom (global adjustments, noise reduction), and Photoshop (layer blending for sky-foreground composites). Free alternatives like Starry Landscape Stacker and GIMP can achieve similar results with more manual effort.
How important is the Bortle scale for choosing a shoot location?
Extremely important. Franklin considers Bortle 4 the minimum for serious Milky Way work and prefers Bortle 2–3 locations. At Bortle 5 and above, the galactic core loses significant contrast and faint structures become invisible. Light pollution maps are an essential planning tool.
Can landscape astrophotography techniques be practiced near cities?
Partially. Star trail photography and images of the brightest constellations are possible from Bortle 5–6 zones. However, detailed Milky Way core photography requires dark skies. Franklin recommends driving at least 90 minutes from major metropolitan areas to reach usable darkness.
What is the biggest mistake beginners make with night landscape photography?
According to Franklin, it is neglecting the foreground. Many newcomers point their cameras straight up at the sky and capture technically adequate star fields with no compositional anchor. The best night images integrate a compelling landscape element that gives the viewer a sense of place and scale beneath the stars.
The stars will always be there — the photographer's job is to show up prepared, compose with intention, and let the landscape carry the story.
 |
 |
 |
 |

About Alex W.
Alex is a landscape, equine, and pet photographer based in the Lake District, UK, with years of experience shooting in one of Britain's most photographically demanding natural environments. His work has been featured in Take a View Landscape Photographer of the Year, Outdoor Photographer of the Year, and Amateur Photographer Magazine — publications that reflect a serious, competitive standard of image-making. At Click and Learn Photography, he shares the camera settings, gear choices, and compositional techniques he has developed through real-world shooting and competition-level work.
You can Get FREE Gifts. Furthermore, Free Items here. Disable Ad Blocker to receive them all.
Once done, hit anything below
|
|
|
|