Last week, our team spent an entire afternoon sorting through a folder of 200+ downloaded presets that had been sitting untouched for months. The files were scattered across three different directories, half were in formats we didn't recognize, and we couldn't figure out why Lightroom refused to see any of them. It was a mess — and it's a problem we hear about constantly. Learning how to install Lightroom presets correctly the first time saves hours of frustration and unlocks one of the most powerful features in Adobe's editing ecosystem. For anyone just getting into post-processing, our photography beginners section covers the fundamentals worth mastering before diving into presets.
Presets are essentially saved recipes of editing adjustments — exposure, white balance, tone curves, color grading, sharpening, and more — bundled into a single file that can be applied to any photo with one click. They're the reason professional photographers can edit thousands of images with a consistent look in a fraction of the time manual editing would take. Whether the goal is a moody landscape aesthetic or a bright, airy portrait style, presets serve as a starting point that most people can customize to fit their vision.
The installation process itself is straightforward once the differences between Lightroom versions and file formats are understood. But there are enough small gotchas — wrong file types, incorrect folder paths, version incompatibilities — that a clear walkthrough makes all the difference. That's exactly what this guide delivers.
Contents
- What Are Lightroom Presets and Why They Matter
- When Presets Improve a Workflow (and When They Hurt)
- Downloading and Organizing Preset Files
- How to Install Lightroom Presets Step by Step
- Preset Workflows for Different Photography Genres
- Getting the Most Out of Installed Presets
- Fixing Common Preset Installation Problems
- Practical Preset Applications for Every Skill Level
- Frequently Asked Questions
- Next Steps
What Are Lightroom Presets and Why They Matter
At their core, Adobe Lightroom presets are configuration files that store a set of Develop module adjustments. Think of them as a saved state of every slider, curve, and calibration setting in the editing panel. When applied, the preset instantly moves all those sliders to the saved positions. This is fundamentally different from filters in apps like Instagram — presets are non-destructive, fully adjustable, and work with RAW files to preserve maximum image data.
XMP vs. LRTemplate: File Formats Explained
One of the first points of confusion most people encounter is the file format. Older presets use the .lrtemplate extension, while newer ones use .xmp. Here's the breakdown:
- .lrtemplate — The legacy format used by Lightroom Classic versions prior to 7.3. These are XML-based files stored in the Lightroom settings folder.
- .xmp — The current standard since Lightroom Classic 7.3 and all versions of Lightroom CC. These are sidecar-style files that Adobe has standardized across its products.
- .dng — Sometimes presets are distributed as DNG files, especially for mobile. The preset is embedded in the file's metadata.
Lightroom Classic automatically converts .lrtemplate files to .xmp upon import, so backward compatibility is rarely an issue. The reverse isn't true — older Lightroom versions cannot read .xmp presets natively.
Lightroom Classic vs. Lightroom CC
Adobe maintains two desktop versions of Lightroom, and the installation process differs between them. Lightroom Classic is the full-featured desktop application with local file management. Lightroom CC (now just called "Lightroom") is the cloud-based version with a simplified interface. Our team primarily works in Classic for its catalog management and tethering capabilities, but the cloud version has closed the gap significantly. The installation method varies enough between the two that we cover each separately below.
When Presets Improve a Workflow (and When They Hurt)
Presets are not a universal solution. Our team has strong opinions on this: they're excellent accelerators but terrible crutches. Understanding when to reach for a preset — and when to edit from scratch — is the difference between efficient editing and lazy editing.
Ideal Scenarios for Preset Use
- Batch editing sessions — Wedding photographers processing 800+ images from a single event benefit enormously from a consistent baseline preset.
- Establishing a visual brand — Content creators and bloggers who need a cohesive look across their feed.
- Learning tool — Applying a preset and then studying which sliders moved is one of the fastest ways to understand Lightroom's Develop module.
- Time-sensitive delivery — Press and sports photographers working against tight deadlines.
When Manual Editing Wins
Fine art work, competition entries, and images destined for print portfolios deserve individual attention. Our experience with the sky replacement debate taught us that automated tools — presets included — work best as starting points, not endpoints. Landscape photographers in particular should be cautious about applying the same tone curve to a sunrise shot and a forest interior. The lighting conditions are so different that a single preset will flatten one or the other.
Mixed-lighting situations also tend to fight presets. A reception hall with tungsten overheads, LED DJ lights, and camera flash hitting the same scene will confuse any white balance preset immediately.
Downloading and Organizing Preset Files
Before learning how to install Lightroom presets, getting the files organized saves significant headaches down the road. Most people download a zip file, extract it, and dump the contents into whatever folder their browser defaults to. That's a recipe for lost files and duplicated installs.
Where to Find Quality Presets
Free presets are everywhere, but quality varies wildly. Here are the sources our team trusts:
- Adobe's built-in Premium Presets (included with a Creative Cloud subscription)
- Photographer-made presets from creators who show before/after samples on diverse image types
- Established marketplaces that vet their preset packs for compatibility
- Photography community forums where presets are shared with detailed usage notes
Avoid presets that only show results on heavily stylized studio shots — they rarely translate to real-world conditions. Anyone serious about shooting in RAW will get far more mileage from presets designed for RAW files specifically.
Setting Up a Clean Folder Structure
Our team maintains a dedicated directory structure for presets outside of Lightroom's default location. This serves as a backup and makes reinstallation trivial.
| Folder | Contents | Purpose |
|---|---|---|
| Presets/Landscape | .xmp files for nature, outdoor, scenic | Sorted by genre for quick access |
| Presets/Portrait | .xmp files for skin tone, studio, natural light | Separate from landscape to avoid misapplication |
| Presets/B&W | .xmp files for monochrome conversions | Black-and-white presets that work across genres |
| Presets/Film | .xmp files emulating analog film stocks | Kodak, Fuji, Ilford emulations |
| Presets/Custom | Personally created .xmp files | Our own presets built from scratch |
| Presets/_Archive | Old .lrtemplate files, unused packs | Kept for reference, not imported |
This structure mirrors how we organize preset groups inside Lightroom itself. When a new pack arrives, the files go into the appropriate genre folder first, then get imported into Lightroom. If something goes wrong with the catalog, the backup folder makes recovery painless.

How to Install Lightroom Presets Step by Step
This is the core of the guide. The process differs depending on which version of Lightroom is installed, so we've broken it down into three clear paths. Regardless of version, always extract zip files completely before importing — Lightroom cannot read presets from inside compressed archives.
Installing in Lightroom Classic
Lightroom Classic offers two installation methods. The first is the official import dialog, and the second is manual file placement. We recommend the import method for most people.
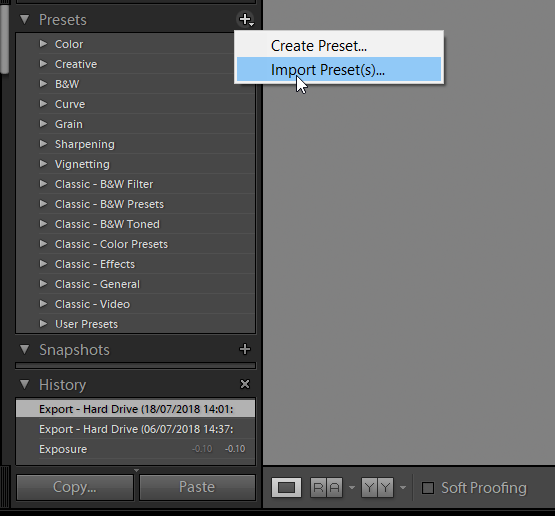
Method 1 — Import via Develop Module:
- Open Lightroom Classic and switch to the Develop module (press D).
- In the left panel, locate the Presets section.
- Click the "+" icon next to the Presets header.
- Select "Import Presets" from the dropdown menu.
- Navigate to the folder containing the .xmp or .lrtemplate files.
- Select the files (Ctrl+A or Cmd+A to select all) and click "Import."
- The presets appear immediately under a new group in the Presets panel.
Method 2 — Manual File Placement:
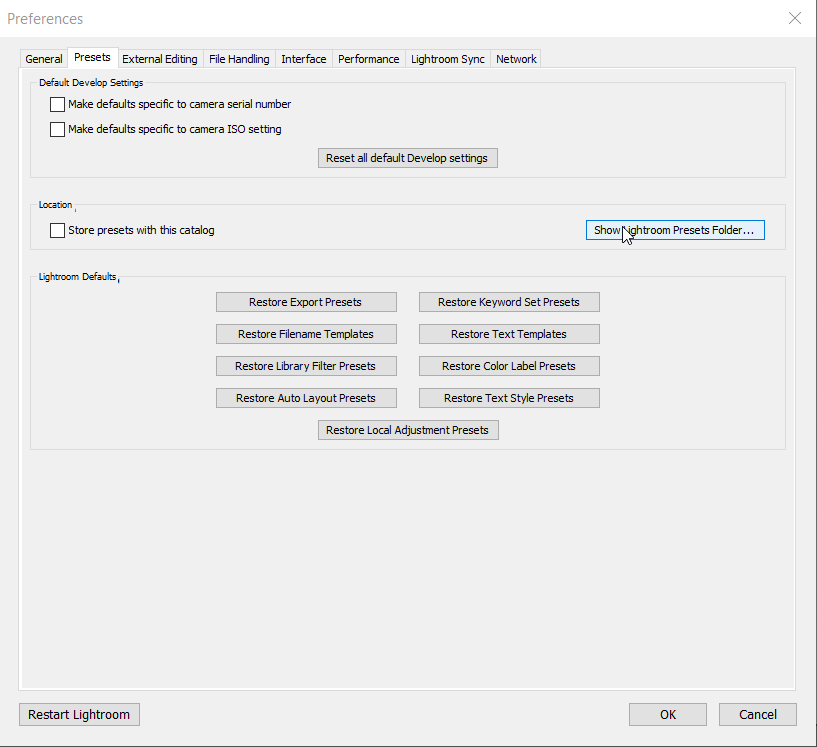
- In Lightroom Classic, go to Preferences → Presets tab.
- Click "Show All Other Lightroom Presets" (this opens the settings folder).
- Navigate into the "Settings" subfolder.
- Create a new subfolder with the preset pack name.
- Copy the .xmp files into this subfolder.
- Restart Lightroom Classic.
Manual placement gives more control over folder naming and organization. It's the method our team prefers for large preset libraries because the import dialog can be slow when handling hundreds of files at once.
Installing in Lightroom CC
The cloud-based Lightroom (CC) handles presets differently because everything syncs through Adobe's servers.
- Open Lightroom and select any photo to enter the Edit view.
- Click the Presets icon at the bottom of the Edit panel (it looks like two overlapping circles).
- Click the three-dot menu (⋯) at the top of the Presets panel.
- Select "Import Presets."
- Browse to the preset files and select them.
- The presets sync automatically across all devices signed into the same Adobe account.
The cross-device sync is the biggest advantage of the CC method. Install presets on a desktop, and they appear on a tablet or phone within minutes. This is especially useful for photographers who do rough edits on mobile during a shoot and refine on desktop later.
Installing on Lightroom Mobile
Mobile installation without a Creative Cloud subscription requires a workaround using DNG files. With a subscription, presets installed on desktop sync automatically — no extra steps needed.
For the DNG method:
- Download or transfer the DNG preset files to the mobile device.
- Open Lightroom Mobile and import the DNG files as photos.
- Open one of the imported DNG files.
- Tap the three-dot menu and select "Create Preset."
- Name the preset, assign it to a group, and save.
- Repeat for each DNG file.
It's tedious for large packs, but it works. The DNG method is the only option for free Lightroom Mobile users who don't have cloud sync.
Preset Workflows for Different Photography Genres
Installing presets is step one. Using them effectively is where the real value lives. Our team has developed specific workflows for different shooting scenarios that demonstrate how presets fit into a broader editing process.
Landscape and Nature
For landscape work, we typically start with a preset that handles the base tone curve and color grading, then manually adjust exposure, highlights, and shadows for the specific light conditions. Anyone exploring landscape photography — especially those following guides like our landscape photography planning guide — will find that presets work best when the shooting conditions are planned for in advance. Consistent golden-hour shooting means consistent preset results.
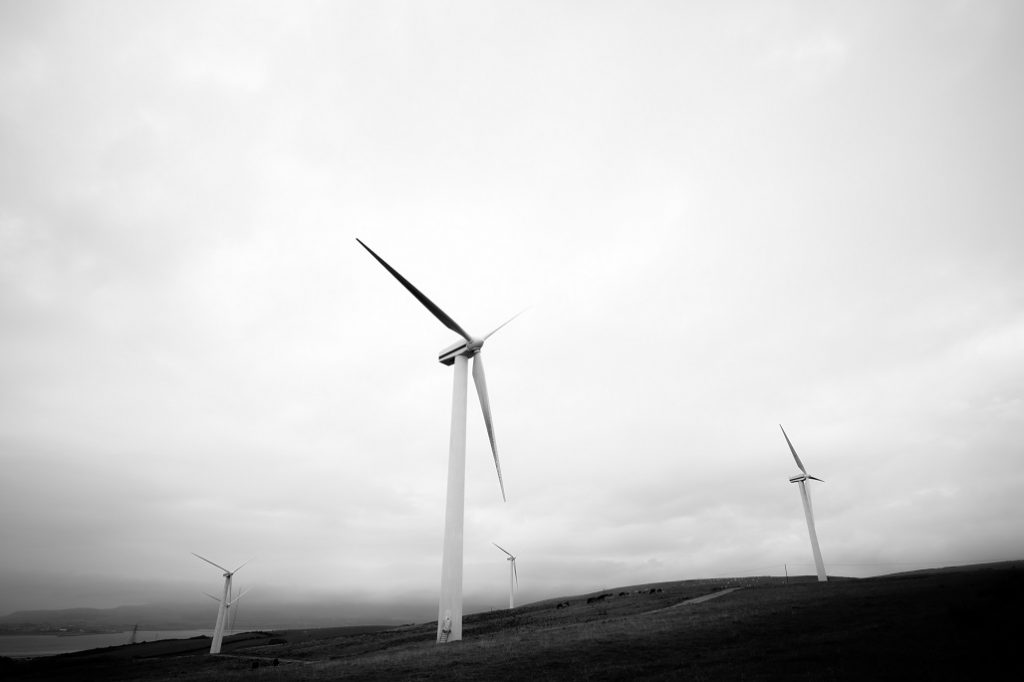
Our landscape preset workflow typically follows this pattern:
- Apply the base preset to get the overall mood right.
- Adjust white balance manually — presets rarely nail this for outdoor scenes.
- Fine-tune the graduated filter for sky exposure.
- Check the histogram and pull back any clipped highlights.
- Apply local adjustments (radial filters, brushes) as needed.
Portraits and Events
Portrait presets are where consistency matters most. A client expects every photo from a session to look like it belongs in the same set. We apply the preset to one representative image, dial in the skin tone adjustments, then sync those settings across the entire series. The key is picking a preset that handles skin tones well under the specific lighting used. A preset built for natural light will produce muddy skin tones under mixed artificial lighting every single time.
Event photography takes this further — multiple lighting scenarios in a single shoot. Our approach: sort images by location or lighting first, apply different presets to each group, then manually match the overall brightness and contrast so the final gallery feels cohesive despite the technical differences.
Getting the Most Out of Installed Presets
Most people install presets, apply them at full strength, and call it done. That's leaving performance on the table. Presets are meant to be a foundation, not a finished product.
Tweaking Presets After Application
Every preset should be adjusted after application. Here are the sliders our team checks every time:
- Exposure — presets can't predict the exposure of every image. Adjust to taste.
- White Balance — shift the temperature and tint to match the actual scene lighting.
- Highlights and Shadows — recover detail that the preset's tone curve might have clipped.
- Saturation vs. Vibrance — many presets oversaturate. Pull saturation back slightly and let vibrance handle the subtlety.
- Sharpening — preset sharpening values are generic. Match sharpening to the lens and subject distance.
A good rule of thumb: if applying a preset and exporting without any manual adjustment, the preset is doing too much or the photographer is doing too little. The sweet spot is a preset that gets the image 70% of the way there.
Building Custom Presets
Once the adjustments after applying a preset become repetitive — meaning the same tweaks happen every time — it's time to create a custom preset that incorporates those changes. In Lightroom Classic, simply adjust an image to the desired look, click the "+" next to Presets, choose "Create Preset," select which settings to include, and save. We recommend excluding exposure, white balance, and crop from custom presets since those are always image-specific.
Over time, a library of personal presets built from real editing patterns will outperform any downloaded pack. They're calibrated to specific gear, shooting conditions, and aesthetic preferences. That level of personalization is impossible to buy.

Fixing Common Preset Installation Problems
Even when the steps above are followed precisely, things can go wrong. Here are the most common issues our team encounters and exactly how to resolve them.
Presets Not Appearing in Lightroom
This is by far the most reported problem. In our experience, the cause falls into one of these categories roughly 95% of the time:
- Files still zipped — Lightroom cannot read presets inside .zip archives. Extract completely before importing.
- Wrong folder location — Manual installations placed in the wrong directory. Use Preferences → Show Presets Folder to verify the correct path.
- Lightroom not restarted — After manual file placement, a restart is required. The application does not watch the presets folder for changes in real time.
- Incompatible version — .xmp presets in a pre-7.3 Lightroom Classic version. Update Lightroom or find .lrtemplate versions of the presets.
- Hidden file extensions — On Windows, a file might appear as "preset.xmp" but actually be "preset.xmp.xmp" due to hidden extensions. Enable file extension visibility in Explorer settings.
Presets Producing Unexpected Results
Sometimes presets install fine but produce results that look nothing like the advertised preview. Common causes include:
- The preview was made from a perfectly exposed studio shot while the actual image is an underexposed outdoor snap. Presets amplify what's already in the file.
- Camera profile mismatch — the preset was built using a specific camera profile (like Adobe Color) but the current image uses a different one (like Camera Faithful). Check the Camera Calibration section at the bottom of the Develop panel.
- JPEG vs. RAW — presets designed for RAW files produce drastically different results on JPEGs because the tonal range is already compressed.
- Process version — older presets built on Process Version 4 or earlier behave differently under Process Version 5. Lightroom usually prompts to update, but the results shift.
When a preset looks completely wrong, our first troubleshooting step is always to reset the image to defaults (Ctrl+Shift+R), verify the camera profile, then reapply. That alone fixes the issue more than half the time.
Practical Preset Applications for Every Skill Level
Understanding how to install Lightroom presets is the mechanical part. Knowing where they fit into a real photography practice is where the value compounds. Here are concrete applications segmented by experience level and use case.
Batch Processing and Consistency
Batch processing is the strongest practical argument for presets. Our team's workflow for a typical landscape shoot looks like this:
- Import all RAW files into Lightroom.
- Apply the appropriate base preset during import (Lightroom Classic supports this in the Import dialog).
- Review images in Library module and flag the keepers.
- In Develop, fine-tune the first image from each lighting condition.
- Select similar images and sync the adjustments.
- Make individual tweaks to standout shots.
This process takes our team roughly 15 minutes per 100 images versus 45+ minutes editing each from scratch. The composition fundamentals still matter more than any preset — a poorly composed shot edited with a beautiful preset is still a poorly composed shot. But for well-captured images, presets eliminate the repetitive mechanical work so more time can go toward creative decisions.
Client Delivery and Branding
For anyone doing client-facing work — real estate photography, product shots, social media content — presets enforce brand consistency. A real estate photographer applying the same bright, clean preset to every listing ensures the portfolio looks professional and cohesive. Product photographers can build presets that match a client's specific color palette and apply them across hundreds of product shots.
The branding angle extends to personal projects too. Instagram photographers who maintain a consistent feed aesthetic almost universally rely on presets. The look becomes recognizable. Followers associate that color grading with the photographer's identity. That kind of visual branding is difficult to maintain manually across hundreds of posts but trivial with a well-designed preset.
Frequently Asked Questions
Can presets from Lightroom Classic be used in Lightroom CC and vice versa?
Yes, as long as both applications are updated to versions that support the .xmp format. Lightroom Classic (7.3+) and Lightroom CC both use .xmp presets natively. Exporting a preset from Classic produces an .xmp file that CC can import directly. The only caveat is that some Classic-specific features (like Print module adjustments) have no equivalent in CC, so those settings are simply ignored during import. For most Develop module presets, cross-compatibility is seamless.
How many presets can Lightroom handle before performance degrades?
In our testing, Lightroom Classic handles up to around 2,000–3,000 presets without noticeable slowdown on a modern system with 16GB+ RAM. Beyond that, the Presets panel begins to lag when scrolling, and hovering over presets for the live preview becomes sluggish. Lightroom CC tends to handle large preset libraries better due to its lighter interface. Our recommendation is to keep the active library under 500 presets by disabling or removing packs that aren't in regular rotation.
Are free presets as good as paid ones?
Some are, most aren't. The difference usually comes down to refinement and range. Paid preset packs are typically tested across diverse camera bodies, lighting conditions, and subject types. Free presets are often built from a single photographer's specific setup and may only look great under those exact conditions. That said, Adobe's built-in presets and the free packs from established photographers like Peter McKinnon or Pat Kay are genuinely excellent. Our advice: start with free presets to learn what styles appeal, then invest in a paid pack that matches the specific genre and shooting conditions being targeted.
Next Steps
- Download one free preset pack (Adobe's built-in Premium Presets are a solid start) and install it using the step-by-step method for the specific Lightroom version installed — Classic, CC, or Mobile.
- Apply the preset to five different images shot under varying lighting conditions, then study which Develop sliders moved and how the results differ between images. This builds intuition for what presets actually change.
- Create a dedicated preset backup folder on an external drive or cloud storage using the folder structure outlined above — organizing by genre from the start prevents the chaos that comes with a growing library.
- Build one custom preset based on a personal editing style by editing a favorite image from scratch, then saving those adjustments as a new preset with exposure and white balance excluded.
- Apply that custom preset to an entire shoot using Lightroom's batch sync feature, making individual adjustments only where needed — this is the workflow that separates efficient editors from those stuck processing one image at a time.
 |
 |
 |
 |

About Alex W.
Alex is a landscape, equine, and pet photographer based in the Lake District, UK, with years of experience shooting in one of Britain's most photographically demanding natural environments. His work has been featured in Take a View Landscape Photographer of the Year, Outdoor Photographer of the Year, and Amateur Photographer Magazine — publications that reflect a serious, competitive standard of image-making. At Click and Learn Photography, he shares the camera settings, gear choices, and compositional techniques he has developed through real-world shooting and competition-level work.
You can Get FREE Gifts. Furthermore, Free Items here. Disable Ad Blocker to receive them all.
Once done, hit anything below
|
|
|
|