Why You Should Shoot in Bad Weather: A Landscape Photographer's Guide
by Alex W.
What if the forecast that makes you want to stay home is actually your best chance at a portfolio-defining shot? Landscape photography in bad weather delivers the kind of drama, mood, and atmosphere that blue-sky days simply cannot match. Storm clouds, fog, rain, and mist create scenes that stop viewers mid-scroll — and most photographers never capture them because they pack up when the weather turns. If you're serious about leveling up your work, check out our ultimate guides for more in-depth techniques, but this post will give you everything you need to start embracing rough conditions with confidence.
The truth is, overcast skies act as a giant softbox. Rain adds reflections and texture. Fog isolates subjects in ways no lens can replicate. Once you learn to work with these elements instead of against them, you'll find yourself actively hoping for bad weather on shoot days.
Below, you'll find practical techniques you can use immediately, real scenarios that show why storms produce better images, guidance on when to push through and when to call it, and the mistakes that trip up even experienced shooters.
Contents
Techniques That Deliver Instant Results in Bad Weather
You don't need years of experience to get strong results in rough conditions. A few targeted adjustments to your approach will make an immediate difference. If you're still building your foundation, our guide on transforming your landscape photography pairs well with these bad-weather techniques.
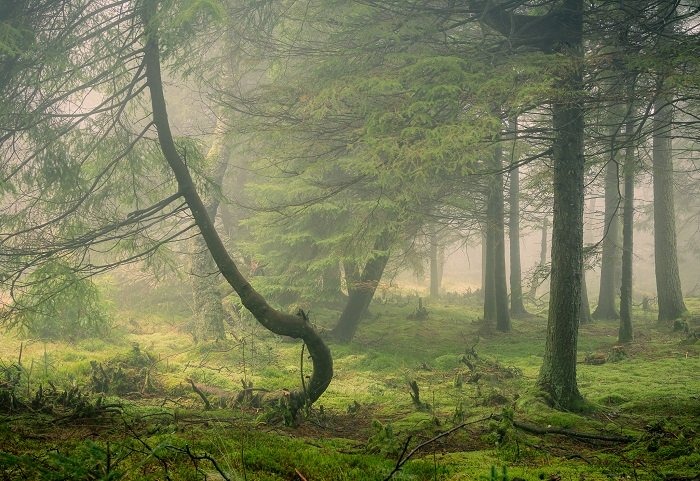
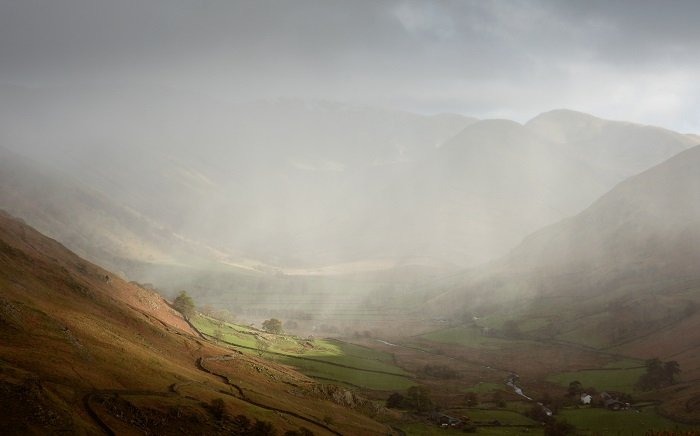
Use Fog and Mist to Simplify Your Compositions
Fog is one of the most powerful tools in landscape photography in bad weather. It strips away distracting backgrounds and isolates your subject naturally. Here's how to make the most of it:
- Shoot into the fog rather than with it behind you — this maximizes depth and layering
- Look for trees, fences, or paths that lead into the mist to create strong leading lines
- Use spot metering instead of evaluative — fog confuses matrix metering into overexposing
- Arrive early, as ground fog often burns off within an hour of sunrise
Fog also compresses tonal range beautifully. You'll find that even a simple scene — a lone tree in a field — becomes striking when everything beyond it fades to white. This is minimalist composition at its best.
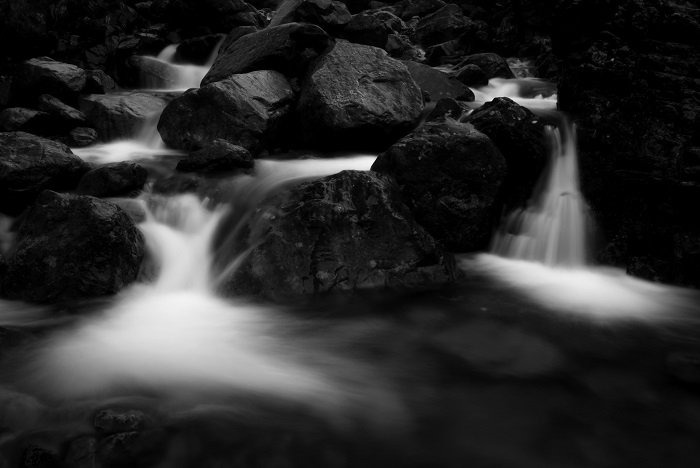
Slow Down with Long Exposures
Overcast skies give you lower ambient light, which means you can use longer shutter speeds without an ND filter. This is perfect for motion blur techniques like smoothing water or streaking clouds. A sturdy tripod is non-negotiable here.
Try exposures between 1 and 30 seconds for moving water. For cloud streaks, you'll want 30 seconds or longer — this is where an ND filter becomes useful even on dark days.
Pro tip: In rain, use a 2-second timer or remote shutter release. Wiping your lens and then rushing to press the shutter button creates camera shake — the timer gives you time to shelter the lens until the last moment.
Recommended Camera Settings by Weather Type
| Weather Condition | Aperture | Shutter Speed | ISO | Key Tip |
|---|---|---|---|---|
| Heavy fog | f/8–f/11 | 1/60–1/125s | 200–400 | Use spot metering; +0.5 EV compensation |
| Light rain | f/5.6–f/8 | 1/250s+ | 400–800 | Fast shutter freezes raindrops |
| Storm clouds | f/11–f/16 | 1/30–1/125s | 100–200 | Expose for highlights to keep cloud detail |
| Snow | f/8–f/11 | 1/250s+ | 200–400 | +1 to +1.5 EV to avoid grey snow |
| Wind (long exposure) | f/16–f/22 | 2–30s | 100 | ND filter + tripod mandatory |
These are starting points — shooting in manual mode gives you full control to adapt as conditions shift, which they will constantly in bad weather.
Real Storms, Real Shots: What Bad Weather Actually Produces
It's one thing to talk about theory. It's another to see what happens when you actually stand in a storm with your camera. The results speak for themselves.
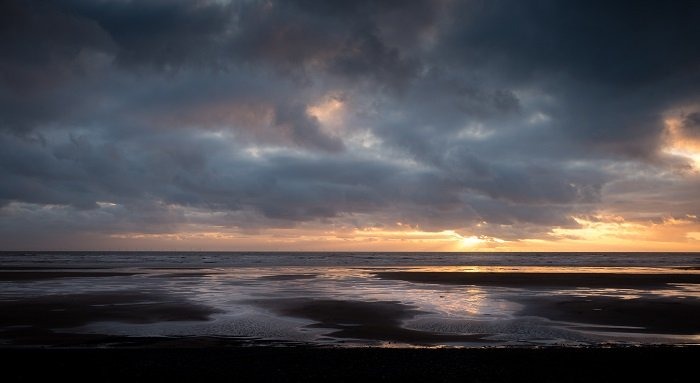
The Magic of Storm Breaks
The most dramatic light in landscape photography happens when sunlight punches through a gap in storm clouds. These crepuscular rays — shafts of light streaming through cloud breaks — create spotlight effects across the landscape that last only minutes.
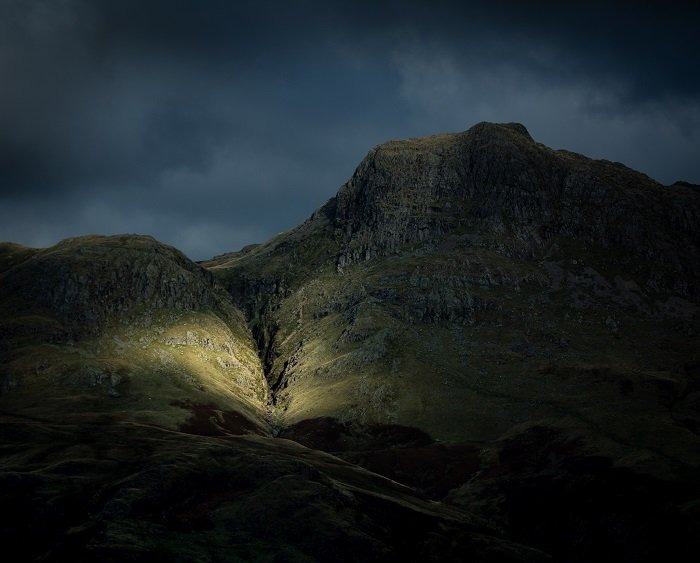
You can't plan these moments precisely, but you can position yourself for them. Watch the western horizon during afternoon storms — when you see thinning cloud edges, get your composition ready. The break will come fast.
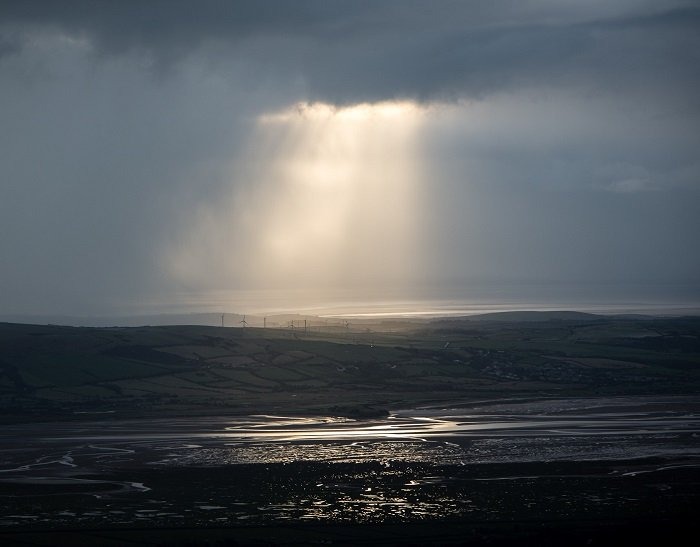
These storm-break shots often become the centerpiece of a landscape portfolio. They carry emotion and drama that fair-weather images rarely achieve.
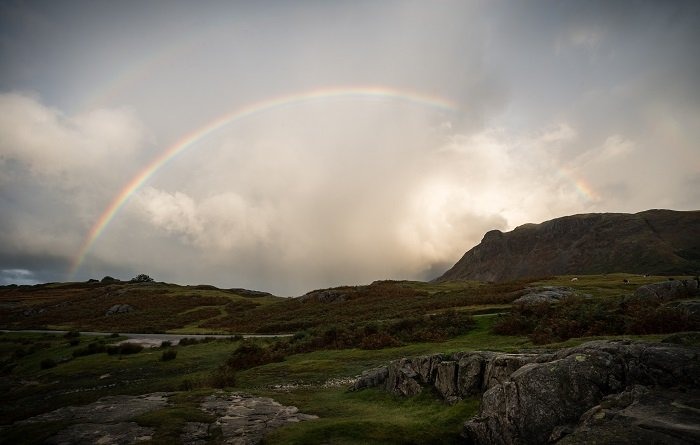
Rain-Soaked Reflections and Saturated Color
Rain does something remarkable to color. Wet surfaces reflect light, greens become more vivid, and rocks take on a richness that dry conditions never produce. After even a brief shower, the landscape transforms.
- Puddles become mirrors — get low and use them as foreground elements
- Wet roads and paths create leading lines with built-in reflections
- Autumn foliage after rain is one of the most photogenic combinations in nature
- Waterfalls swell with volume, making them far more impressive to photograph
And then there are rainbows. You can't force them, but if you're already out shooting in rain with sun breaking through behind you, you're in the exact right position to capture one.
Know When to Brave It and When to Pack Up
Not all bad weather is created equal. Some conditions are goldmines for landscape photography in bad weather. Others are genuinely dangerous or just unproductive. Learning the difference saves you time and keeps you safe.
Conditions Worth Shooting In
These are the scenarios where you should grab your gear without hesitation:
- Approaching or clearing storms — the edges of weather systems produce the best light and most dramatic skies
- Fog and mist — especially in valleys, near rivers, and in wooded areas at dawn
- Light to moderate rain — manageable with basic weather protection and produces saturated colors
- Overcast days — perfect for cloudy day photography, especially waterfalls, forests, and intimate landscapes
- Snow — transforms ordinary scenes into something extraordinary
When You Should Stay Home
Your safety always comes first. These situations aren't worth the risk:
- Active lightning within your area — no photograph is worth a lightning strike. If you can hear thunder, you're within range
- High winds above 50 mph — your tripod becomes unstable and flying debris is a real hazard
- Flash flood warnings near rivers, canyons, or low-lying areas
- Visibility near zero with no safe shelter nearby
Safety warning: Always check the forecast before heading out and tell someone where you're going. Carry a fully charged phone, and know your exit route before conditions deteriorate.
The sweet spot is the boundary between bad and worse. You want conditions that are dramatic enough to produce interesting light but stable enough that you can work safely and protect your gear.
Mistakes That Ruin Bad Weather Shoots
Even photographers who embrace bad weather often sabotage their results with avoidable errors. Here are the ones that cost you the most shots.
Gear Protection Failures
Your camera can handle more than you think, but it's not waterproof. These mistakes lead to damaged gear or missed shots:
- No rain cover or plastic bag — a dedicated rain sleeve costs less than a lens repair. A plastic shopping bag with a hole cut for the lens works in a pinch
- Forgetting lens cloths — you'll wipe your front element dozens of times per session. Carry at least three microfiber cloths
- Changing lenses in rain — avoid it entirely. Pick your lens before you leave the car and commit to it
- Ignoring condensation — moving from cold outdoor air to a warm car causes internal fogging. Put your camera in a sealed bag before going indoors and let it acclimate slowly
Your own comfort matters too. Cold, wet hands make it harder to work your controls precisely. Invest in weatherproof gloves with fingertip access — you'll shoot longer and make better decisions when you're not shivering.
Exposure and Composition Errors
Bad weather changes the rules. Photographers who shoot the same way they do on sunny days will get disappointing results.
- Blowing out bright clouds — expose for the highlights in the sky and recover shadows in post. A grey, featureless sky adds nothing to your image
- Ignoring the foreground — dramatic skies are only half the equation. Without a strong foreground element, your shot lacks depth. Review our advanced composition tips for more on building layered images
- Shooting too wide — when the entire sky is grey, a wide-angle lens just captures a lot of grey. Zoom in tighter to isolate interesting cloud formations or light breaks
- Chimping constantly — checking every shot on your LCD in rain exposes your camera's rear screen and controls to water. Trust your settings and review in shelter
The biggest mistake of all? Staying home. Every experienced landscape photographer will tell you that their most striking images came from days when they almost didn't go out.
Video: Landscape Photography in Bad Weather
Frequently Asked Questions
Is landscape photography in bad weather safe for my camera?
Most modern DSLRs and mirrorless cameras have weather sealing that handles light rain and moisture well. Use a rain cover or plastic bag for extra protection, avoid changing lenses in the rain, and always dry your gear thoroughly afterward. The bigger risk is condensation when moving between temperatures — seal your camera in a bag before entering warm spaces.
What is the best lens for shooting landscapes in rain or fog?
A mid-range zoom like a 24-70mm f/2.8 is the most versatile choice. It gives you flexibility to go wide for sweeping foggy scenes or zoom in to isolate storm-break light. A weather-sealed lens paired with a UV or clear filter protects the front element from water droplets without affecting image quality.
How do you keep your lens dry while shooting in rain?
Use a lens hood to block angled rain, carry multiple microfiber cloths to wipe the front element frequently, and hold a small umbrella or use a rain sleeve between shots. Some photographers attach a piece of gaffer tape to create a small visor above the lens hood for extra protection during heavy downpours.
What camera settings work best for stormy landscapes?
Shoot in manual mode at f/8 to f/11 for sharpness, keep ISO as low as possible (100-400), and adjust shutter speed based on whether you want to freeze rain (1/250s+) or blur clouds and water (1-30 seconds). Use exposure compensation of +0.5 to +1 EV in fog or snow to prevent your camera's meter from underexposing.
When is the best time to photograph during a storm?
The most dramatic moments happen at the leading and trailing edges of a storm — as it arrives or clears. The transition periods produce crepuscular rays, rainbow opportunities, and extreme contrast between dark clouds and breaking sunlight. Position yourself where you can see the horizon and watch for gaps in the cloud cover.
Key Takeaways
- Landscape photography in bad weather produces more dramatic, emotionally compelling images than clear skies ever will — fog simplifies, rain saturates, and storm breaks create once-in-a-lifetime light.
- Protect your gear with rain sleeves, lens cloths, and smart habits like avoiding lens changes in rain, but don't let weather anxiety keep you indoors.
- The edges of storms — arriving and clearing — are where the magic happens, so position yourself early and stay patient.
- Always prioritize safety over the shot: check forecasts, avoid lightning zones, and tell someone your location before heading out.
 |
 |
 |
 |

About Alex W.
Alex is a landscape, equine, and pet photographer based in the Lake District, UK, with years of experience shooting in one of Britain's most photographically demanding natural environments. His work has been featured in Take a View Landscape Photographer of the Year, Outdoor Photographer of the Year, and Amateur Photographer Magazine — publications that reflect a serious, competitive standard of image-making. At Click and Learn Photography, he shares the camera settings, gear choices, and compositional techniques he has developed through real-world shooting and competition-level work.
You can Get FREE Gifts. Furthermore, Free Items here. Disable Ad Blocker to receive them all.
Once done, hit anything below
|
|
|
|