Ultimate Guide to Landscape Photography Part 3 – Planning and Preparation
by Alex W.
Note – This is Part 3 of our Ultimate Guide to Landscape Photography series. You can see Part 1 here and Part 2 here.
You have already learned all about the gear used in landscape photography and when and where to implement specific camera settings, so now it’s time to start planning your perfect landscape photography shoot.
This is what landscape photography all boils down to – Being in the right place at the right time with the right equipment and the knowledge of how to use it.
It’s all well and good knowing exactly how to use your camera, but you’re unlikely to get a stunning image if you don’t put yourself in front of interesting subjects in interesting conditions.
This is where the planning and preparation aspect of landscape photography comes in, and fortunately there are now a host of tools we can use to aid us on our way. We’ll go through them first, and then I’ll divulge the process I go through when planning a shoot.

For this image, I wanted the trees illuminated and the background in relative darkness to create a deep contrast. Rather than turning up and waiting for hours for the right moment I used some carefully selected tools, turning up 30 minutes before the sun rose over the hills and being in position at just the right time. Proper planning can change your photography!
Useful Tools for Landscape Photography
Different photographers prefer different approaches to landscape photography, so don’t feel the need to go out and use every one of these useful tools in every shoot. These tools range from the traditional (such as a map and compass) to the more modern (such as apps and websites.)
You Might Like… Best Cameras for Landscape Photography
The Traditional Approach
If you know some basic navigation and map reading, using a traditional, non-digital approach can be a very pleasant process.
- Maps – There’s nothing quite like opening up a detailed map and studying the lie of the land. It’s not only a soothing practise, but also allows you to study every nook and cranny of a landscape. You can pick out key features, routes to your location, and potential hazards all from a single piece of paper. It takes some practise to use it accurately, but it pays to know this skill when you’re out in the landscape with no phone reception! I tend to use the OS Explorer series, but this will vary depending on your location. Bing Mapsalso offers the Ordnance Survey overlay online.
- Compass – Combine this with your map and you have a navigational set that will never let you down (provided you know how to use them.) In planning for a landscape session I use this to determine the orientation in which the sun will rise and set in relation to my location.
- Walking and Hiking Guides – Photographers aren’t the only people who appreciate a beautiful view, we’re just the ones who choose to capture that beauty. Hiking guides provide you with interesting routes to interesting locations, and the chances are you’ll find something worth shooting on most of their trails.
- Personal Knowledge – We’ll get into this more later, but having a personal knowledge of the area you’re visiting helps immensely in the planning stage. Being able to visualise the area becomes so useful that I often now don’t bother checking any apps or websites and instead just head to a certain location that would suit the conditions I expect.
The Modern Approach

The traditional approach may be soothing, but by ignoring the wealth of digital tools at your disposal as photographers you will miss out on some crucial information.
There are those that scorn the incredible rise of technology over the past two decades, but I am not one of them. This advancement has seen the introduction of some incredibly useful tools for photographers, and I’ll go through just a few of my favourites here.
Okay, so either one of these first two (both, preferably) are absolute must-haves for any landscape photographer. I cannot recommend them highly enough.
I won’t go into all the details (their website puts it much better than I ever could) but The Photographer’s Ephemeris can help you plan your landscape shoots down to a tee. In it’s simplest form it can tell you the sunrise, sunset, moonrise, and moonset times and orientations so you know exactly when and where that first light will break over the horizon.
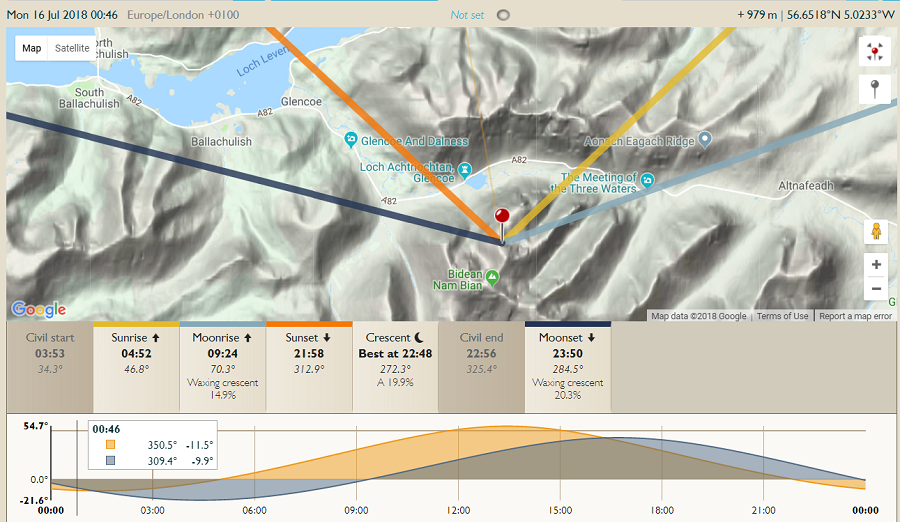
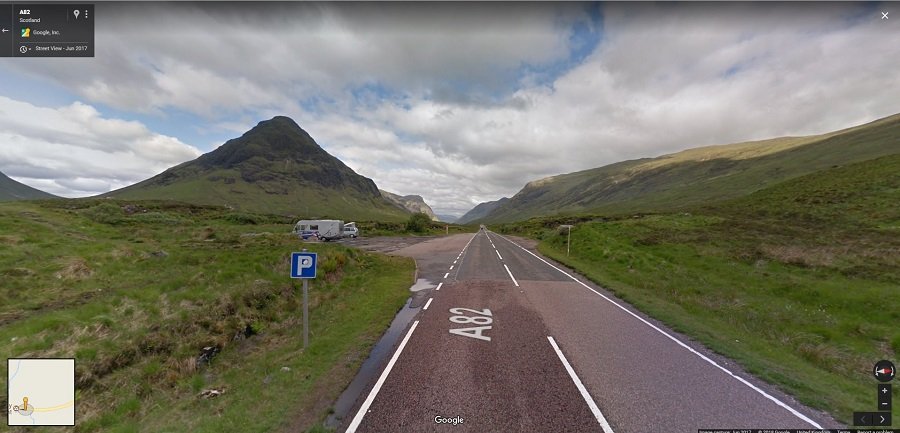
Using TPE, I am able to determine that if I want to shoot the view down the majestic valley of Glencoe a sunset expedition would probably be the most suitable. This is only the most basic of uses for this powerful piece of software.
You’re missing a goldmine of potential if you only use it for that though. Using it you can easily figure out the exact time that the sun will break over a mountain, or the precise time of astronomical twilight for your astrophotography adventures.
TPE also has a few other tools, some included and some as paid extras. Skyfire predicts the likelihood of a colourful sunset, while The Photographer’s Transit offers a baffling array of planning tools that can even help you figure out which lenses to take with you.
TPE is available in app form for both iOS and Android but aren’t free (definitely worth it though.) You can, however, use their web app for completely free!
PhotoPills is a similar app to The Photographer’s Ephemeris, and while they don’t offer a free version they bring a few exciting additions to the scene.
As well as doing almost everything the TPE base version can do, it also offers things such as augmented reality, depth of field calculations, ND filter calculator, and time lapse capability. My favourite addition is the 2D Milky Way tool though, which allows you to plan exactly when is best to capture our stunning galaxy.
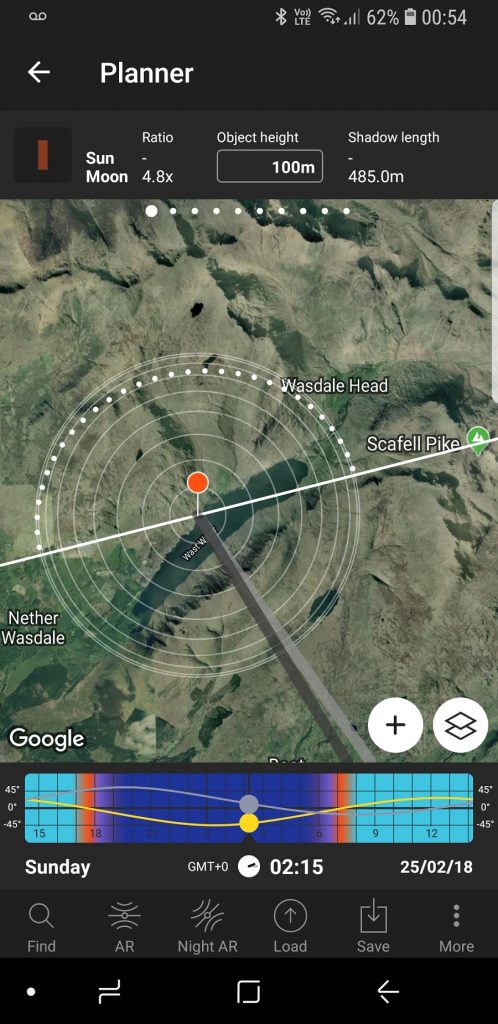
The interface of PhotoPills is slightly different from TPE, but it offers some extra features that could be very helpful. Here, I can see exactly where the Milky Way will appear in the night sky.
If you’re opting for a paid version I’d go for PhotoPills because of the additional features, but it’s well worth learning how to use The Photographer’s Ephemeris too because of it’s free desktop app.
Just like TPE, PhotoPills is now available in both iOS and Android apps.
You Might Like… Beginner’s Guide to Improving Your Astrophotography
Met Office Weather and Cloud Cover
Knowing the predicted weather is incredibly important in landscape photography, and the Met Office offer a ton of useful tools to help with this. There is all the necessary information such as cloud cover and precipitation, but best of all is the visual representation of cloud cover.
Cloud cover is a very important aspect of landscape photography, especially when shooting during the Golden Hours. Too much cloud cover and the light will be snuffed out. Too little and the rising or setting sun has nothing to illuminate, leaving you with a largely uninteresting and colourless sky.
Read More… Natural Light – The Types of Light and How to Use Them
However, knowing that there’s a predicted 30% cloud cover is all well and good, but if that cloud cover is in the wrong area of the sky it’s not much good to you photographically speaking. The Met Office’s radar helps massively in this regard.
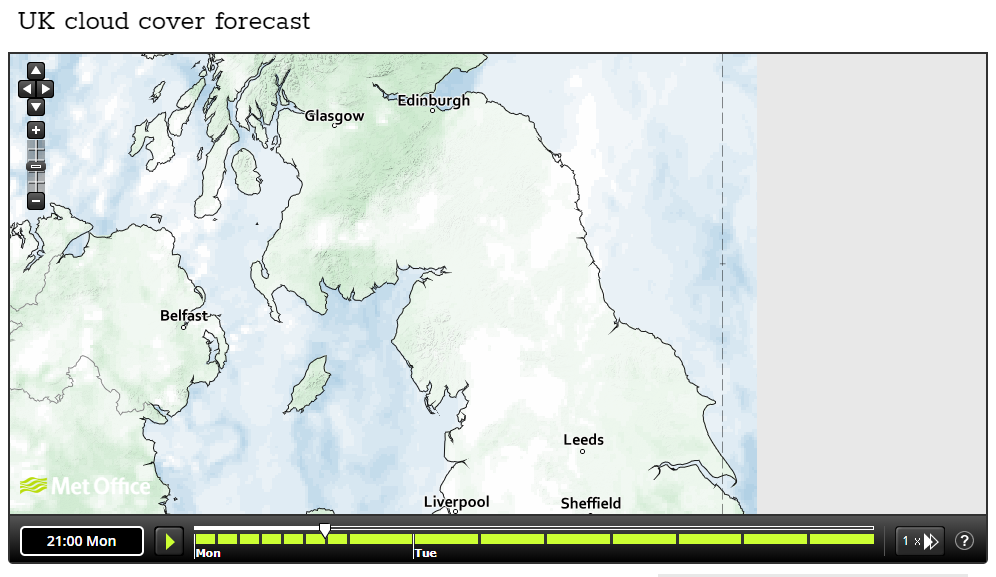
Using a cloud cover forecast you can determine whether the light will be able to break through when on location.
If the Met Office cloud cover overlay doesn’t go quite as local as you hoped then the Myweather2 website could be the website for you. You can select the region you wish to see and watch a rolling forecast of the predicted cloud movements.
It’s also worthwhile checking any reputable weather sites local to you for even more localised forecasts.
This is a bit of a strange one, but the Norwegian weather forecast website and app is actually one of the best around; no matter where you live. It covers most of the world and gives important information such as precipitation, wind speed and direction, and temperature.
Best of all – It’s actually accurate!
A tool that was designed for use by adventure sportspeople has become an invaluable tool in my planning arsenal.
Their almost mesmerising interface displays accurate visual forecasts for all sorts of different weather conditions. This includes fresh snow, wind, cloud cover (split into low altitude and high altitude), fog, rain, lightning, and many more.
It’s a great tool – Not only because of it’s usefulness but also because of how intuitive and pleasant the app and desktop versions are to use.
Anybody who likes to shoot seascapes and coastal scenes knows that the tide plays a huge role. Not only does it determine what parts of the beach will be exposed, but knowing what the tide is going to do is massively important in maintaining your safety.
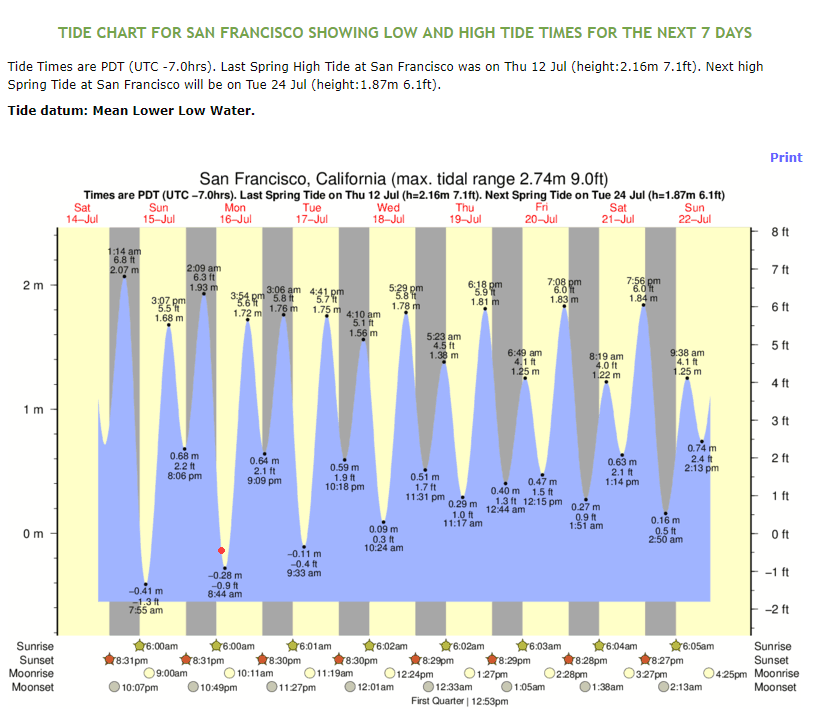
Paying careful attention to the tide times if an absolute necessity if you’re planning any seascape shoots – Not just for photography, but also for your safety.
Tide Forecast offers a very wide coverage net in terms of tide times and heights. It’s something you should definitely put in your bookmarks for those seascape shoots.
Everybody knows about Google Maps, but not many photographers actually take advantage of it’s wide array of features! The terrain map helps you to get a feel for the lie of the land, but the best feature of all has to be Street View.
Once you’ve decided on an area to visit you can hop into Street View and explore the roads. Doing so can give you a feel of the overall view you’ll get from the area, and it’s fantastic for finding good parking spots and directions.
Using Google Street View not only gives you a visual representation of what to expect, but it’s great for finding potential parking spots!
Believe me; getting lost when you’re short on time on the way to a shoot is no fun, and spotting that perfect parking spot a few seconds too late is even more frustrating.
500px / Flickr
If you’re heading to a completely unfamiliar location it can be worthwhile plugging that location into 500px or Flickr. These sites are filled with talented photographers, and the search results can help you determine whether there is anything worthwhile shooting in the area.
It’s not a technique I recommend using all the time though. Just by doing this you instantly take away your ability to see the location with fresh eyes. Instead, you’re likely to be drawn to the same focal point as the images you have seen online. It can stifle creativity.
However, if you’re short of time and in an unfamiliar area it can help to point you in the right direction.
How to Plan a Landscape Photography Shoot
Now you’ve got some of those tools under your belt I’ll run through a good starting point when planning a landscape shoot. Obviously can be tailored to your own specific situation, and not all of these tools need using all the time (there has to be some spontaneity after all!)
This serves as a demonstration of the thoroughest of approaches. It’s what I would do if I were planning a few days away in an unfamiliar location, and after chopping and changing some things you should be able to figure out a method that works for you from this:
The Days Before
First thing’s first, if it’s a completely unknown location to me, I’ll plug in a quick search on 500px or Flickr to see what pops up. I don’t want to spend hours trawling through all the images to find the ‘best’ composition, but instead just confirm that there is potential in the area without getting influences by what other photographers have produced.
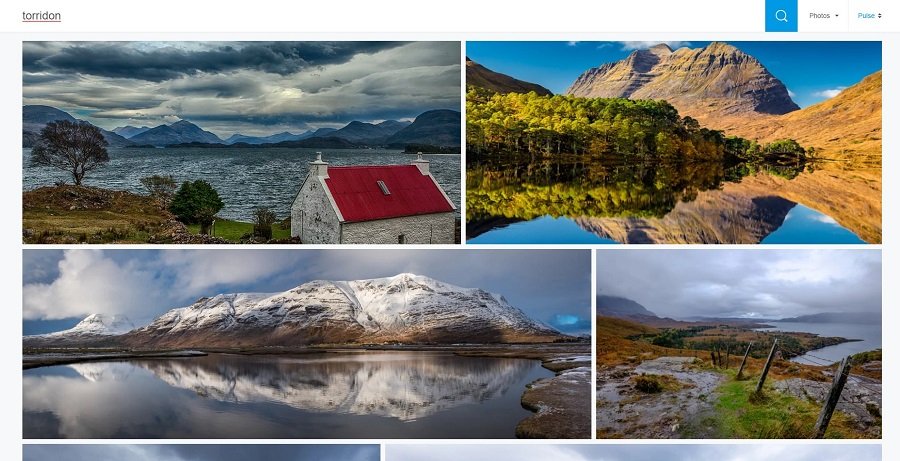
A quick search on 500px shows that Torridon has a huge amount of photographic potential. This is all I need – I don’t want to be overly influenced by what other photographer’s have shot.
Provided that I know where I’m staying at this point I’ll take a look on Google Maps to check out where my potential shooting locations are in relation to where I’ll be based. I’ll also have a look on Bing Maps Ordnance Survey overlay to study the local terrain and footpaths.
Next up is a quick weather forecast check. I’ll find which days are looking best for sunrise and sunset and then match them up to the most promising locations. So far, so good. Also note that this is when I’d check the tide tables if I was shooting in a coastal location.
You Might Like… Using Leading Lines to Improve Your Composition
Once I’ve determined where I’ll be and at what time of the day I’ll open up The Photographer’s Ephemeris or PhotoPills. From here I’ll check the sunrise/sunset times and the orientation of each one. This gives me a basic idea of where the light will fall on the land, when combined with a basic knowledge of terrain and topography.
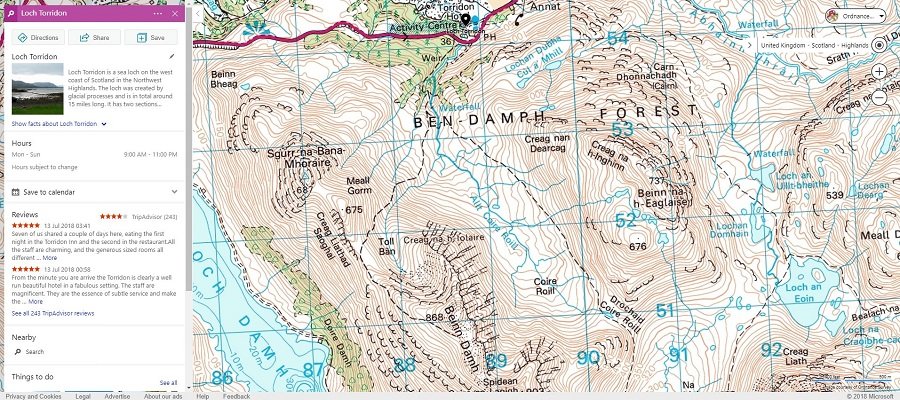
Using Bing Maps I can see that a walk up Beinn Damh would be perfect for a sunset shoot in the summer months, with it likely to offer gorgeous views of the sun setting at the end of the valley.
Now that I’ve decided on some general locations I’ll head back to Google Maps and go to Streetview. Here I can gain a wider image of the area, and also scout for directions and useful parking spots. Believe me, this saves an awful lot of frustration down the line!
That’s it for now. Before I’ve even packed my bags I have a basic outline for my landscape photography adventures. I know which area I’ll be in on each day and have an idea of how the light will fall. I tend to leave my plans quite rough around the edges rather than set in stone, just because I prefer to react to changing conditions.
The Night Before
I’ll start to get a little more specific the night before the photography outing. This is also where I’d start from if I was shooting in a familiar spot.
First port of call is the weather. I’ll use a combination of AccuWeather, the Met Office, and the Norwegian Meteorological Office to try and get an accurate forecast of the weather. I’ll dig deeper into it as well, checking out wind speed (useful for predicting mist), cloud cover, and cloud radars as well as temperature and chance of precipitation.
If the weather has changed significantly it might be time for me to juggle my original plans around a bit to suit the new forecast.
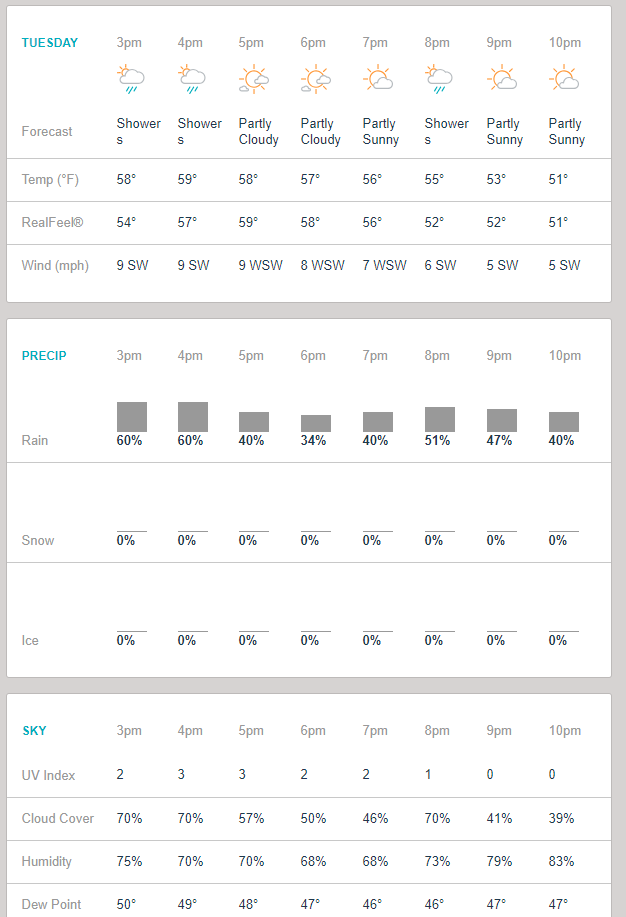
I’ve struck it lucky! We have sunshine and showers predicted for the hours leading up to sunset in Torridon. With between 40% and 70% cloud cover that means we should be able to capture some gorgeous evening light, as well as some colour in the sky and a bit of drama from the showers.
Next up it’s back to The Photographer’s Ephemeris or PhotoPills to get a little more information on the area. For example, I might want to know what time the sun would peak out over the top of a nearby mountain and flood the valley with light.
That’s my planning done! Some people love to plan their shots down to the precise composition and moment, but I am not one of them. I prefer to gain some knowledge on the overall lie of the land, determine where I can park and walk, and then scout the area out with my own eyes.
Final Preparations
Now it’s time to make life even easier for ourselves. We know where we’re going and roughly what we’re shooting, but we need to make sure we get there on time and in the right mindset.
Check how long it will take to get to your location on Google Maps, add a bit extra and then aim to get there 30 minutes before you need to. This might mean an early alarm call to get there half an hour before sunrise, but when you arrive completely calm and relaxed it’s well worth the sleep deprivation. This additional time on location gives you time to scout the area out too and perfect a composition before that decisive moment of light.
Now, make sure your camera bag is packed and ready. Batteries charged and spare SD cards wherever you can put them. There’s nothing quite as heartbreaking as slogging your way up a mountain only to find that you left all your SD cards at home.
Make sure you’ve got any extra equipment prepared too. In my case this is usually maps and compass, a flask of coffee, and some water. Gloves and a hat in winter too. Set your alarm and you’re good to go!
That’s it, you’ve planned your shoot using the wealth of incredible tools we now have at our disposal. Now all that’s left is to nail the shot on location!
Closing Thoughts
That’s three parts of our Ultimate Guide to Landscape Photography done, and now all that’s left is the small matter of getting the shot and editing it! If you’ve planned and prepared your landscape photography shoot well you should arrive on location calm and with plenty of time to spare, so there’s no need to rush.
Relax, and enjoy the great outdoors.
Make sure to subscribe to our email newsletter to stay up to date with all the latest photography guides, tutorials, and news from Click and Learn Photography. You will also be the first to know when Part 4 of our Ultimate Guide comes out.
Before heading into Part 4, I recommend reading some of our articles on composition below:
- Beginner’s Guide to Composition
- 5 More Tips to Improve Your Composition
- Quick Tips to Transform Your Landscape Photography
- Using Leading Lines to Enhance Your Photography Composition
If you liked this piece of content please consider sharing it with your friends or leaving a comment below.
Read More…
A Beginners Guide to Photography Composition
Astrophotography for Beginners – Improving your Night Sky Images
6 Reasons to Start Using Prime Lenses
Ultimate Guide to Waterfall Photography
 |
 |
 |
 |

About Alex W.
Alex is the owner and lead writer for Click and Learn Photography. An avid landscape, equine, and pet photographer living and working in the beautiful Lake District, UK, Alex has had his work featured in a number of high profile publications, including the Take a View Landscape Photographer of the Year, Outdoor Photographer of the Year, and Amateur Photographer Magazine.
Thoughts on "Ultimate Guide to Landscape Photography Part 3 – Planning and Preparation"
|
|
|
|
You can Get FREE Gifts. Furthermore, Free Items here. Disable Ad Blocker to receive them all.
Once done, hit anything below
|
|
|
|