Lightroom Export Settings for Web and Print: A Complete Guide
by Alex W.
Last month I spent an entire afternoon editing a landscape shot from Iceland, only to watch it turn into a muddy, oversaturated mess the moment I uploaded it to my portfolio site. The culprit wasn't my editing — it was my export settings. Getting your Lightroom export settings for web and print dialed in correctly is the difference between showcasing your work beautifully and undermining hours of careful post-processing. Whether you're preparing files for your photography beginners portfolio or sending high-resolution images to a print lab, this guide walks you through every setting that matters.
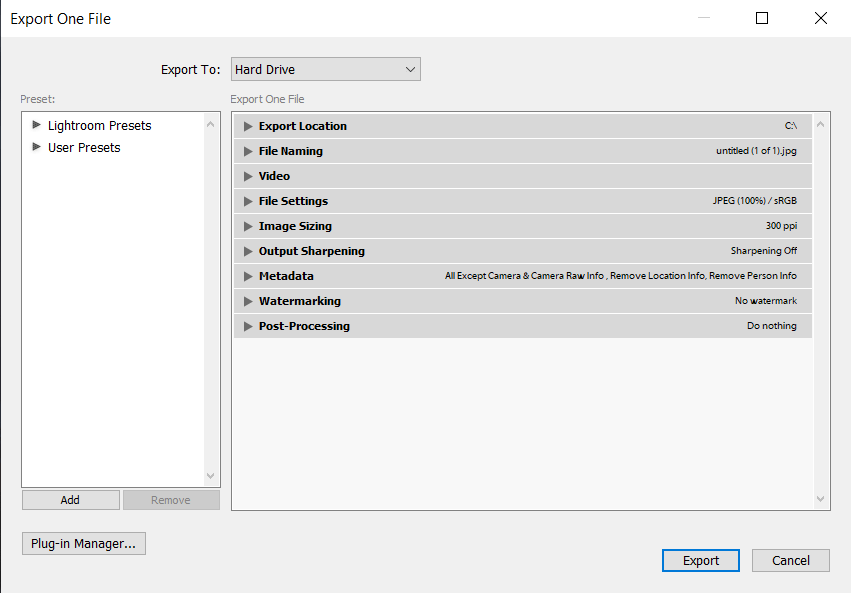
The export dialog in Lightroom Classic might look intimidating with its dozen-plus panels, but once you understand what each setting does and why it matters for your specific output, you'll breeze through it in seconds. The key is building presets for your most common workflows — web galleries, social media, client delivery, and print orders — so you never have to second-guess yourself again.
If you've already mastered the basics of shooting and want to ensure your final output matches what you see on screen, understanding export settings is the natural next step. It pairs well with learning how to become a better photographer — because technical excellence extends all the way through your post-processing pipeline.
Contents
Understanding How Lightroom Export Works
Before diving into specific numbers, you need to understand what happens under the hood when you hit that Export button. Lightroom stores your edits as metadata instructions attached to your original file — it never touches the original pixels. When you export, Lightroom renders a brand-new file by applying all your adjustments, then compresses and resizes it according to your chosen settings.
Color Space and File Format Basics
Your choice of color space determines how many colors your exported file can represent. For web use, sRGB is the universal standard — every browser and screen assumes sRGB unless told otherwise. For print, Adobe RGB or ProPhoto RGB gives you a wider gamut that print labs can leverage for richer output.
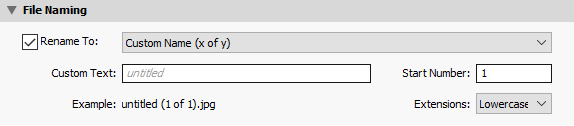
File format matters equally. JPEG works for the vast majority of web and print use cases. TIFF is the go-to when your print lab wants maximum quality with no compression artifacts. PNG is rarely needed for photographs — save it for graphics with transparency.
Why Export Is Non-Destructive
Here's the reassuring part: you can export the same image fifty different ways without ever degrading your source file. Your catalog preserves every edit. This means you should feel free to experiment with different settings until you find what works for each destination.
Pro tip: Always export a test file at your chosen settings and view it on the actual device or platform where it'll be displayed. What looks perfect in Lightroom might shift once a browser or social platform recompresses it.
Optimal Export Settings for Web and Social Media
Web output is all about balancing visual quality against file size. Nobody waits for a 15MB image to load on a blog post, and search engines penalize slow-loading pages. Your goal is the smallest file that still looks sharp at the display size.
Resolution and Sizing for Screens
For web, resolution (PPI) is meaningless — screens display pixels at their native density regardless of what the file metadata says. What matters is pixel dimensions. For a full-width blog image, 2048 pixels on the long edge covers retina displays comfortably. For social media thumbnails, 1080–1200 pixels is sufficient.
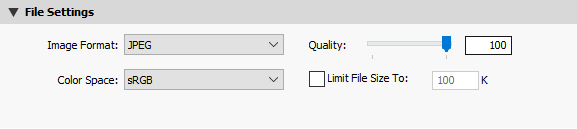
Set quality between 76–82% for JPEG. Below 70% you'll notice banding in skies and gradients. Above 85% you're adding file size with virtually no visible improvement. This is one of those cases where the numbers matter more than your instinct to crank everything to maximum.
Output Sharpening for Web
Downsizing inherently softens an image, so Lightroom's output sharpening compensates. Select "Sharpen for Screen" at Standard amount. If you've already applied heavy sharpening in the Develop module, drop to Low to avoid halos.

Configuring Lightroom Export Settings for Print
Print demands a completely different approach. You're no longer constrained by bandwidth — you want every pixel of detail your sensor captured, rendered with the widest color range your lab can reproduce.
DPI and File Size for Print Labs
Unlike web, resolution does matter for print. Most labs request 300 DPI at the final print dimensions. For a 20×30 inch print, that means you need a file at least 6000×9000 pixels. If your camera doesn't produce enough resolution natively, export at 100% size and let the lab handle upscaling — they have better algorithms than Lightroom's resize.
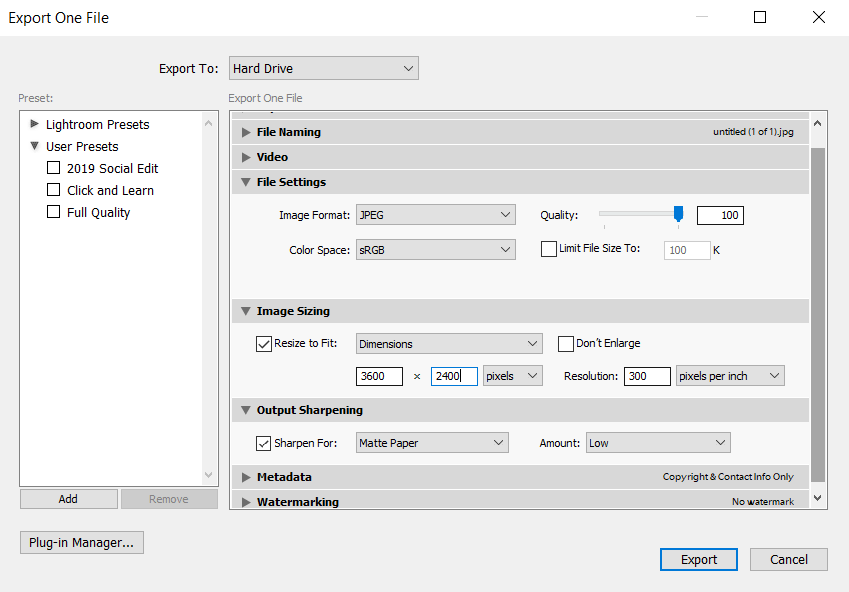
Set JPEG quality to 100% for print, or better yet, export as TIFF with no compression. The file will be large — 50–100MB is normal for a full-resolution TIFF — but print labs expect this and their upload systems handle it fine.
Color Space Selection for Print
Choose Adobe RGB (1998) for print unless your lab specifically requests something else. This gives you roughly 35% more reproducible colors than sRGB in the green and cyan range — exactly where landscape photography lives. If you shoot landscapes on location, those rich forest greens and deep ocean blues will thank you.
Warning: Never export in ProPhoto RGB for print unless your lab explicitly confirms they support it. An unmanaged ProPhoto file printed in sRGB will look washed out and flat.
Step-by-Step Export Walkthrough
Let's walk through the entire export dialog panel by panel so you know exactly what to click for each scenario.
Exporting for Web
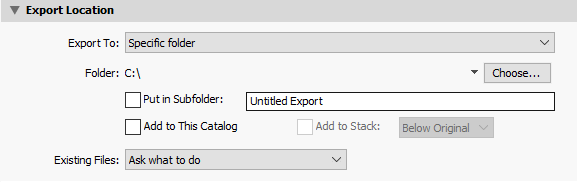
Select your images in the Library module and press Ctrl+Shift+E (Cmd+Shift+E on Mac) to open the Export dialog. In the Export Location panel, choose a dedicated "Web Exports" folder so you never accidentally upload a full-resolution file. Under File Naming, use a custom template with your slug — this helps with SEO when you upload to your site.

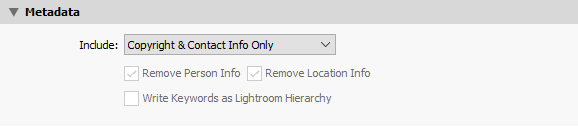
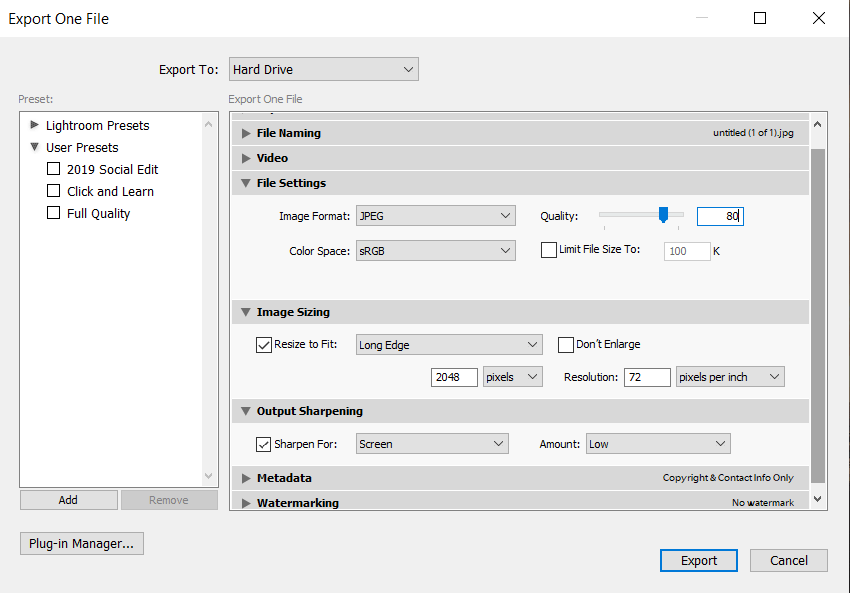
In File Settings, select JPEG, sRGB color space, quality 80. Under Image Sizing, check "Resize to Fit" and choose "Long Edge" at 2048 pixels. Don't check "Don't Enlarge" — if an image is already smaller, you want to leave it alone. Under Output Sharpening, select Screen at Standard. Under Metadata, choose "Copyright Only" to strip location data and camera serial numbers from public files.

Exporting for Print
Same starting point, different choices. File Settings: TIFF, Adobe RGB, no compression (or JPEG at 100% if your lab prefers it). Image Sizing: uncheck "Resize to Fit" entirely — export at full resolution. Set resolution to 300 pixels per inch. Output Sharpening: select "Matte" or "Glossy" depending on your paper choice, at Standard strength.
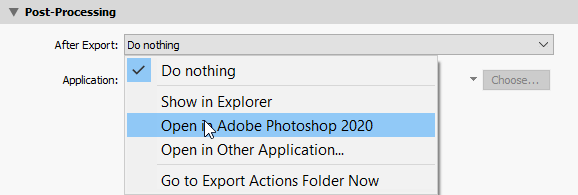
For metadata on print files, you can include all metadata — the lab won't publish it anywhere, and IPTC data helps them identify your order if something goes wrong.
Common Export Mistakes That Ruin Your Photos
Even experienced photographers make these errors. Each one silently degrades your images without any warning from Lightroom.
Quality and Compression Errors
The number one mistake is exporting at 100% quality for web. It sounds counterintuitive, but a 100% JPEG is typically 3–5x larger than an 80% JPEG with no visible difference on screen. You're punishing your viewers' bandwidth for zero visual payoff. Similarly, exporting for print at less than 100% quality is leaving detail on the table for a file size savings that doesn't matter when you're uploading to a lab.
Another common error: choosing the wrong color space. Export in Adobe RGB for web and most browsers will display your vibrant sunset as a dull, desaturated mess because they assume sRGB. This happens constantly with photographers who know enough to shoot in Adobe RGB but forget to convert on export.
Metadata and Naming Oversights
Leaving full EXIF data in web exports broadcasts your GPS coordinates, camera serial number, and editing history to anyone who downloads your image. For client wedding or event photography, this is a privacy liability. Always strip metadata to "Copyright Only" for any public-facing file.
Poor file naming is equally problematic. "IMG_4523.jpg" tells search engines nothing. Use descriptive names with hyphens — "sunset-over-santorini-landscape.jpg" — and Lightroom's file naming templates make this automatic.
| Setting | Web Export | Print Export |
|---|---|---|
| Format | JPEG | TIFF or JPEG |
| Color Space | sRGB | Adobe RGB (1998) |
| Quality | 76–82% | 100% |
| Long Edge | 2048 px | Full resolution (no resize) |
| Resolution | 72 PPI (irrelevant) | 300 PPI |
| Sharpening | Screen, Standard | Matte/Glossy, Standard |
| Metadata | Copyright Only | All |
| Typical File Size | 500 KB – 2 MB | 30 – 100 MB |
Building Export Presets to Save Time
Once you've dialed in your perfect settings, the last thing you want is to configure them manually every time. Export presets eliminate repetitive decisions and ensure consistency across your entire library.
Creating Your First Preset
Configure all your settings for a specific use case — let's start with web. Before clicking Export, look at the bottom-left of the dialog. Click "Add" in the Preset panel. Give it a clear name like "Web – Blog 2048px sRGB" and click Create. From now on, one click applies all those settings instantly.
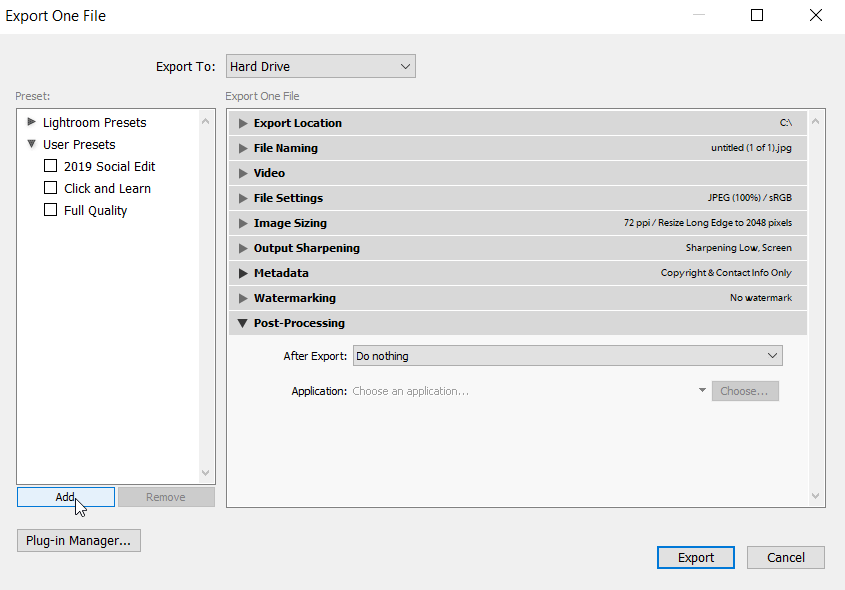
If you already have Lightroom presets installed for your develop module, think of export presets the same way — they standardize your output workflow just like develop presets standardize your editing starting points.
Organizing Presets by Use Case
Create a folder structure that mirrors your actual workflow. I recommend these as a starting set:
- Web – Blog Full Width (2048px, sRGB, 80%, Screen sharpening)
- Web – Social Media (1200px, sRGB, 85%, Screen sharpening)
- Print – Fine Art Lab (Full res, Adobe RGB, TIFF, Matte sharpening)
- Print – Client Delivery (Full res, sRGB, JPEG 100%, no sharpening)
- Archive – Full Quality (Full res, ProPhoto, TIFF, no sharpening)
The five minutes you spend building export presets today will save you hundreds of decisions over the life of your photography practice. Set them up once and never think about export settings again.
Frequently Asked Questions
What quality setting should I use for web exports in Lightroom?
Set JPEG quality between 76–82% for web. This range produces files under 2MB with no visible quality loss on screens. Going above 85% adds significant file size without any perceptible improvement to viewers.
Does PPI matter for web images?
No. Screens display images based on pixel dimensions, not PPI metadata. A 2048-pixel-wide image displays identically whether marked as 72 PPI or 300 PPI. PPI only matters when calculating physical print dimensions.
Should I export in Adobe RGB or sRGB for web?
Always sRGB for web. Most browsers and devices assume sRGB. Exporting in Adobe RGB without an embedded profile causes colors to display incorrectly — typically appearing desaturated and flat.
What resolution do print labs require?
Most professional print labs request 300 DPI at final print size. For a 16×20 inch print, that means 4800×6000 pixels minimum. If your file is smaller, export at full resolution and let the lab handle upscaling with their professional software.
Can I use the same export settings for Instagram and my website?
You can, but ideally you'd use slightly different sizing. Instagram recompresses everything, so exporting at 1080px wide and 85% quality gives the best results after their processing. For your website, 2048px at 80% provides sharper full-screen viewing.
How do I strip location data from exported photos?
In the Metadata panel of the Export dialog, select "Copyright Only" or "Copyright & Contact Info Only." This removes GPS coordinates, camera serial numbers, and other sensitive EXIF data while preserving your copyright notice.
Your editing is only as good as your export — nail the settings once, save them as presets, and let your images speak for themselves everywhere they appear.
 |
 |
 |
 |

About Alex W.
Alex is a landscape, equine, and pet photographer based in the Lake District, UK, with years of experience shooting in one of Britain's most photographically demanding natural environments. His work has been featured in Take a View Landscape Photographer of the Year, Outdoor Photographer of the Year, and Amateur Photographer Magazine — publications that reflect a serious, competitive standard of image-making. At Click and Learn Photography, he shares the camera settings, gear choices, and compositional techniques he has developed through real-world shooting and competition-level work.
You can Get FREE Gifts. Furthermore, Free Items here. Disable Ad Blocker to receive them all.
Once done, hit anything below
|
|
|
|