Shutter Speed Chart / Cheat Sheet – Get to Grips with Shutter Speed
by Alex W.
Following on from our popular F-Stop Chart Infographic, we bring you our handy Shutter Speed Chart Infographic / Cheat Sheet.
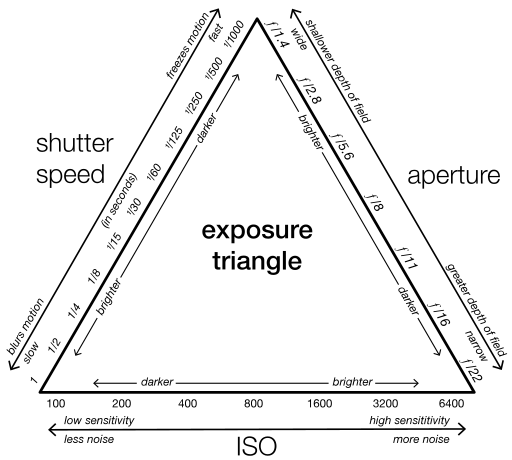
You may have picked up all the basics of the Exposure Triangle from this site already, but delving into a deeper understanding of the three pillars of exposure is never a bad idea.
Knowing all about aperture, shutter speed and ISO opens up a world of artistic opportunities, such as the use of creative motion blur in your photography that we talked about recently.
Our F-Stop Chart got heaps of positive feedback from those of you who prefer visual learning, so we thought it was only fair to bring you a shutter speed chart too!
So here it is! You can refer back to this Shutter Speed Chart throughout this article, save it for future reference or even print it out.
Contents
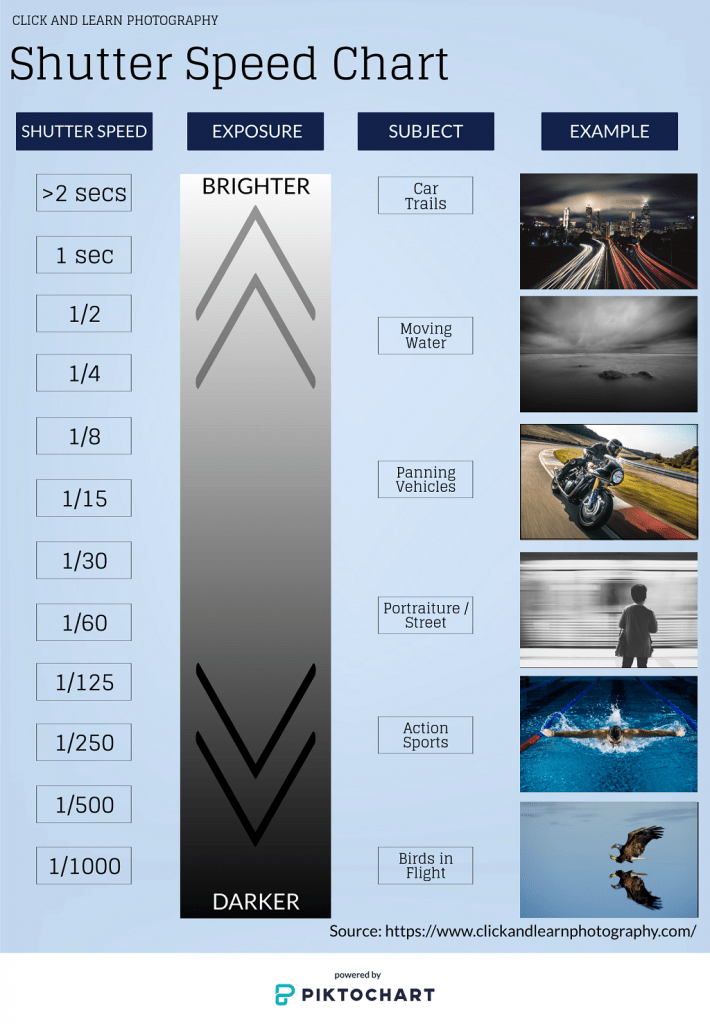
Shutter Speed Chart Infographic
Shutter Speed Explained
Unlike apertures and f-stops, shutter speed is actually very simple to explain - It's just the length of time that the shutter inside your camera stays open, exposing the sensor to light and capturing an image.
As long as you have a working knowledge of the Exposure Triangle, you should find this pretty easy. Just remember, if you double your shutter speed, you then need to either stop down your aperture or half your ISO to maintain the initial exposure and vice versa.
Despite its simplicity, variations in shutter speed can both open new creative avenues and introduce some potential problems.
Problem - Camera Shake
Unless you're practising Intentional Camera Movement, camera shake is an issue you want to avoid.
No matter how steady your hands are, there will come a point where the shutter speed is too slow and the movement of the camera during exposure introduces camera shake. The result is often a completely ruined, blurry image.
There are two ways to avoid this:
- Use a tripod to stabilize the camera.
- Increase the shutter speed to counteract the hand movement.
How fast should my shutter speed be when hand holding?
There's a simple rule of thumb that works in the vast majority of situations. You can calculate the maximum usable shutter speed with the formula 1/focal length.
So using a trusty Nifty Fifty lens (50mm focal length) would yield a maximum usable exposure time of 1/50 second ( 1 divided by 50).
A 15mm wide-angle lens would be 1/15 second, while a 300mm telephoto would be 1/300 second.
Basically, the longer the focal length, the faster you need your shutter speed if you want to use it hand held. Simple, right?
Camera Shake vs Subject Movement
There are two types of movements that might have an impact on how sharp an image looks. The first one is directly related to your camera. The other one is only indirectly related because it's all about how your subject moves.
Camera movement can result from vibration, impact or simply the slight movements our hands make when holding the camera. These cause blur in an image by causing a longer exposure than necessary which might sound counter-intuitive at first but makes sense if you think about it for a second. A longer exposure will allow more light to hit the sensor and produce brighter photos so why would we want to avoid that? The problem is that this also means there are more chances of movement occurring during the exposure which will show up in photos as blur.
Two comments about these kinds of camera shake:
It's usually easier to get sharp images at low ISOs because of reduced noise. This is the only time where using a tripod is not necessary. Of course, it's certainly better to use one but if you can't, try to keep your ISO as low as possible.
You have no control over movements made by your subject so anything they do will contribute to blur in an image. Keep this in mind when choosing aperture, focus mode etc.
Opportunity - Long Exposure Photography
The potential for blurring may be a problem when hand holding the camera, but once it's mounted on a tripod that problem transforms into an opportunity.
We can use the moving elements within a scene to creatively introduce motion blur to our images.
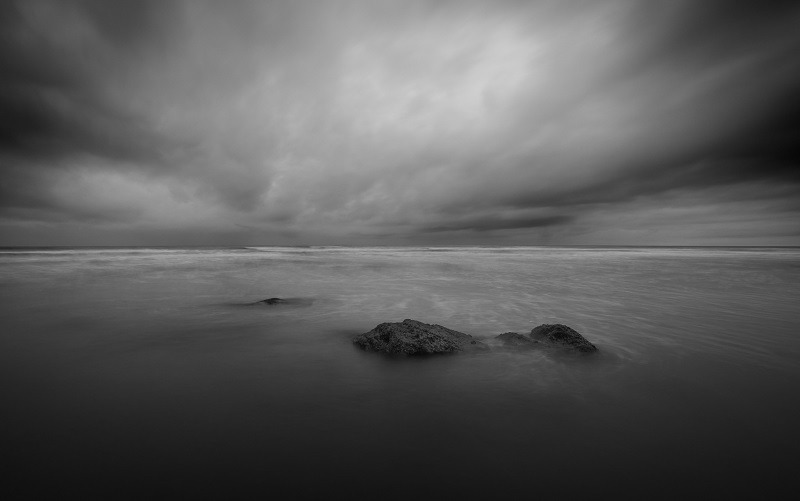
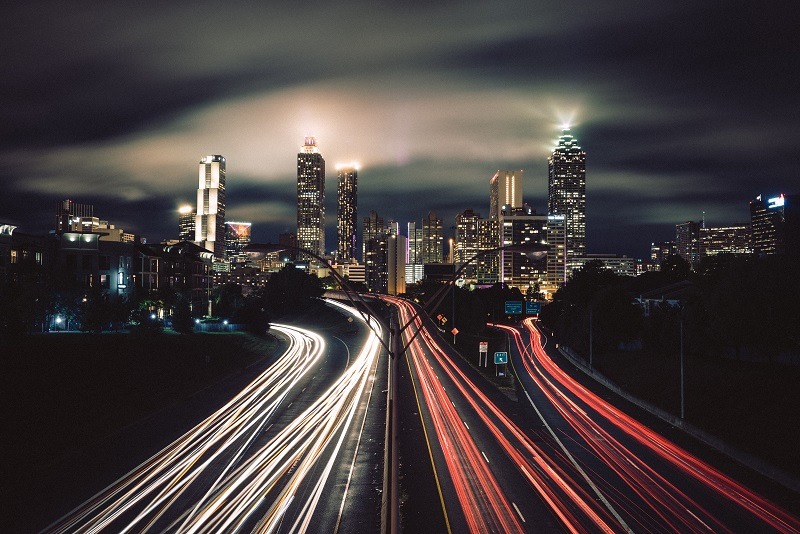
This can be anything from dreamy, ethereal landscapes that blur the water and clouds into a silky-smooth mist to bustling cityscapes full of streaks of light created by car headlights.
Opportunity - Panning
Panning is a technique where you track the movement of a subject with your camera and capture an image using a relatively slow shutter speed.
When done correctly, this results in a moving subject being sharp while the background is blurred, evoking a sense of movement and speed.
The shutter speeds used depend entirely on the speed of the subject and your accuracy in tracking that subject.
For example, a Formula 1 car is moving so fast that a shorter shutter speed of around 1/100 second would be enough to convey movement, whereas a person walking down the street would require a much slower shutter speed of around 1/4 second.
Opportunity - Intentional Camera Movement
You know I said about camera shake being something to avoid a short while ago? Well…. Maybe don't always avoid it.
Intentional Camera Movement (or ICM) is a technique where we move the camera… Yep, you guessed it: Intentionally.
We do this while using a relatively long shutter speed, introducing extreme levels of camera shake to create abstract images of our subject.
It's very much a trial and error approach, so experiment with your shutter speed, subjects and the type of movement you do with the camera.
You can find more about all of these techniques here.

There you have it, a quick guide to shutter speed. You can also find some examples of what type of subject works well with certain exposure times on the right hand side of our shutter speed chart, so make good use of it!
Along with our F-Stop Chart, you should be well on your way to mastering the Exposure Triangle now!
The Different Types of Shutter Speed and When to Use Them
People taking pictures with iphones usually don't have manual settings on their cameras because it takes away from the iphone's simplicity. People who use point-and-shoot cameras usually only have aperture priority settings, not full manual controls. These cameras do not allow you to do everything that a DSLR does though. For maximum control over your camera, DSLRs are recommended. I'm going to talk about shutter speed now! Before I get into all of the technical details, you need to understand how shutter speed works. A camera has two shutters that are located on the front of the lens. This is what they look like:
The top one opens when you take a picture, letting in light; it then closes right before taking another exposure. The bottom one lets in light during preview (when you look through your viewfinder). That's why there's no scene in your previews when taking pictures without flash. It only needs the bottom shutter when it's trying to focus (it tries to focus by sending out some kind of "preview" or something - I'm not sure exactly how this works), and then that individual exposure occurs after the full exposure time (which can be different for each exposure if you're using shutter priority). So, the bottom shutter opens and closes twice - first to focus and then to take a picture. The top one always stays open.
Now that we've got that out of the way, let's talk about different types of shutter speed!
The different types of shutter speed are as follows:
1/8000 sec (or faster!)
1/4000 sec (also very fast!)
1/2000 sec (very slightly slower than 1/4000 and faster than 1/6000)
1/1500 sec (same as above but slower than 4000) 5) 1/1000 sec (slightly slower than 2000 and faster than 1500!) 6) 1/500 sec (slower than 1500 but faster than 1000!)
1/250 sec (slower than 500 and slightly slower than 1/1000!)
1/125 sec (slower that 250 and also slishtly slower thon n 125!!!!) 9) 1/60 sec (slower than 125 but still able to take a picture of a moving car pretty well, any more movement by the car and you'll have a blurry image though.)
1/30 sec (the same as 60 except twice as slow so you can get half as much light on your sensor. 30 is not really recommended ever because it's just too slow for most situations).
1/15 sec (see above)
1/8 sec (I think this is about the slowest you can go without any kind of tripod or stabilizer - it will definitely be blurred if there's any kind of zoom to the picture).
1/4 sec (this speed is just slightly slower than 8 and also requires a steady hand or some sort of tripod).
I hope that helps clear things up! Most people don't understand exactly what shutter speed is, but hopefully now you're on your way. Remember that these are general speeds, they might not always work for everything, but they should give you an idea of what your settings are doing at all times.
How to Change the Shutter Speed on Your Camera

The shutter speed on your camera controls how long the camera's shutter is open while taking a picture. This has a lot to do with whether or not you have any light showing in the photo, and how much of that light shows up in the shot. If you want to capture fast movement, for example during sports, then you will need a shorter shutter speed - but if there isn't enough light available, it might make more sense to choose a longer shutter speed so that more of the picture can be seen.
Shutter speeds are usually between 15 seconds and 1/4000th of a second. There are faster shutter speeds available on very high-end cameras which allow exposures as short as 1/8000th of a second.
Shutter Speed May Be Adjusted in Fractions
Depending on the brand and model of camera, shutter speed may be adjusted in fractions (1/250) or in full stops (200, 400, 800). It can be set to any speed between these numbers.
The best place to start is the manufacturer's recommendations for your make and model. One thing you will notice though when looking at recommendations from different brands is that there is not much consistency between them; Canon typically suggests a 1/60th setting when other manufacturers may suggest something like 1/250th. This means that you might need to experiment with your own settings before getting the right balance. Don't worry though - with experience this will become second nature and you'll be able to accurately adjust the shutter speed before a shot without needing to think about it too much.
A Good Starting Point Is the 's' Setting on Your Camera Dial
If you're not sure what shutter speed to use, a good starting point is the 's' setting on your camera dial. This means "let the camera choose". It will usually pick an appropriate setting if for instance for sports it uses a faster shutter speed and for sunsets or other bright scenes it will use a slower one.
In the old days, photographers used film which had different speeds - ISO 100 was brighter than ISO 400, producing darker photos in low light conditions. Speed settings have been replaced by digital technology with something called ISO numbers. The larger the number, the more sensitive the sensor becomes to light and vice versa. This sort of works like film speed, but because there is no exact correlation it's not really possible to pick the best speeds for your camera. The 's' setting on the other hand will always set an appropriate speed for your particular situation.
It can be difficult trying to choose between shutter speeds when you're just starting out with photography, so another option is to use a tripod and go for one long exposure shot. If this is too limiting then you should at least take two shots with different settings so that you have some choice. That way if one photo doesn't turn out as planned, you'll still have something usable to work with.
Generally speaking, shutter speeds are used in fractions (1/4) or full stops (100, 200, 400). The "standard" shutter speed in photography is at least 1/60th of a second.
The Lower the Number of Your Shutter Speed Setting, the More Light It Will Allow Onto Your Sensor and Vice Versa
It's important to note that the lower the number of your shutter speed setting, the more light it will allow onto your sensor and vice versa. Lower speeds are good for helping take photos in dark environments without a flash. If you use a high speed setting your images might be too bright or blown out if there isn't enough available light.
If you want to get creative with capturing motion then really short shutters speeds might come in handy - but bear in mind that using these can produce an image which looks like it has been taken from a movie sequence such as when someone jumps up into the air. Experiment with different speeds to see what works for your shot!
Light trails are some of the most interesting images captured with fast shutter speeds. If you have a camera which enables you to select shutter speeds down into one-thirtieth or one-sixtieth of a second then try pointing it at any bright light source and taking a long exposure shot. You'll be able to capture all sorts of interesting patterns in lights, whether they're traffic trails at night, stars moving across the sky or even someone swinging a torch in their garden after dark. It's an incredibly simple technique but really effective when used properly.
Different Types of Lighting and Various Settings Such as Aperture and Iso
Try experimenting with different types of lighting and various settings such as aperture and ISO too and see how these affect your photos.
Shutter speeds are really useful when taking photos of small children. If you use a shutter speed which is slower than 1/100th of a second the child's movement will start to become blurred while they are in mid-jump or on the move, making for more interesting images.
Examples of Photos Taken With Different Shutter Speeds
Example of Photos with 1/30 Shutter Speed

Example of Photos with 1/60 Shutter Speed

Example of Photos with 1/125 Shutter Speed

Example of Photos with 1/250 Shutter Speed

Example of Photos with 1/500 Shutter Speed

Read More…
Ultimate Guide to Landscape Photography Ebook
Must Have Lenses for Your Nikon DSLR
5 Best Lenses for Food Photography
The 6 Best Portable Photo Printers
 |
 |
 |
 |

About Alex W.
Alex is the owner and lead writer for Click and Learn Photography. An avid landscape, equine, and pet photographer living and working in the beautiful Lake District, UK, Alex has had his work featured in a number of high profile publications, including the Take a View Landscape Photographer of the Year, Outdoor Photographer of the Year, and Amateur Photographer Magazine.
You can Get FREE Gifts. Furthermore, Free Items here. Disable Ad Blocker to receive them all.
Once done, hit anything below
|
|
|
|