Last summer, I stood on a clifftop in Cornwall watching golden hour light pour across the coastline — and every single frame came back either blown out or muddy. The problem wasn't my composition or my camera. It was my aperture. If you're struggling with the same frustration, this aperture f-stop photography guide will give you the clarity you need. Whether you're just getting comfortable with manual mode or you've been shooting for years and want tighter control over depth of field, understanding f-stops is the single biggest lever you can pull for better images. For more foundational knowledge, check out our ultimate guides section.
Aperture controls how much light enters your lens and how much of your scene stays in focus. Get it wrong and you'll fight your camera all day. Get it right and your images start doing what you actually intended. This guide breaks down every f-stop on the chart, explains when to use each one, and gives you practical fixes for the most common aperture problems photographers face.
Contents
- Understanding F-Stops: From First Click to Full Control
- Wide Open vs Stopped Down: Strengths and Trade-Offs
- Your Aperture F-Stop Photography Guide to the Exposure Triangle
- F-Stop Mistakes That Ruin Otherwise Great Shots
- Fixing Soft Images and Exposure Problems
- Building Aperture Mastery Over Time
- Aperture Settings You Can Use Today
- Frequently Asked Questions
- Next Steps
Understanding F-Stops: From First Click to Full Control
What Are F-Stops, Exactly?
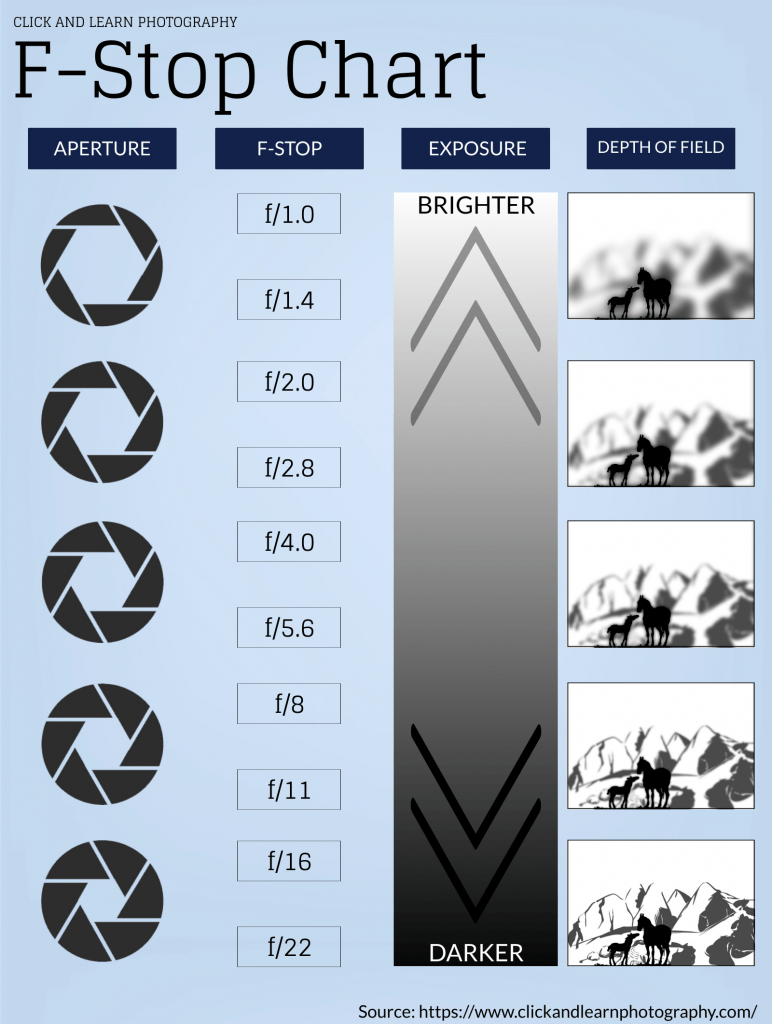
An f-stop is a ratio. It describes the size of your lens's aperture opening relative to the lens's focal length. The "f" stands for focal length, so f/2.8 on a 100mm lens means the aperture opening is roughly 36mm wide. The number gets larger as the opening gets smaller — that's the part that trips up every beginner.
Think of it like a fraction. F/2 is a bigger opening than f/16, just like 1/2 is bigger than 1/16. A wider opening lets in more light and produces a shallower depth of field. A narrower opening lets in less light but keeps more of your scene sharp from front to back.
The F-Stop Scale Decoded
The standard f-stop scale follows a specific mathematical sequence. Each full stop either doubles or halves the amount of light hitting your sensor. Here's the full-stop sequence you'll encounter on most lenses:
| F-Stop | Light | Depth of Field | Typical Use |
|---|---|---|---|
| f/1.4 | Maximum | Very shallow | Low light portraits, bokeh |
| f/2.8 | High | Shallow | Indoor events, portraits |
| f/4 | Moderate-high | Moderate | General shooting, travel |
| f/5.6 | Moderate | Moderate | Group photos, outdoor portraits |
| f/8 | Moderate-low | Deep | Landscapes, street |
| f/11 | Low | Very deep | Landscapes, architecture |
| f/16 | Very low | Near-total | Maximum sharpness landscapes |
| f/22 | Minimal | Total | Sunstars, extreme depth |
Wide Open vs Stopped Down: Strengths and Trade-Offs
When to Shoot Wide Open
Shooting at f/1.4 to f/2.8 gives you two advantages: more light and subject isolation. You separate your subject from a distracting background, and you can shoot handheld in dimmer conditions without cranking your ISO into noisy territory. Portrait photographers live at these apertures for good reason. Wedding shooters especially rely on wide apertures during receptions and ceremonies where flash isn't welcome — our guide on mastering wedding confetti shots covers this in detail.
The trade-off is razor-thin focus. At f/1.4, even a slight sway forward can shift focus from your subject's eyes to their ears. You need precise autofocus or careful manual technique.
When to Stop Down
Landscape photographers typically shoot between f/8 and f/16 to keep everything from the foreground rocks to the distant mountains acceptably sharp. F/8 to f/11 is the sweet spot on most lenses — peak optical sharpness with deep depth of field. If you're serious about landscape work, our landscape camera settings guide walks through the exact settings for different conditions.
Beyond f/16, you start fighting diffraction — a physics phenomenon where light waves bend around the tiny aperture opening and actually reduce sharpness. More isn't always better.
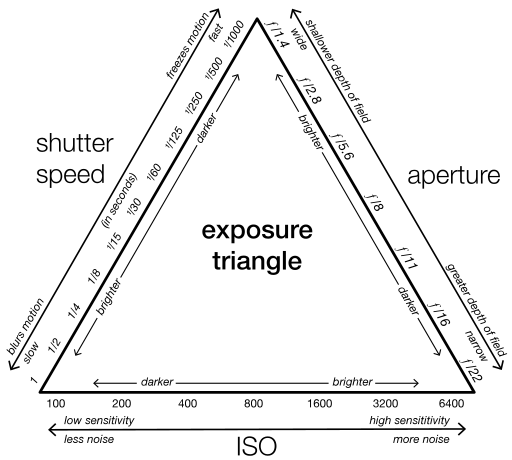
Your Aperture F-Stop Photography Guide to the Exposure Triangle
Balancing Aperture, Shutter Speed, and ISO
Aperture never works alone. Every time you change your f-stop, you affect exposure, which means you need to compensate with either shutter speed or ISO. Open up from f/8 to f/4 and you've let in four times more light — your image will be overexposed unless you speed up your shutter or drop your ISO.

This is exactly why Aperture Priority mode (A or Av) is so powerful. You choose your f-stop based on the depth of field you want, and the camera handles shutter speed automatically. It's the fastest way to take creative control without managing every variable manually.
When you're working in full manual mode, think of aperture as your starting point. Set the depth of field you need first, then adjust shutter speed for motion, and use ISO as the final lever to nail exposure.
F-Stop Mistakes That Ruin Otherwise Great Shots
The most common mistake is always shooting wide open. Yes, f/1.8 gives gorgeous bokeh, but if you're photographing two people standing at slightly different distances, one of them will be soft. For group shots, close down to at least f/5.6.
Another frequent error is ignoring your lens's sharpest aperture. Every lens has a sweet spot, usually two to three stops down from wide open. A 50mm f/1.8 lens produces noticeably sharper images at f/4 than at f/1.8. Test yours — shoot a detailed subject at every full stop and compare at 100% zoom.
Pro tip: If your images look soft and you're already at f/11 or narrower, diffraction is likely the culprit. Open up one or two stops before blaming your lens or autofocus.
Forgetting to check your aperture after switching scenes catches even experienced photographers. You walk from a bright outdoor setting into a dim interior and wonder why your shutter speed dropped to 1/15s — because you're still at f/11 from the landscape you just shot.
Fixing Soft Images and Exposure Problems
Soft images at wide apertures usually mean missed focus, not a bad lens. Switch to single-point autofocus and place that point directly on your subject's eye. At f/1.4, the depth of field can be thinner than a centimeter at close range, so back-button focus gives you better hit rates than half-pressing the shutter.
Diffraction and the Sharpness Sweet Spot
If your landscape shots look soft at f/22, you've pushed past the diffraction limit. On APS-C sensors, diffraction typically becomes visible around f/11 to f/13. On full frame, you have a bit more room — usually f/13 to f/16. Micro Four Thirds shooters see it even earlier, around f/8 to f/10.
When you need maximum depth of field without diffraction softness, use hyperfocal distance focusing. Focus one-third into your scene at f/8 or f/11 and you'll keep everything from a few feet away to infinity acceptably sharp — no need to stop down to f/22.
Building Aperture Mastery Over Time
Real aperture mastery comes from deliberate practice, not from reading charts. Start by spending an entire week shooting only in Aperture Priority. Force yourself to consciously choose an f-stop before every shot instead of leaving it on auto.
Next, learn your specific lenses. Each one behaves differently. A kit 18-55mm at f/5.6 performs differently than a prime 35mm at f/5.6 — corner sharpness, vignetting, and bokeh quality all vary. Shoot test charts if you're serious, or simply pay attention to your results over time.
Build a personal reference library. When you nail a shot, note the aperture in the EXIF data and remember why it worked. After a few months, you'll instinctively know that your 85mm at f/2 gives you exactly the look you want for headshots, or that your wide-angle at f/9 handles architecture perfectly. This instinct is faster and more reliable than any chart.
Once you're comfortable with aperture's effect on depth of field, explore its creative possibilities. Shoot through foreground elements at wide apertures for dreamy framing. Use narrow apertures with a strong point light source to create sunstars. Push your understanding of how aperture interacts with focal length and subject distance to build your own visual style.
Aperture Settings You Can Use Today
You don't need to master every f-stop to see immediate improvement. Here are the settings that cover the vast majority of shooting situations:
- Portraits: f/2.8 for single subjects, f/4 for couples, f/5.6 or higher for groups
- Landscapes: f/8 to f/11 for maximum sharpness across the frame
- Street photography: f/8 for zone focusing — pre-focus at a set distance and shoot without autofocus delay
- Low light without flash: Wide open (whatever your lens's maximum aperture is), combined with a higher ISO
- Product and food: f/4 to f/5.6 for selective focus with enough detail in the subject
Set your camera to Aperture Priority right now. Pick one of these settings based on what you're shooting today. Pay attention to the background blur and the sharpness of your subject. Adjust by one stop if needed. That single change — choosing your aperture intentionally — will improve your images more than any piece of gear you could buy.
Frequently Asked Questions
What f-stop should I use for sharp landscape photos?
Use f/8 to f/11 for the sharpest results on most lenses. These apertures avoid diffraction softness while providing deep depth of field. Pair this with hyperfocal distance focusing to keep everything from your foreground to the horizon in sharp focus without stopping down further.
Why do lower f-stop numbers mean a bigger aperture opening?
Because the f-number is a fraction — it represents the focal length divided by the aperture diameter. So f/2 on a 100mm lens means a 50mm opening, while f/16 means only a 6.25mm opening. The larger the denominator, the smaller the result. Once you think of it as a fraction, the numbering makes intuitive sense.
Is a lens with a lower maximum f-stop always better?
Not necessarily. Lenses with wider maximum apertures (f/1.4, f/1.2) allow more light and shallower depth of field, but they're heavier, more expensive, and often softer wide open compared to their performance when stopped down. An f/1.8 prime delivers excellent results at a fraction of the cost and weight of an f/1.2 equivalent. Choose based on your actual shooting needs.
Next Steps
- Set your camera to Aperture Priority mode right now and shoot 20 frames of the same subject at five different f-stops (f/2.8, f/4, f/8, f/11, f/16). Compare the results at 100% zoom on your computer to see how depth of field and sharpness change.
- Find your lens's sweet spot by photographing a detailed, flat surface (a newspaper or bookshelf works) at every full f-stop. Note which aperture produces the sharpest corners — that's your go-to setting for critical sharpness.
- Practice the five quick-win aperture presets from this guide on your next shoot. Before each frame, consciously decide your f-stop based on the subject, then check the result immediately. Build the habit of choosing aperture first.
- Read our guide on shooting in manual mode to take full control over all three exposure variables once you're confident with aperture.
 |
 |
 |
 |

About Alex W.
Alex is a landscape, equine, and pet photographer based in the Lake District, UK, with years of experience shooting in one of Britain's most photographically demanding natural environments. His work has been featured in Take a View Landscape Photographer of the Year, Outdoor Photographer of the Year, and Amateur Photographer Magazine — publications that reflect a serious, competitive standard of image-making. At Click and Learn Photography, he shares the camera settings, gear choices, and compositional techniques he has developed through real-world shooting and competition-level work.
You can Get FREE Gifts. Furthermore, Free Items here. Disable Ad Blocker to receive them all.
Once done, hit anything below
|
|
|
|