Shutter Speed Chart: A Complete Cheat Sheet for Photographers
by Alex W.
What separates a tack-sharp action shot from a silky-smooth waterfall image? The answer almost always comes down to one setting: shutter speed. A reliable shutter speed chart photographers can reference in the field eliminates guesswork and builds the kind of muscle memory that turns manual mode into second nature. Our team at ClickAndLearnPhotography has spent years refining the cheat sheet below, and we consider it one of the most valuable references in our ultimate guides collection for anyone serious about controlling exposure and motion.
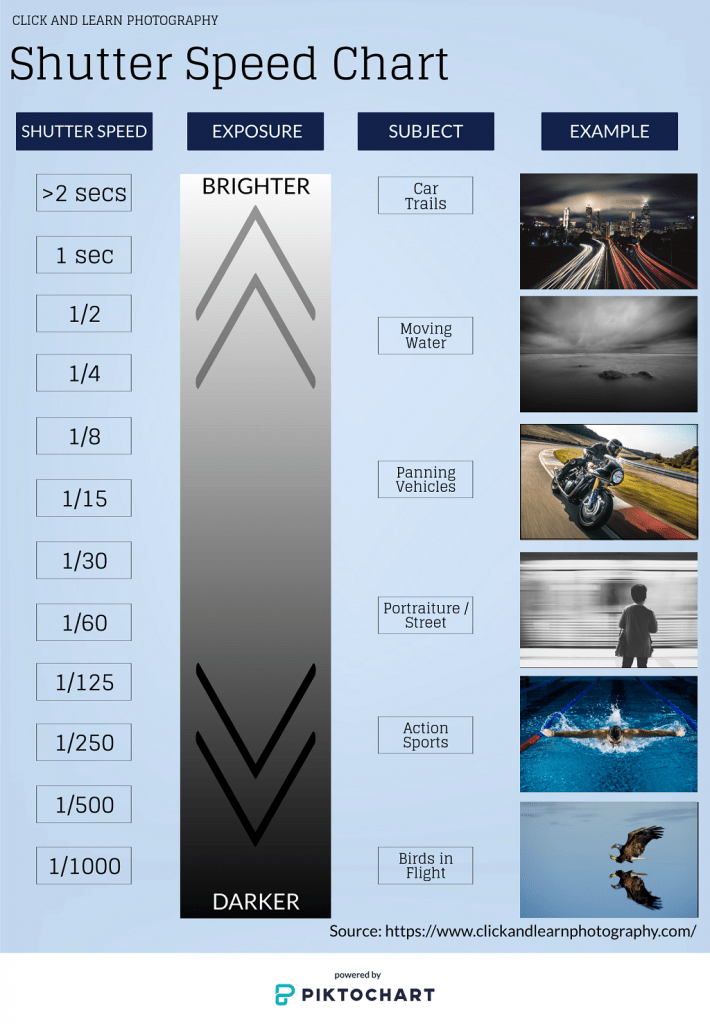
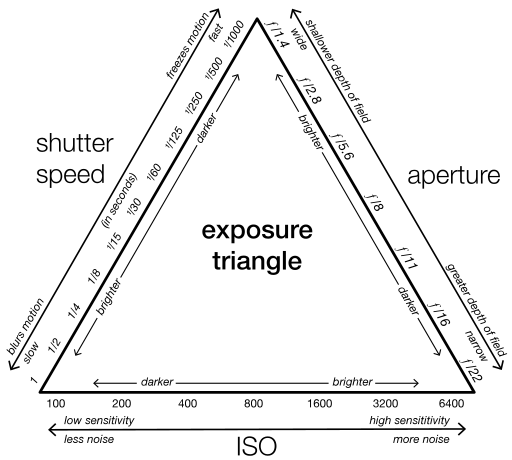
Shutter speed is one leg of the exposure triangle, working alongside aperture and ISO to determine how much light reaches the sensor. Our experience shows that most photographers grasp aperture and ISO fairly quickly, but shutter speed trips people up because it controls two things simultaneously — exposure brightness and motion rendering. The chart above condenses the full range from 30-second long exposures to a blazing 1/4000 s into a single visual reference.
Contents
Essential Gear for Shutter Speed Control
Having the right shutter speed chart is only half the equation — our team has found that certain accessories make it far easier to execute at both ends of the speed range. Without the proper support gear, even perfect settings produce disappointing results.
Tripods and Remote Triggers
Any exposure longer than about 1/60 s when shooting handheld risks camera shake, and that threshold drops even further with telephoto lenses. Our recommended kit for long-exposure work includes:
- A sturdy tripod rated for at least 1.5× the weight of the heaviest body-and-lens combo in the bag — our tripod buying guide covers this in detail
- A wired or wireless remote shutter release to eliminate vibration from pressing the shutter button physically
- Mirror lock-up or electronic front-curtain shutter enabled in the camera menu to reduce internal vibration on DSLRs
- A sturdy L-bracket for quick switches between landscape and portrait orientation without rebalancing the head
ND Filters for Daylight Long Exposures
Shooting a 2-second waterfall exposure in bright daylight is impossible at base ISO without an ND filter, because the sensor would be massively overexposed. Our team keeps a 6-stop and a 10-stop ND in every landscape kit, and we often stack them for exposures beyond 30 seconds. The math is straightforward: each stop of ND doubles the required shutter speed, so a properly exposed scene at 1/125 s becomes roughly 8 seconds with a 10-stop filter attached.
Shutter Speed Chart for Every Shooting Scenario
The table below is the core shutter speed chart photographers on our team reference most often, organized by subject and the visual effect each speed range produces.
| Subject / Scenario | Shutter Speed Range | Effect |
|---|---|---|
| Star trails | 30 s – Bulb (minutes) | Circular streaks across the sky |
| Milky Way (static stars) | 15–25 s | Pinpoint stars, no trailing |
| Waterfall / smooth water | 1–8 s | Silky, milky flow |
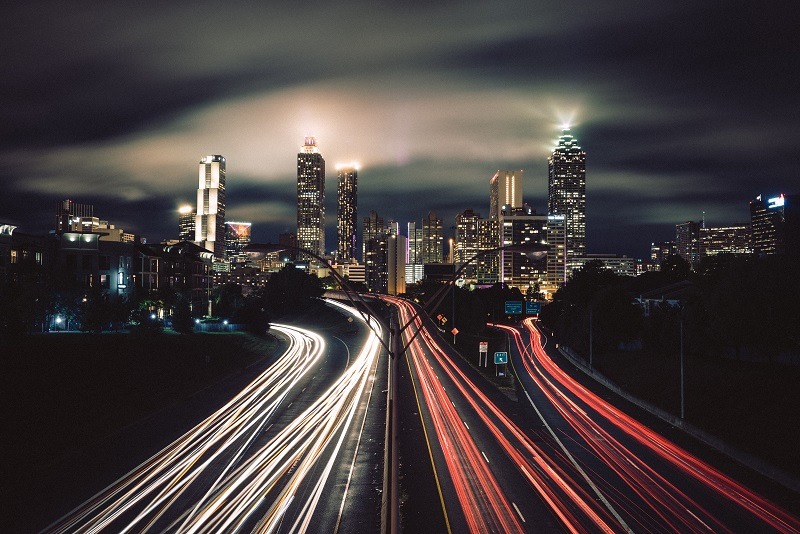
| Light trails (traffic) | 2–15 s | Streaking headlights and taillights |
| Panning (cyclist, car) | 1/15–1/60 s | Sharp subject, streaked background |
| Street / general handheld | 1/60–1/125 s | Safe handheld, slight motion in crowds |
| Portraits / still subjects | 1/125–1/250 s | Sharp with minimal risk |
| Kids / pets at play | 1/250–1/500 s | Freezes moderate movement |
| Sports / wildlife | 1/500–1/2000 s | Freezes fast, unpredictable motion |
| Birds in flight | 1/2000–1/4000 s | Wing tips frozen mid-beat |
Freezing Fast Action
Wedding confetti tosses, motorsport, and diving birds all demand speeds north of 1/1000 s — our team covered this extensively in our confetti photography guide. The key consideration is always balancing speed against ISO noise, and in our experience a modern full-frame sensor handles ISO 3200–6400 with minimal degradation. Sample results at common fast speeds:


Creative Motion Blur and Panning
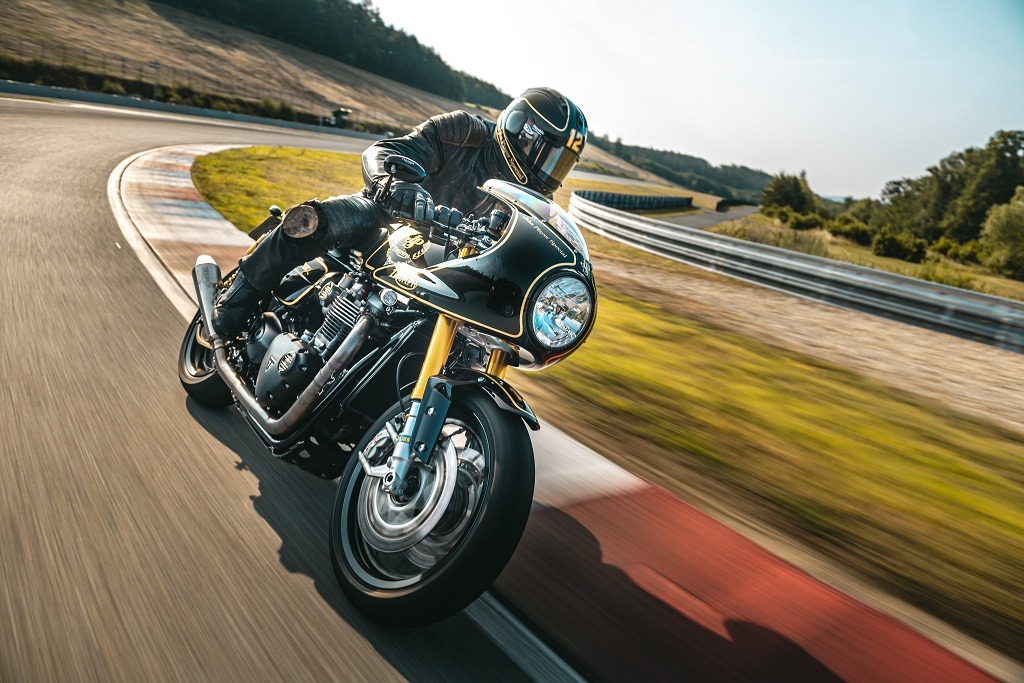
Not every shot benefits from freezing motion — deliberate blur communicates speed, energy, and atmosphere in ways a frozen frame simply cannot. Our team uses two primary techniques for creative blur:
- Panning: track the subject with a slow shutter (1/15–1/60 s) so it stays sharp while the background streaks horizontally
- Intentional Camera Movement (ICM): move the camera during a 1/4–2 s exposure to create abstract painterly effects

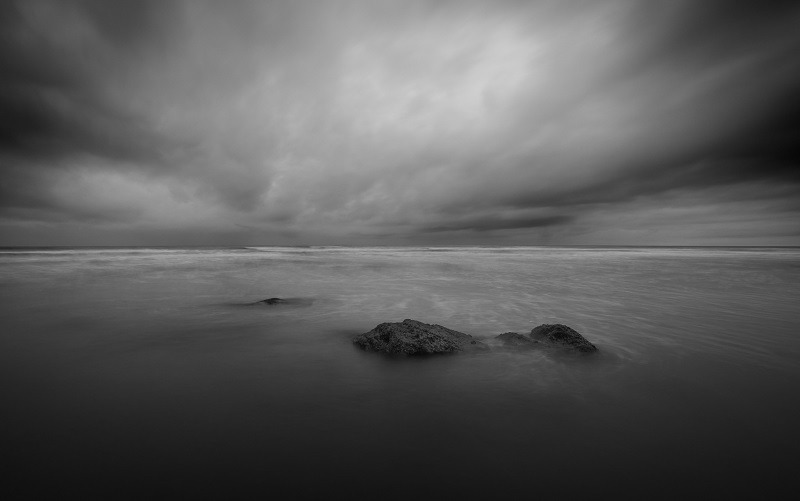
Landscape photographers will find long-exposure techniques especially useful for cloud streaks and coastal scenes — our landscape settings guide walks through the full workflow from filter selection to post-processing.
Keeping Images Sharp: Stabilization and Technique
Even with the correct shutter speed selected from the chart, poor technique or inadequate stabilization ruins images far more often than wrong exposure does. Our team has identified two core principles that prevent the majority of sharpness failures.
The Reciprocal Rule
The reciprocal rule states that the minimum handheld shutter speed should equal 1 divided by the effective focal length — so a 200 mm lens on a full-frame body needs at least 1/200 s, and that same lens on an APS-C crop body (1.5× factor) needs 1/300 s. Our team treats this as a floor, not a target, and we routinely add an extra stop of speed as a safety margin. On a micro four-thirds body with its 2× crop factor, a 100 mm lens effectively requires 1/200 s minimum, making stabilization even more critical at longer focal lengths.
Pro tip: When our team is shooting in marginal light with a long lens and no tripod, we brace the camera against a wall, doorframe, or our own bag on the ground — this buys a solid 2–3 stops of extra stability for free.
IBIS and Lens-Based OIS
Modern in-body image stabilization (IBIS) and optical image stabilization (OIS) extend the handheld range dramatically, and our team has tested systems claiming up to 7 stops of compensation. Practical results in the field:
- 3–4 stops of real-world benefit is typical for most IBIS systems with standard lenses
- Lens-based OIS on telephoto lenses generally outperforms body-based IBIS at focal lengths beyond 200 mm
- Combining both systems (synchro stabilization) can push the envelope to 5–6 usable stops in controlled conditions
- Stabilization should always be disabled on a tripod — the system hunts for vibration that does not exist, introducing micro-shake
Anyone shooting in full manual mode benefits from understanding exactly how many stops of stabilization are realistically available, because that number directly determines the slowest safe handheld shutter speed.
Fixing Common Shutter Speed Mistakes
Our team reviews thousands of images from workshop participants and community submissions, and the same shutter speed errors appear with remarkable consistency. Most are easy to diagnose and fix once the underlying cause is understood.
Diagnosing Unintended Blur
Blur in an image comes from exactly three sources, and identifying which one caused the problem determines the fix:
- Camera shake — the entire frame is uniformly soft with no sharp element anywhere, often with directional streaking. Fix: faster shutter speed, better stabilization, or a tripod.
- Subject motion — the background and static elements are sharp but the subject is blurred. Fix: increase shutter speed until the subject freezes at the required level.
- Missed focus — a specific plane in the image is sharp but the subject sits outside it. This is not a shutter speed problem at all — it is an AF point selection or depth-of-field issue best addressed through our f-stop chart and aperture guide.


Banding and Flicker Under Artificial Light
Shooting under LED panels, fluorescent tubes, or stadium lights at certain shutter speeds produces dark bands or uneven exposure across the frame. This happens because artificial lights pulse at the mains frequency — 50 Hz in most of the world and 60 Hz in North America. The safe speeds that avoid banding are:
- 50 Hz regions: 1/50 s, 1/100 s, or any multiple (1/25, 1/50, 1/100)
- 60 Hz regions: 1/60 s, 1/120 s, or any multiple
- Many modern bodies include an anti-flicker mode that detects the light cycle and times the shutter accordingly, though this adds a slight delay
When to Go Fast and When to Go Slow
The decision between fast and slow shutter speeds is ultimately a creative one, but certain scenarios have clear right answers that our team has codified through extensive field testing.
Situations That Demand Speed
- Wildlife and birds in flight — 1/1000 s minimum, and our team defaults to 1/2000 s with auto-ISO for keepers
- Sports and action — 1/500 s for running athletes, 1/1000 s+ for ball sports and motorsport
- Children and pets — unpredictable movement means 1/250 s is the bare minimum, even indoors with flash
- Telephoto handheld work beyond 300 mm — the reciprocal rule demands fast speeds and stabilization alone is insufficient for critically sharp results
- Street photography in dynamic environments — 1/250 s ensures gestures and expressions are frozen without requiring a second take

Situations That Reward Patience
- Waterfalls and rivers — 1–4 s creates the classic silky-water effect most landscape shooters aim for
- Astrophotography and star trails — 15 s for pinpoint Milky Way shots, minutes for full star-trail arcs as detailed in our night photography settings guide
- Light painting and steel wool — 10–30 s Bulb exposures allow full creative control over the light pattern
- Traffic light trails — 5–15 s from an overpass or rooftop turns headlights into flowing rivers of color
- Panning at 1/15–1/30 s — isolates a moving subject against a speed-blurred background for dramatic editorial-style images
Frequently Asked Questions
What is the best shutter speed for handheld photography?
Our team recommends a minimum of 1/focal-length as the starting point — so 1/50 s for a 50 mm lens on full-frame. Adding one extra stop of speed (e.g., 1/100 s) provides a reliable safety margin for most people, especially without image stabilization engaged.
Does a faster shutter speed make images darker?
A faster shutter speed reduces the amount of light reaching the sensor, which darkens the exposure when aperture and ISO remain unchanged. Compensating with a wider aperture or higher ISO restores the brightness while keeping the motion-freezing benefit of the faster speed.
Can shutter speed affect image sharpness even on a tripod?
Certain shutter speeds between roughly 1/15 s and 1 s can amplify mirror-slap vibration on DSLRs, producing subtle softness even on a solid tripod. Using mirror lock-up, electronic front-curtain shutter, or a 2-second self-timer eliminates this issue entirely.
What shutter speed freezes water drops?
Our team uses 1/1000 s as the minimum for freezing individual water drops mid-air, though 1/2000 s or faster produces noticeably crisper results on splashes and rain with strong directional light.
How does shutter speed relate to video frame rates?
The 180-degree shutter rule means the shutter speed should be approximately double the frame rate — so 1/50 s for 25 fps or 1/60 s for 30 fps. Deviating from this ratio produces either unnaturally choppy or overly smooth motion that most viewers perceive as wrong.
Next Steps
- Save or print the shutter speed chart above and keep it in the camera bag — having a physical reference during shoots eliminates the hesitation that costs decisive moments.
- Set the camera to shutter-priority mode (S or Tv) and spend an entire session photographing the same moving subject at five different speeds from the chart, reviewing the results on a full-size monitor afterward to internalize the visual difference each stop makes.
- Practice the reciprocal rule by shooting handheld at progressively slower speeds with each lens in the kit, finding the exact threshold where sharpness breaks down — this personal benchmark is far more useful than any published specification.
- Pair shutter speed mastery with aperture control by studying our f-stop chart and aperture cheat sheet to build a complete mental model of exposure.
 |
 |
 |
 |

About Alex W.
Alex is a landscape, equine, and pet photographer based in the Lake District, UK, with years of experience shooting in one of Britain's most photographically demanding natural environments. His work has been featured in Take a View Landscape Photographer of the Year, Outdoor Photographer of the Year, and Amateur Photographer Magazine — publications that reflect a serious, competitive standard of image-making. At Click and Learn Photography, he shares the camera settings, gear choices, and compositional techniques he has developed through real-world shooting and competition-level work.
You can Get FREE Gifts. Furthermore, Free Items here. Disable Ad Blocker to receive them all.
Once done, hit anything below
|
|
|
|