A recent survey of over 2,000 professional photographers found that 73% consider motion blur one of the most underused creative techniques in their toolkit, yet it consistently ranks among the top five methods for creating emotionally compelling images. Learning how to use motion blur effectively transforms your photography from static snapshots into dynamic visual stories that pull viewers straight into the scene. Whether you're capturing the rush of city traffic or the gentle flow of a waterfall, this technique gives you a level of creative control that no amount of post-processing can replicate. If you're working to become a better photographer, mastering motion blur is one of the fastest ways to elevate your work.
The beauty of motion blur lies in its simplicity — you're using time as a compositional element, letting movement paint itself across your sensor during a longer exposure. The technique works across virtually every genre, from landscape and street photography to sports and abstract art, and it requires no expensive specialty gear beyond what you likely already own.
In this guide, you'll learn the essential camera settings, avoid the most common pitfalls, and discover proven techniques that professional photographers rely on to create stunning motion blur images consistently.
Contents
- Quick-Start Settings for Instant Motion Blur Results
- Common Motion Blur Mistakes That Ruin Your Shots
- Motion Blur Myths You Should Stop Believing
- Shutter Speed Comparison for Different Subjects
- Proven Techniques for Creative Motion Blur
- Best Practices for Consistent Results
- Step-by-Step Guide to Your First Motion Blur Shot
- Frequently Asked Questions
- Next Steps
Quick-Start Settings for Instant Motion Blur Results
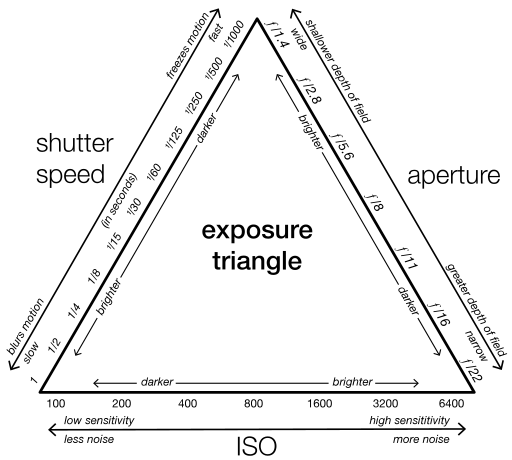
You don't need to spend hours experimenting to get your first successful motion blur shot — a handful of reliable starting points will get you there within minutes. The key is understanding the relationship between shutter speed, aperture, and ISO, which together form the exposure triangle that governs every photograph you take.
Shutter Priority Mode
Switch your camera to Shutter Priority mode (S or Tv on your dial) and set your shutter speed to 1/15th of a second as a starting point for moving pedestrians. Your camera will automatically adjust the aperture to maintain proper exposure, which lets you focus entirely on the creative side of the technique. For faster subjects like vehicles or cyclists, you can start at 1/30th and work your way down as you gain confidence with the panning motion.
Neutral Density Filters for Daytime Blur
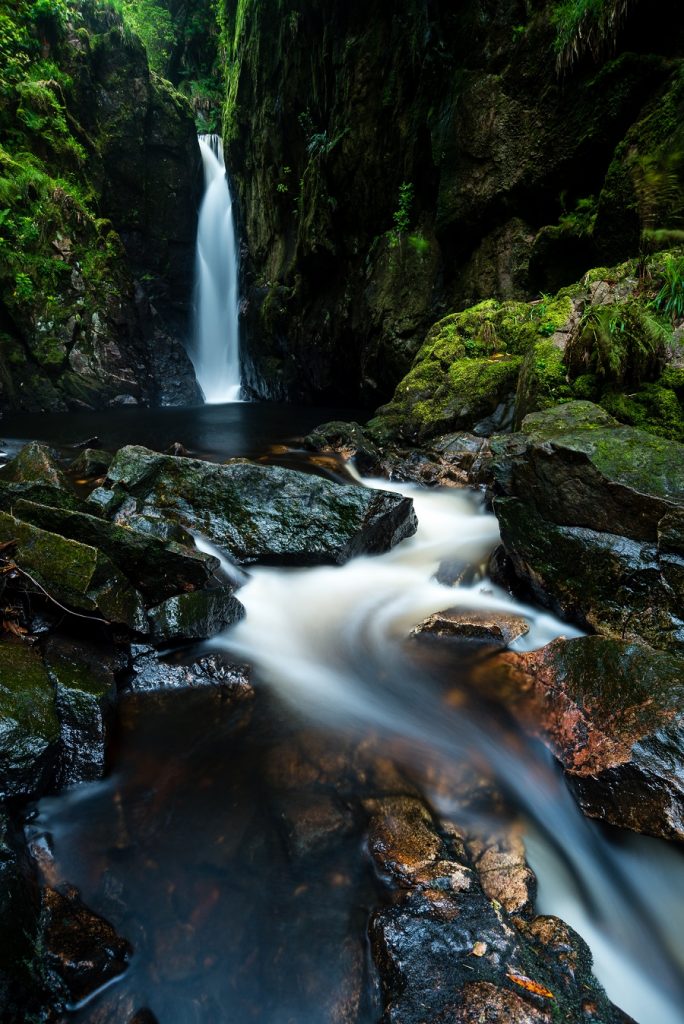
Shooting motion blur during daylight hours creates an immediate problem — your sensor receives far too much light at slow shutter speeds, even at your smallest aperture and lowest ISO. A neutral density filter solves this by reducing the light entering your lens without affecting color. A 6-stop ND filter is the most versatile starting point, and if you're interested in the gear side, check out this review of professional ND filters for detailed performance comparisons. For landscape photographers chasing silky waterfalls or streaking clouds, a 10-stop filter opens up exposures of 30 seconds or longer even in bright afternoon sun.
Common Motion Blur Mistakes That Ruin Your Shots
Camera Shake vs. Subject Blur
The single most frequent mistake photographers make with motion blur is confusing intentional subject blur with accidental camera shake, and the difference is immediately visible in your results. Subject blur keeps your static elements razor-sharp while the moving subject streaks through the frame, whereas camera shake makes everything in the image uniformly soft and unusable. Always use a sturdy tripod for stationary long exposures, and pair it with either a remote shutter release or your camera's built-in two-second timer to eliminate vibration from pressing the shutter button.
Overexposure in Long Exposures
When you slow your shutter speed down, you're letting dramatically more light hit your sensor, and many photographers forget to compensate properly for this change. Drop your ISO to its native base (typically 100), narrow your aperture to f/11 or f/16, and if the image is still blown out, that's your signal to grab an ND filter. Avoid going beyond f/22 on most lenses because diffraction at extreme apertures softens the entire image and undermines the sharpness contrast you're trying to achieve.
Pro Tip: Check your histogram after every long exposure shot — the LCD preview is unreliable in bright conditions, and you won't catch subtle highlight clipping until you're back at your computer.
Motion Blur Myths You Should Stop Believing
One of the most persistent myths is that you need expensive, professional-grade gear to create compelling motion blur images, but this is flatly untrue. Any camera with a manual or shutter priority mode — including most smartphones with a pro mode — can produce beautiful motion blur results with the right technique. Another common misconception is that motion blur only works for water and traffic, when in reality the technique applies beautifully to clouds, crowds, sports, wildlife, and even abstract art through intentional camera movement.
You'll also hear photographers claim that motion blur is "easy" and requires no planning, which leads to frustrated beginners shooting aimlessly without thinking about composition first. The truth is that the most striking motion blur photographs combine deliberate composition with controlled exposure times, and the photographers who produce them consistently spend time scouting locations and visualizing the final result before pressing the shutter. Understanding leading lines and composition strengthens your motion blur work dramatically because the blur itself follows compositional paths within your frame.
Shutter Speed Comparison for Different Subjects
Choosing the right shutter speed is the single most important decision you'll make when creating how to use motion blur effects, and it varies dramatically depending on your subject. The table below gives you tested starting points for the most common motion blur scenarios.
| Subject | Shutter Speed Range | Tripod Needed? | Recommended Filter |
|---|---|---|---|
| Waterfalls / Rivers | 0.5s – 2s | Yes | 3-6 stop ND |
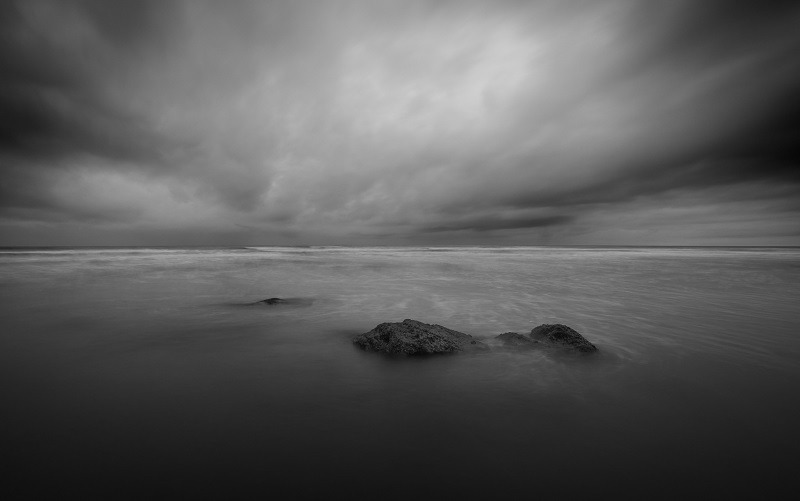
| Ocean Waves | 1s – 8s | Yes | 6-10 stop ND |
| Moving Clouds | 15s – 120s | Yes | 10 stop ND |
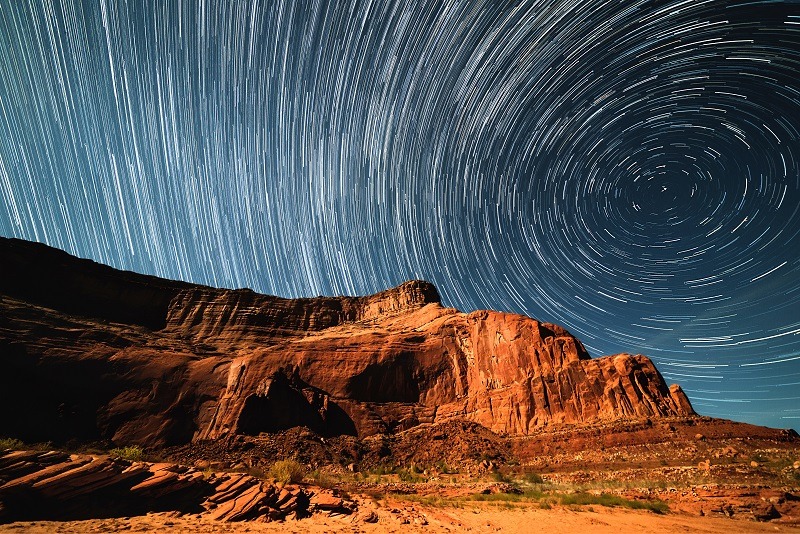
| Star Trails | 15min+ (stacked) | Yes | None (night) |
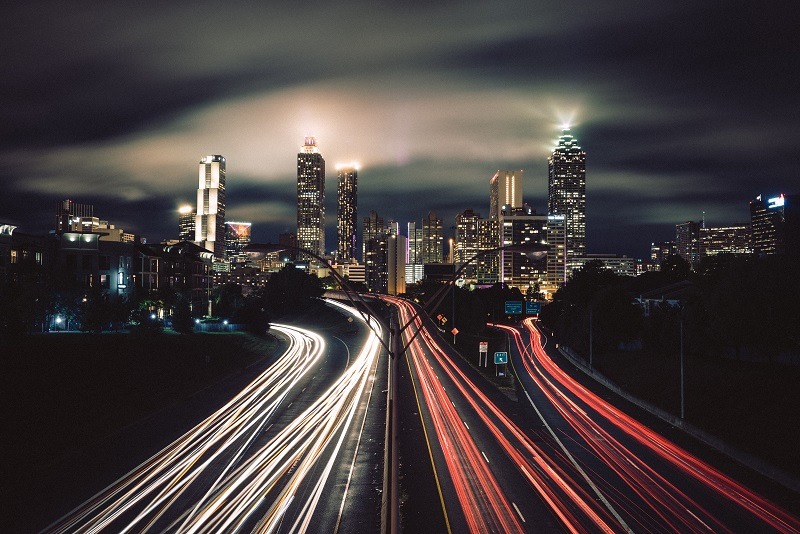
| City Traffic Light Trails | 8s – 30s | Yes | None (night) / ND (dusk) |
| Panning – Cyclists | 1/30s – 1/60s | No | None usually |
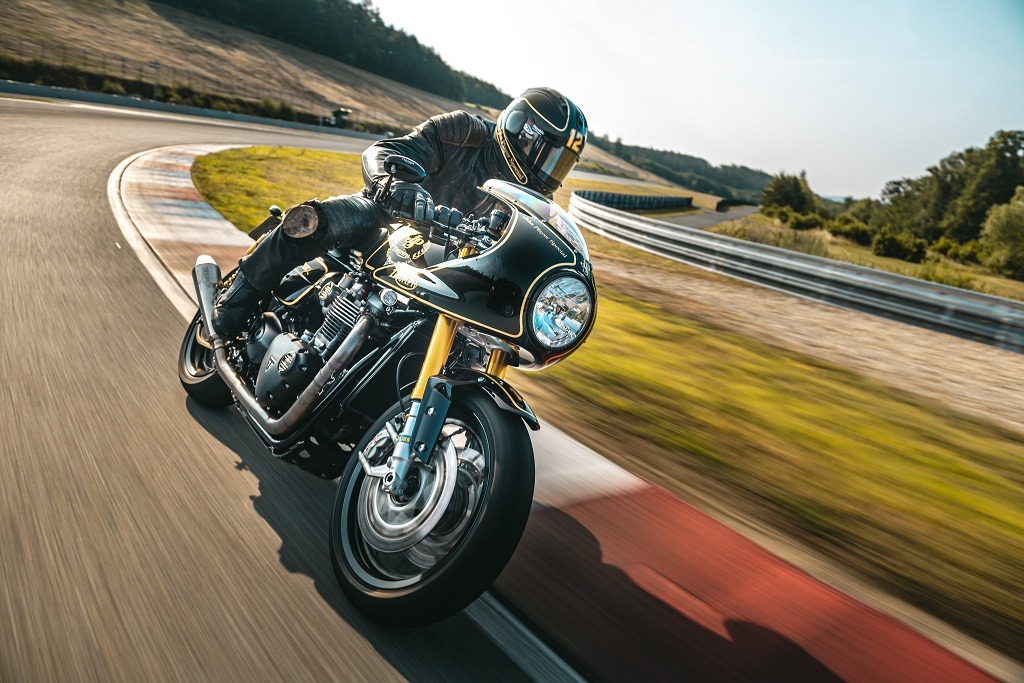
| Panning – Cars / Trains | 1/60s – 1/125s | No | None usually |
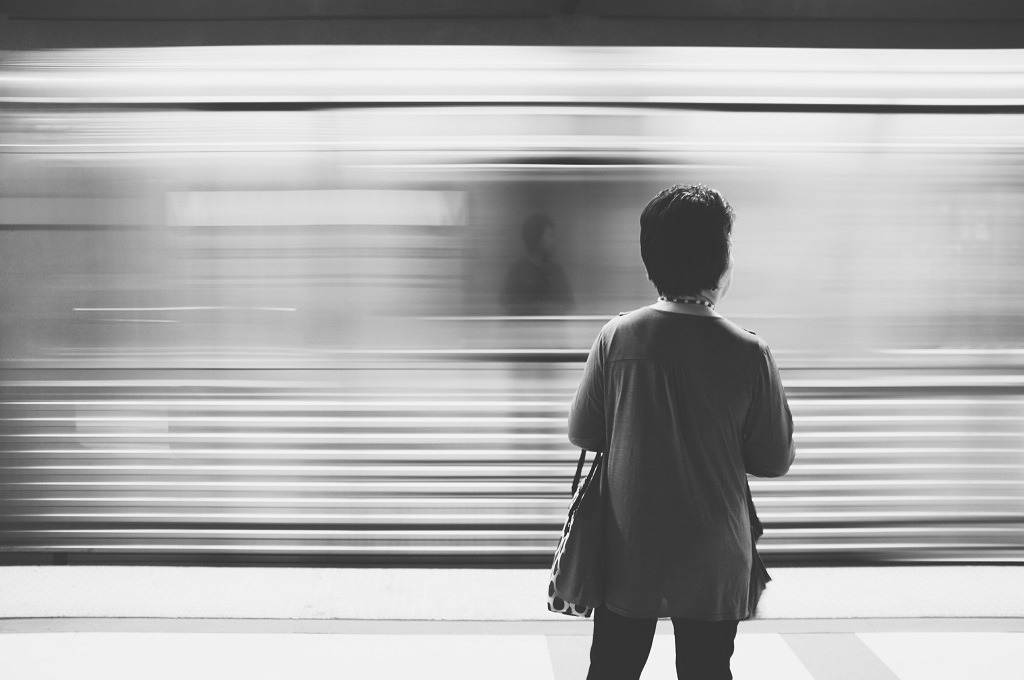
| Walking Pedestrians | 1/8s – 1/15s | Yes | ND if daytime |
These values are starting points — your exact settings will depend on the speed of your subject, the distance from your camera, and the amount of blur you want in the final image. Bracket your exposures by shooting several frames at different shutter speeds so you can choose the most effective version later.
Proven Techniques for Creative Motion Blur
Panning for Sharp Subjects with Blurred Backgrounds
Panning is the technique of tracking a moving subject with your camera during the exposure, which keeps the subject relatively sharp while the background streaks into horizontal blur lines. Set your shutter speed between 1/15th and 1/60th depending on the speed of your subject, switch to continuous autofocus (AF-C or AI Servo), and use burst mode to fire multiple frames during each pan. The trick is to start tracking the subject before you press the shutter, follow through smoothly during the exposure, and continue the motion after the shutter closes — just like a golf swing where the follow-through matters as much as the contact.
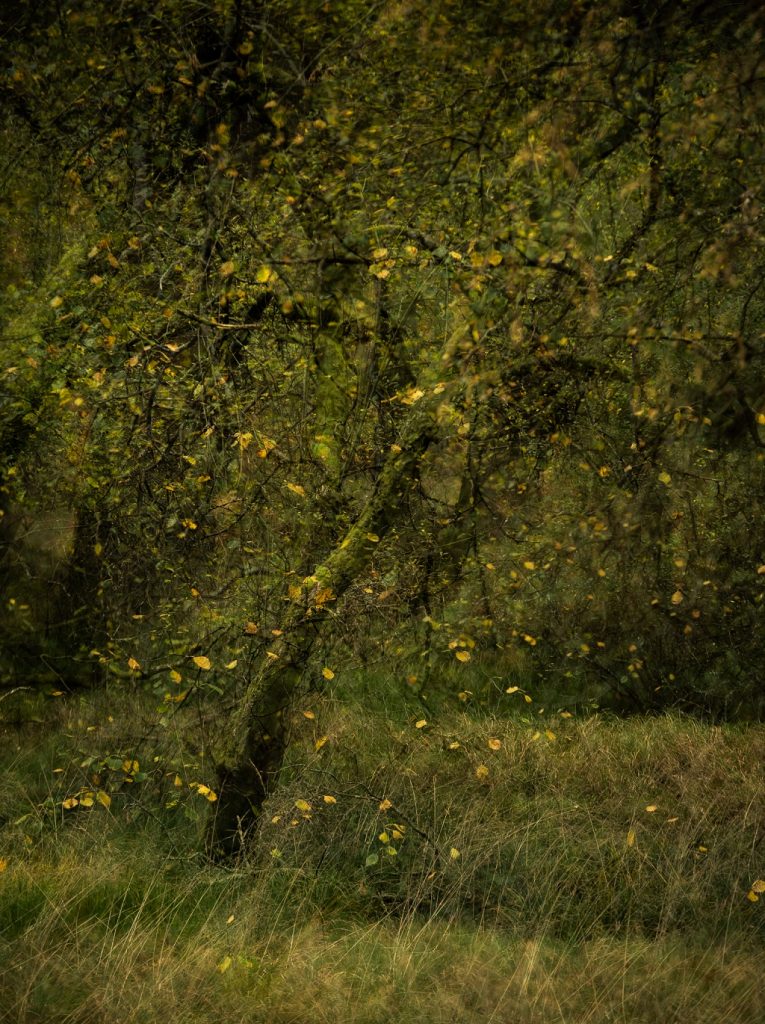
Intentional Camera Movement
Intentional Camera Movement (ICM) is the opposite of traditional motion blur — instead of keeping the camera still while the subject moves, you deliberately move the camera during a longer exposure to create abstract, painterly images. Vertical sweeps through trees produce dreamlike forest scenes, horizontal movements along a coastline create ethereal seascapes, and rotational movements generate spiraling abstract patterns that look nothing like a conventional photograph. ICM works best with shutter speeds between 1/4 and 2 seconds, and the direction and speed of your camera movement become your primary compositional tools.

Best Practices for Consistent Motion Blur Results
Shoot in RAW format exclusively when working with motion blur because the extended dynamic range gives you far more flexibility to recover highlights and shadows in post-processing, which is especially critical with long exposures that push the boundaries of your sensor. If you're unfamiliar with optimizing your export workflow afterward, this guide to Lightroom export settings covers everything you need for delivering sharp, properly sized final images.
Use mirror lock-up (or electronic front-curtain shutter on mirrorless cameras) to eliminate the micro-vibrations caused by the mirror mechanism slapping up before the exposure begins. This makes a measurable difference at shutter speeds between 1/15th and 1 second, which is precisely the range where many motion blur techniques operate. Combine this with a cable release or two-second self-timer, and you've eliminated the three most common sources of unwanted camera movement during long exposures.
When shooting cityscapes with motion blur, position yourself on overpasses, rooftops, or elevated walkways to capture the full sweep of traffic patterns below, and time your exposures to coincide with traffic light cycles for the densest, most continuous light trails.
Step-by-Step Guide to Your First Motion Blur Shot
Follow this straightforward process to create your first deliberate motion blur photograph, whether you're working with flowing water, passing traffic, or moving people in a busy street scene.
- Scout and compose first. Find a scene with both a strong static element (bridge, building, rock) and a predictable moving element (stream, road, sidewalk). Set up your tripod and compose the shot as if the movement didn't exist, making sure the static elements create a compelling frame on their own.
- Set your base exposure. Switch to Manual mode, set ISO to 100, aperture to f/8 or f/11 for maximum sharpness, and adjust your shutter speed until the meter reads correctly. Now slow the shutter speed to your target from the comparison table above, and compensate by narrowing the aperture or adding an ND filter until the exposure balances again.
- Focus and lock. Use single-point autofocus to lock onto your static element, then switch your lens to manual focus so the camera doesn't attempt to refocus during the long exposure and hunt for a new focal point.
- Fire the shutter remotely. Use a cable release, wireless remote, or your camera's self-timer to trigger the shutter without touching the camera body, and wait for the full exposure to complete before reviewing.
- Review and adjust. Check the histogram for proper exposure, zoom into the static elements at 100% to verify sharpness, and examine the motion trails to assess whether you need a faster or slower shutter speed for the desired effect.
Repeat this cycle three or four times, adjusting your shutter speed in one-stop increments, and you'll quickly develop an intuitive sense for exactly how much blur each speed produces with your particular subject. For more location inspiration where these techniques shine, explore our ultimate guides collection for in-depth coverage of specific photography genres.
Frequently Asked Questions
What shutter speed do you need for motion blur?
The ideal shutter speed depends entirely on your subject's speed and distance from the camera. For walking pedestrians, start around 1/8th to 1/15th of a second; for flowing water, try 0.5 to 2 seconds; and for smooth cloud movement, you'll typically need exposures of 15 seconds or longer with a strong ND filter attached.
Can you create motion blur without a tripod?
You can achieve motion blur handheld when using the panning technique, where you track a moving subject to keep it sharp against a blurred background. However, for long-exposure motion blur of stationary scenes with moving elements like water or traffic, a tripod is essential to keep the non-moving parts of your image sharp.
How do you use motion blur in bright daylight?
Attach a neutral density filter to your lens — a 6-stop ND filter is the most versatile starting point. Set your ISO to its lowest native value (usually 100), narrow your aperture to f/11 or f/16, and the ND filter will block enough light to allow shutter speeds of several seconds even in direct sunlight.
What is the difference between motion blur and camera shake?
Motion blur is an intentional creative effect where a moving subject creates blur streaks while static elements remain sharp, achieved through controlled slow shutter speeds on a stable platform. Camera shake is accidental blur that affects the entire image uniformly, caused by hand-holding at too slow a shutter speed or vibrations transmitted through an unstable tripod.
Does motion blur work with smartphone cameras?
Many modern smartphones offer a Pro or Manual mode that lets you control shutter speed directly, and several dedicated apps provide long-exposure simulation by stacking multiple frames. The results won't match a dedicated camera with an ND filter for very long exposures, but smartphones can produce impressive motion blur for panning shots and moderately slow shutter speeds.
How do you avoid overexposure when using slow shutter speeds?
Start by dropping your ISO to its base value and narrowing your aperture to f/11 or f/16. If the image is still overexposed, you need a neutral density filter to physically reduce the light entering your lens. Avoid closing the aperture past f/22, as diffraction will soften your entire image and defeat the purpose of maintaining sharp static elements.
Next Steps
- Practice panning this week — find a busy road near your home, set your camera to 1/30th of a second in Shutter Priority mode, and shoot 50 frames of passing cars while tracking them smoothly through the viewfinder until you get three keepers you're proud of.
- Invest in a 6-stop ND filter — pick one that fits your most-used lens diameter, take it to the nearest stream or fountain, and practice the full long-exposure workflow from tripod setup through histogram review.
- Study your results at 100% zoom — after each session, review your images at full magnification on your computer to check whether your static elements are truly sharp, and note which shutter speeds produced the most pleasing blur for each subject type.
- Try one ICM session — visit a local park or forest, set your shutter to 1/2 second, and experiment with vertical sweeps through the trees to create abstract images that push your creative boundaries beyond conventional photography.
 |
 |
 |
 |

About Alex W.
Alex is a landscape, equine, and pet photographer based in the Lake District, UK, with years of experience shooting in one of Britain's most photographically demanding natural environments. His work has been featured in Take a View Landscape Photographer of the Year, Outdoor Photographer of the Year, and Amateur Photographer Magazine — publications that reflect a serious, competitive standard of image-making. At Click and Learn Photography, he shares the camera settings, gear choices, and compositional techniques he has developed through real-world shooting and competition-level work.
You can Get FREE Gifts. Furthermore, Free Items here. Disable Ad Blocker to receive them all.
Once done, hit anything below
|
|
|
|