The Exposure Triangle Explained – Shutter Speed, Aperture, and ISO
by Alex W.
We walked you through the basics of the exposure triangle in our Learn the Basics article, but now it’s time to delve further into the subject and understand exactly how you can use the shutter speed, aperture, and ISO to your advantage.
At the most basic level a change to any of these three variables alters the brightness of your image, but each one of them also has additional effects to the final image. Here you will learn which one to change and when:
Shutter Speed
As we now know, the shutter speed is simply the length of time that the camera shutter is open and letting light through to the sensor. As simple as this sounds, it can actually be used in a lot of creative ways, but the wrong shutter speed can also introduce some problems:
Camera Shake

This might have been a nice photograph, but due to camera shake we’ll never know. By Suwatch (originally posted to Flickr as define camera shake) [CC BY 2.0 (http://creativecommons.org/licenses/by/2.0)], via Wikimedia Commons
You may think your hands are steady as a rock, but push those limits too far and you can start to introduce unwanted camera shake into your images. Basically, if we leave the shutter open for too long our hands move the camera during the exposure, introducing blur to the final image.
How to solve it – There are two ways to counteract this. Firstly, you can use a tripod to keep the camera steady during the exposure (read why you should think about using a tripod anyway.) Alternatively, you can increase the shutter speed to a usable level and eliminate the shake, but darkening the final image in the process. We then need to change one of our other variables to get the correct exposure.
What is a Usable Shutter Speed when Hand Holding?
A basic rule of thumb under normal conditions is to use the 1/focal length rule for determining your minimum acceptable shutter speed. Your focal length is dependant on what lens you’re using, and basically refers to the level of zoom. A longer focal length (more zoom) requires a faster shutter speed.
So, imagine we’re using our trusty 50mm f/1.8 lens (something I recommend every photographer should have in their arsenal). What we do is 1 divided by 50, giving us a minimum shutter speed of 1/50 second. A 300mm telephoto lens would give us a minimum shutter speed of 1/300 second for comparisons sake.
Creative Shutter Speed

Experimenting with shutter speed on the coast can yield stunning results. Here, the waves crashing over the volcanic coastline of Tenerife complemented the setting sun perfectly. 1/10sec at f/11 and ISO-100 – Tripod mounted.
Now we get into the fun and creative side of shutter speed. Remember all those gorgeous landscape photographs with a silky smooth waterfall you’ve seen, or that dramatic seascape with powerful waves crashing onto the beach. That’s all thanks to the shutter speed.
If we purposefully select a longer shutter speed by narrowing the aperture and decreasing the ISO (remember, we need a tripod) then we can create wonderful effects, especially with water. The camera records every movement before displaying the final output as an average, meaning the moving elements within the image become beautifully smooth.
This works especially well with water and fast moving clouds, but does require a bit of experimentation. The best advice I can give you is to pick up your tripod, get out there, and try it out! If you head to the beach try experimenting with shutter speeds between 1/2 second and 4 seconds to capture the movement of the waves.
Obviously this requires the light level to be low enough to allow these longer shutter speeds, so try to shoot at either sunrise or sunset for the best results. You can also check out our guide on Neutral Density Filters (LINK) to allow you to use long exposures in the middle of the day!
When Should You Change Shutter Speed?
- When you’re handholding the camera and a longer shutter speed is introducing camera shake. Shorten the shutter speed by widening the aperture and/or increasing to ISO to maintain correct exposure.
- When you want to use creative shutter speeds to record the movement within a scene. Lengthen the shutter speed by narrowing the aperture and/or decreasing the ISO, again to maintain correct exposure.
Aperture
The second piece of our Exposure Triangle puzzle is the aperture, and just like the shutter speed it can be used in a lot of creative ways once you know what you’re doing.
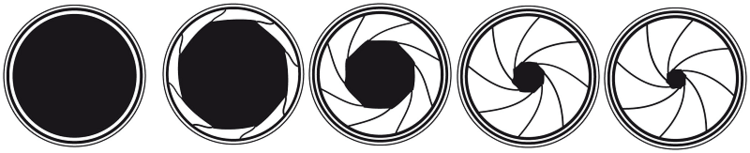
The aperture refers to the mechanical component inside every camera lens, and on most it’s adjustable via the settings. If you take both caps off a lens and look through it you can see the aperture – It’s that round opening made up of small blades organised into a ring.
The function it serves to to actually direct the light coming into the lens onto the sensor, and the size of that small opening makes a big difference to our final image. A wider opening means more light, and therefore a brighter photo, but again there are creative ways we can utilise it.
Size of the aperture is measured in f-stops, and confusingly a lower number f-stop actually means a wider aperture. So an aperture set at f/1.8 is a lot wider than one set at f/16, letting more light in and allowing a faster shutter speed or a lower ISO. But how can this be used creatively?
Still confused? Check out our handy F-Stop Chart Infographic for a more visual explanation!
Aperture ranges from small f-stops on the left (eg f/1.8) to larger f-stops on the right (eg f/16).
Depth of Field
Depth of field is a photography term that refers to the amount of an image that is in focus, and believe it or not there are many occasions where we want most of the image to be out of focus and blurry.
Those beautifully soft portraits you see in professional portrait and wedding photography utilise a shallow depth of field. On the other hand, the expansive and awe inspiring landscape that contains all the detail you could ever need has a large depth of field. All of this is controlled via the aperture, so it does make a huge difference!
When we open up the aperture (using a lower number f-stop) it produces a shallow depth of field, whereas a closed down aperture (higher number f-stop) results in a large depth of field. This all works in conjunction with keeping the exposure correct, which is why landscape photographers often need a tripod due to their low f-stop needing a slower shutter speed.
Large Depth of Field
As I mentioned, this is often used in landscape photography when you want everything from the foreground to the background pin sharp and full of detail. This requires a higher f-stop such as f/11 or f/16, which results in a slower shutter speed and the need for a tripod.
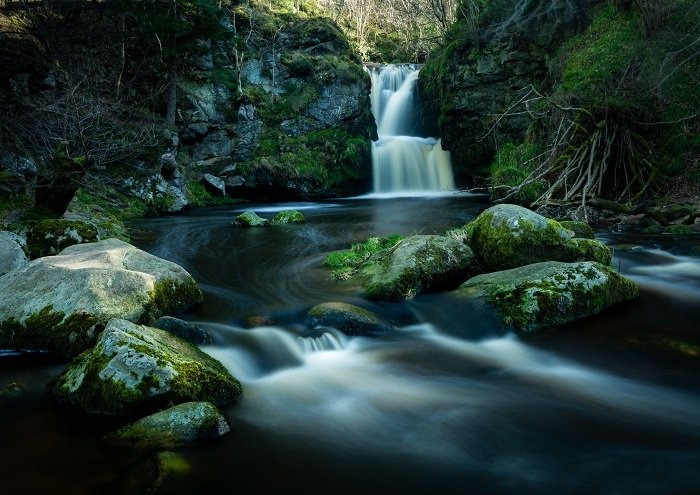
A large depth of field was required here to keep the rocks and the waterfall in focus, so f/13 was selected.
Shallow Depth of Field
This is where we can get creative. Opening up the aperture to those low f-stops allows you to pinpoint exactly what you want to be in focus in your image, throwing everything in front or behind the focal point out of focus.
This works especially well in portrait and wedding photography, drawing the viewer’s eye straight to the main subject and avoiding distractions within the frame. The lower the f-stop, the shallower your depth of field will be, which is exactly why those f/1.4 lenses come with such a hefty price tag!

I wanted to keep all attention on the gorgeous Luna here, so chose an aperture of f/4 to maintain a shallow depth of field and render the surrounding bluebells out of focus
When Should You Change the Aperture?
- When you’re handholding the camera and need to shorten the shutter speed to avoid camera shake. Widen the aperture, letting more light in and allowing you to speed up your shutter speed.
- When you want everything to be pin sharp. Narrow down the aperture to increase the depth of field, but remember that this will require a longer shutter speed and possibly a tripod.
- When you want to blur the background of your image. Widen the aperture and shorten the shutter speed to maintain correct exposure, then focus accurately on your main subject to render the rest of the scene as a smooth blur.
ISO
Now we can tackle the final corner of the Exposure Triangle, and fortunately this is by far the most simple and easy to understand variable.
What is ISO?
ISO is a term that’s been around in photography for decades. It stands for International Standards Organization, and is a standardised scale for measuring sensitivity to light. It was originally used to describe a particular film’s sensitivity to light, but with the emergence of digital sensors we can now change our ISO on the fly at the press of a button.
Most modern cameras have a base ISO of 100 and can then be increased in your settings to make your sensor more sensitive to the light hitting it. This allows you to use a narrower aperture or a faster shutter speed, but does come with it’s own drawbacks that can often outweigh the advantages.
Introduction of Noise
Here you can see the effect using a High ISO can have on an image, with abundant digital noise present in the shadows especially.
To put it simply, as we increase our ISO the quality of our image declines. That’s due to the introduction of digital noise or grain, and while it’s not very noticeable at first once we get into the higher territories of ISO it can actually be very detrimental to our final image. All those old grainy photos that look awful? That’s noise.
It is a gradual shift for the most part, and as the sensor technology continues to advance we are able to get into some very high ISOs before seeing a noticeable decline in images. The newer models of high end DSLRs are able to capture usable images up to ISO-3200 in many cases, something which would have been unthinkable just a decade ago.
We do also have noise reduction software to help with any digital noise, but it’s undoubtedly always better to try and use as low of an ISO as possible in order to maintain the quality of our image.
The Advantages
Here you can see the advantages of using a higher ISO. I needed a fast shutter speed to freeze the motion of the dog, so boosted it to ISO 640 without a huge dip in quality.

Here you can see the advantages of changing the ISO – I needed a fast shutter speed to freeze the motion of the dog, so boosted the ISO to 640 without any significant loss in image quality.
Obviously, increasing the sensor’s sensitivity to light allows us to use faster shutter speeds and narrower apertures. This works especially well in low light situations where we’re trying to capture fast moving subjects. This is because a slower shutter speed, even tripod-mounted, would render the moving subjects as a blur. It’s also useful in bright situations where we have very fast moving subjects such as race cars or motorbikes.
The way the ISO increases in light sensitivity is very simple. Every time the number doubles our exposure gets twice as bright, so assuming all other settings stay the same an ISO-200 image would be twice as bright as an ISO-100 one. This, in turn, allows us to either double the speed of our shutter or half the size of our aperture.
Generally speaking, ISO should always be the last point of call to increase the exposure of your image, but with advancing technology it’s a very viable way to get a good image when conditions are against you. If you find yourself needing a narrow aperture in a low light situation, but you haven’t got the option of using a tripod, then increasing the ISO will always be better than capturing a blurry shot!
The Exposure Triangle – Conclusion
You made it to the end! There you have it, the Exposure Triangle explained in all it’s glory. Hopefully that’s shed a bit more light onto how an image is actually captured and how a camera actually works. Now, you can make that same camera work for you.
Just remember –
- A longer shutter speed increases camera shake, but if you have a tripod you can use it in very creative ways.
- A wider aperture decreases the depth of field but allows more light in, and if you get creative with it you can make very good use of those out of focus areas.
- A higher ISO increases your sensor’s sensitivity to light and allows you to narrow the aperture and/or shorten the shutter speed, but it does come at the cost of increased noise.
- Find the right balance between these three variables and you’re well on your way in your photography education!
You Might Like…
Must-Have Christmas Gift Ideas for Photographers
The Best Entry-Level DSLRs on the Market
Getting Out of Autopilot – Shooting in Manual Mode
Ditch the JPEGs – Why You Should Always Shoot in RAW
A Beginners Guide to Composition
 |
 |
 |
 |

About Alex W.
Alex is the owner and lead writer for Click and Learn Photography. An avid landscape, equine, and pet photographer living and working in the beautiful Lake District, UK, Alex has had his work featured in a number of high profile publications, including the Take a View Landscape Photographer of the Year, Outdoor Photographer of the Year, and Amateur Photographer Magazine.
Thoughts on "The Exposure Triangle Explained – Shutter Speed, Aperture, and ISO"
|
|
|
|
You can Get FREE Gifts. Furthermore, Free Items here. Disable Ad Blocker to receive them all.
Once done, hit anything below
|
|
|
|