Ever wondered why your travel photos look nothing like the breathtaking images you see online? The answer is simpler than you think — and it has less to do with expensive gear than you'd expect. Whether you're planning your first international trip or you've been shooting casually for a while, these travel photography tips for beginners will transform the way you capture every destination. From understanding light to packing smart, the techniques below are the same ones working travel photographers rely on every single shoot. If you're looking for a deeper dive into foundational skills, our ultimate guides cover everything from composition to post-processing.
Travel photography sits at the intersection of storytelling and technical skill. You're not just documenting a place — you're interpreting it. The good news is that the core principles are repeatable. Once you internalize a handful of techniques, you'll start seeing opportunities everywhere, from a quiet side street in Lisbon to a crowded market in Bangkok.
This guide walks you through a complete workflow: what to do before you leave, how to shoot on location, and how to handle your images when you get home. Every section is built around practical, actionable advice you can apply on your very next trip.
Contents
- A Step-by-Step Approach to Travel Photography Tips for Beginners
- Shooting RAW vs JPEG on the Road: Pros and Cons
- Understanding Light: The Foundation of Every Great Travel Shot
- Five Quick Wins That Instantly Improve Your Travel Photos
- Troubleshooting Common Travel Photography Mistakes
- Travel Photography Gear on a Budget
A Step-by-Step Approach to Travel Photography Tips for Beginners
Great travel photos don't happen by accident. They're the result of preparation, awareness, and a willingness to slow down. Here's a repeatable process you can follow for any destination.
Research Your Destination Before You Arrive
Start by searching for images of your destination on platforms like Flickr, 500px, and Instagram. You're not looking for shots to copy — you're building a mental library of what's possible. Pay attention to angles, times of day, and vantage points that show up repeatedly. Those are the proven compositions.
Check sunrise and sunset times using apps like PhotoPills or The Photographer's Ephemeris. These tools show you exactly where the sun will be at any given moment, which is invaluable for planning golden hour shoots. If you're photographing landmarks, look up whether you need permits or if there are access restrictions during certain hours.
Scout Locations and Plan Your Shooting Schedule
On your first day, resist the urge to shoot everything. Walk around with your camera in your bag. Observe how light falls on buildings, where crowds gather, and which streets have the most visual interest. This scouting pass pays dividends because you'll return to each spot at the optimal time rather than settling for whatever conditions you happen to walk into.
If you're shooting landscapes alongside your travel work, the same principles from shooting on location apply: arrive early, stay late, and always have a backup plan for weather changes.
Lock In Your Camera Settings Early
Before you step outside, set your camera to a reliable baseline. Aperture priority mode (A or Av) with auto ISO is a strong default for travel. Set your minimum shutter speed to 1/125s for handheld street shots, or 1/250s if you're using a telephoto lens. This eliminates the most common beginner mistake: motion blur from a shutter speed that's too slow.
Pro tip: Set your camera's auto ISO upper limit to 6400. Modern sensors handle this cleanly, and a slightly noisy sharp photo always beats a smooth blurry one.
Shooting RAW vs JPEG on the Road: Pros and Cons
This is one of the most debated topics among travel photographers, and the right answer depends on your workflow and storage capacity. RAW files give you dramatically more flexibility in post-processing — you can recover blown highlights, correct white balance, and push shadows without destroying image quality. But they're large, typically 25-50 MB per image, and they require dedicated editing software.
JPEG files are smaller, ready to share immediately, and perfectly fine for social media and web use. The trade-off is that every edit degrades the file slightly, and you lose the ability to make major corrections after the fact.
| Factor | RAW | JPEG |
|---|---|---|
| File Size | 25–50 MB per image | 5–15 MB per image |
| Editing Flexibility | Full control over exposure, WB, color | Limited — destructive edits |
| Sharing Speed | Requires processing first | Instant share from camera |
| Storage Needed (1,000 shots) | 25–50 GB | 5–15 GB |
| Dynamic Range Recovery | 2–3 stops recoverable | ~0.5 stops before artifacts |
| Best For | Serious editing, portfolio work | Quick sharing, casual documentation |
The practical recommendation: shoot RAW + JPEG simultaneously. Most cameras support this dual-write mode. You get the convenience of instant JPEGs for sharing while keeping the RAW files for your best shots. Bring enough memory cards — a 128 GB card holds roughly 3,000 RAW files on a modern mirrorless body.
Understanding Light: The Foundation of Every Great Travel Shot
Light is the single most important variable in photography, and it's the one thing you can't buy or carry in your bag. Understanding how light behaves — and how to work with whatever light you're given — separates competent travel photographers from everyone else pointing a camera at the same scene.
Golden Hour and Blue Hour
The hour after sunrise and the hour before sunset produce warm, directional light that adds depth and dimension to every subject. Shadows are long, colors are saturated, and the overall mood is dramatic without being harsh. This is when you shoot your hero images — the ones destined for your portfolio or a travel slideshow.
Blue hour — the 20-30 minutes before sunrise and after sunset — produces a cool, even light that's perfect for cityscapes and architecture. City lights are still on, the sky has color, and the exposure balance between artificial and natural light is ideal. You'll need a tripod or a stable surface for these longer exposures, but the results are worth the extra effort.
Working with Harsh Midday Light
You can't always shoot at golden hour. Sometimes you're standing in front of the Colosseum at noon, and that's the only chance you'll get. In these situations, look for open shade — the shadow side of buildings, covered walkways, or tree canopy. The light in open shade is soft and even, perfect for portraits and detail shots.
For architectural subjects, embrace the hard shadows. Strong directional light creates graphic compositions with bold contrast. Convert these to black and white in post-processing and they take on a completely different character. Midday light is also ideal for shooting straight down into water, where the overhead angle eliminates surface reflections and reveals underwater detail.
Five Quick Wins That Instantly Improve Your Travel Photos
You don't need to overhaul your entire technique to see immediate improvement. These five adjustments deliver noticeable results from your very next outing.
First, use leading lines to pull the viewer's eye into the frame. Roads, rivers, fences, and architectural edges all serve as natural guides. If you want to go deeper on this technique, our guide on using leading lines in composition breaks it down with visual examples.
Second, apply the rule of thirds — but loosely. Place your main subject at one of the four intersection points and let the rest of the frame provide context. Don't stress about pixel-perfect alignment. Close is good enough.
Third, include a foreground element. A flower, a stone wall, a parked bicycle — anything that adds depth and scale. This transforms a flat postcard shot into a layered image that feels three-dimensional.
Fourth, get low or get high. Eye-level shots are how everyone sees the world. Crouch down to pavement level or find an elevated vantage point, and suddenly a familiar scene looks fresh and unfamiliar.
Fifth, wait for a human element. A person walking through a scene provides scale, narrative, and a natural focal point. Patience is your most underrated compositional tool.
The difference between a snapshot and a photograph is often just ten seconds of thought before pressing the shutter.
Troubleshooting Common Travel Photography Mistakes
Even experienced photographers fall into these traps when shooting in unfamiliar environments. Recognizing the patterns helps you correct them in the field rather than discovering problems on your laptop days later.
Blurry Images and Missed Focus
The number one culprit is shutter speed. In the excitement of a new location, it's easy to forget that you've switched to a longer lens or that the light has dropped. As a rule of thumb, your shutter speed should be at least 1/(focal length) — so a 50mm lens needs 1/50s minimum, and a 200mm lens needs 1/200s. With unstabilized lenses, double that number to be safe.
Missed focus usually comes from leaving your camera in multi-point autofocus mode. Switch to single-point AF and place it yourself. This takes an extra half-second per shot, but your hit rate will climb dramatically. For moving subjects — street scenes, markets, festivals — use continuous autofocus (AF-C or AI Servo) so the camera tracks motion between frames.
Flat, Uninteresting Compositions
If your images feel boring despite interesting subjects, the problem is almost always distance. You're too far away. Robert Capa's famous advice — "if your pictures aren't good enough, you're not close enough" — applies to travel photography more than any other genre. Walk closer. Fill the frame. Eliminate distracting background elements by tightening your composition. According to the principles of visual composition, the arrangement of elements within the frame matters more than the subject itself.
Another common cause of flat images is centering everything. Move your subject off-center, leave negative space in the direction they're facing or moving, and let the composition breathe. Tension and asymmetry create visual interest that centered compositions rarely achieve.
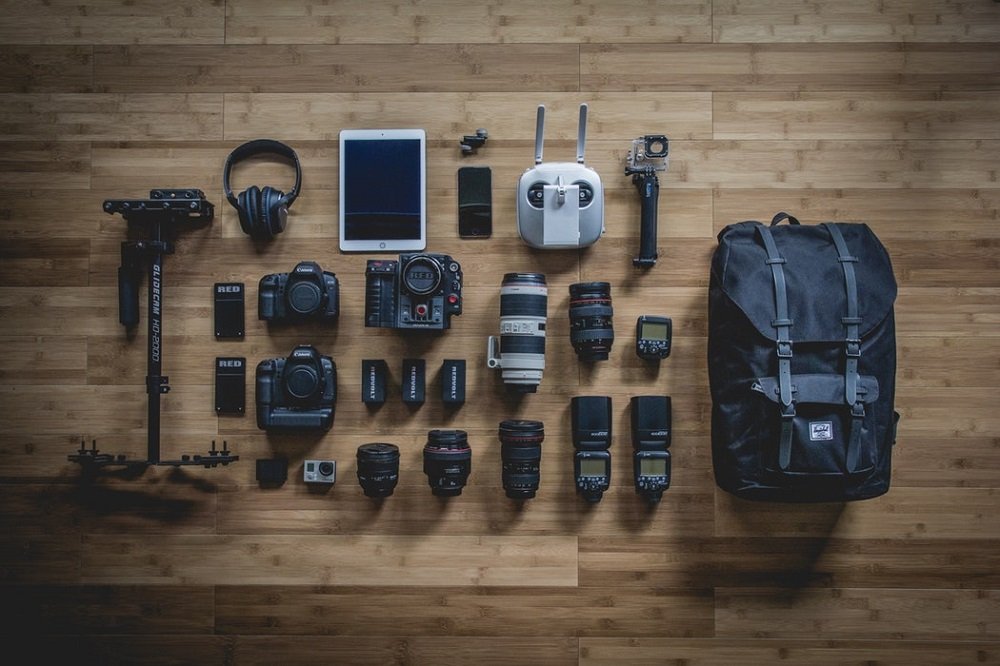
Travel Photography Gear on a Budget
You don't need to spend thousands to produce professional-quality travel photos. The best camera is the one you actually carry, and a lighter kit means you'll shoot more and fatigue less. Here's a realistic budget breakdown for a capable travel photography setup.
- Camera body (used mirrorless APS-C): $400–700. Bodies like the Sony a6400 or Fuji X-T30 deliver excellent image quality in a compact package. Buying refurbished from a reputable dealer saves 30-40% over new pricing.
- Versatile zoom lens (18-135mm or equivalent): $300–500. One lens covers wide-angle landscapes through moderate telephoto for details and candid portraits. You sacrifice a bit of sharpness compared to primes, but you gain flexibility that's invaluable when you can't change lenses quickly.
- Travel tripod (carbon fiber): $80–200. A tripod under 3 lbs that folds to 16 inches fits in a daypack and handles blue hour and long exposure work. Skip the cheapest aluminum options — they vibrate in wind and the leg locks fail within months.
- Memory cards and backup: $50–100. Two 128 GB UHS-II cards plus a portable SSD for nightly backups. Never travel with a single card — hardware failure is rare but catastrophic.
Your total investment for a fully capable travel photography kit: roughly $830–1,500. That's less than most people spend on a single premium lens, and it covers every situation you'll encounter on the road. Invest in experiences and plane tickets before glass — the most expensive lens in the world can't photograph a destination you never visit.
Frequently Asked Questions
What is the best camera for travel photography beginners?
A mirrorless APS-C camera like the Sony a6400, Fuji X-T30, or Canon M50 Mark II offers the best balance of image quality, size, and price. These bodies weigh under 400 grams, shoot in RAW, and pair with compact zoom lenses that cover most travel situations without burdening your bag.
How many lenses should you bring on a trip?
Start with one versatile zoom (18-135mm equivalent range). This covers wide-angle landscapes, environmental portraits, and telephoto details without lens changes. Add a fast prime (35mm or 50mm f/1.8) for low-light and street photography if you have room. Two lenses maximum keeps your kit manageable.
Is it worth shooting in RAW while traveling?
Yes — especially for your best shots. RAW files retain far more data for post-processing, letting you correct exposure, white balance, and color without quality loss. Use RAW + JPEG mode so you can share JPEGs immediately while preserving RAW files for editing later.
How do you photograph people in foreign countries respectfully?
Always ask permission before shooting portraits, even if only through gestures. A smile and a nod toward your camera communicates your intent across language barriers. Show people their photo on your LCD afterward — it builds trust and often leads to better, more relaxed follow-up shots.
What time of day produces the best travel photos?
Golden hour (the first hour after sunrise and last hour before sunset) consistently produces the most flattering light. Blue hour — roughly 20 minutes before sunrise and after sunset — is ideal for cityscapes. Midday works well for overhead shots and black-and-white photography where hard shadows add drama.
How do you keep your camera gear safe while traveling?
Use a bag that doesn't scream "expensive camera inside." Carry your gear in a padded insert inside a normal-looking backpack or messenger bag. Keep your camera strap short so the body sits tight against your chest. In high-risk areas, use a wrist strap instead of a neck strap, and never leave gear unattended.
How do you back up photos while on the road?
Copy files to a portable SSD every evening — this takes five minutes and protects against card failure or theft. If you have reliable internet, upload selects to cloud storage as a secondary backup. Always shoot to two card slots if your camera supports it, so you have an instant duplicate of every image.
The best travel photograph you'll ever take is the one where you stopped rushing, noticed the light, and gave the moment the attention it deserved.
 |
 |
 |
 |

About Alex W.
Alex is a landscape, equine, and pet photographer based in the Lake District, UK, with years of experience shooting in one of Britain's most photographically demanding natural environments. His work has been featured in Take a View Landscape Photographer of the Year, Outdoor Photographer of the Year, and Amateur Photographer Magazine — publications that reflect a serious, competitive standard of image-making. At Click and Learn Photography, he shares the camera settings, gear choices, and compositional techniques he has developed through real-world shooting and competition-level work.
You can Get FREE Gifts. Furthermore, Free Items here. Disable Ad Blocker to receive them all.
Once done, hit anything below
|
|
|
|