Forest Photography Guide – Tips and Tricks for Shooting in the Woods
by Alex W.
What makes forest photography so difficult — and so rewarding — compared to other genres of landscape photography? The answer lies in the chaos. Unlike wide-open vistas with obvious focal points, woodlands demand that photographers find order within visual clutter. Our team has spent years refining our approach to forest photography tips and tricks, and the honest truth is that the forest punishes lazy composition harder than any other environment. But once the fundamentals click, few subjects are more satisfying to photograph.
Forests are everywhere. Most people live within driving distance of a decent woodland, which makes this one of the most accessible genres in landscape work. No flights to Iceland. No permits for national parks. Just trees, light, and a willingness to get up early. In our experience, the photographers who struggle most with woodland shooting are the ones who bring open-landscape habits into a cluttered environment. This guide breaks down what actually works — and what most people get wrong.
We have organized everything below into six core sections, from debunking common myths to a frank assessment of the gear that matters. Whether someone is walking into a forest with a camera for the first time or has been shooting woodlands for a decade, there is something here worth taking into the field.
Contents
- Common Forest Photography Myths That Hold Photographers Back
- When to Shoot in the Woods: Seasonal and Weather Scenarios
- Forest Photography Tips and Tricks for Stronger Compositions
- From First Outing to Advanced Techniques
- Essential Gear for Woodland Shoots
- The Rewards and Challenges of Forest Photography
Common Forest Photography Myths That Hold Photographers Back
Forests come loaded with bad advice. Our team hears the same recycled tips repeated across forums and social media, and many of them actively hurt woodland images. Here are the myths we think deserve to die:
- "Always shoot wide." Wide-angle lenses often make forest scenes look more chaotic, not less. A tighter focal length isolates subjects and compresses layers of trees into pleasing patterns.
- "Golden hour is essential." In dense woodland, direct golden-hour light barely penetrates the canopy. Overcast days and misty mornings consistently produce better results.
- "Forests need a clear subject." Sometimes the mood is the subject. Atmosphere, repeating patterns, and light quality can carry an image without a single dominant element.
- "Post-processing can fix cluttered compositions." No amount of editing rescues a bad composition. Cropping out distractions only works if the remaining frame holds together on its own.
- "Autumn is the only good season." Every season offers distinct possibilities. Our complete guide to autumn photography covers fall specifically, but spring bluebells, summer canopy light, and winter skeletal branches are equally compelling.
The biggest myth of all is that woodland photography is just a subset of landscape work that requires the same approach. It is not. Forests demand different instincts, different timing, and different compositional strategies than open vistas.
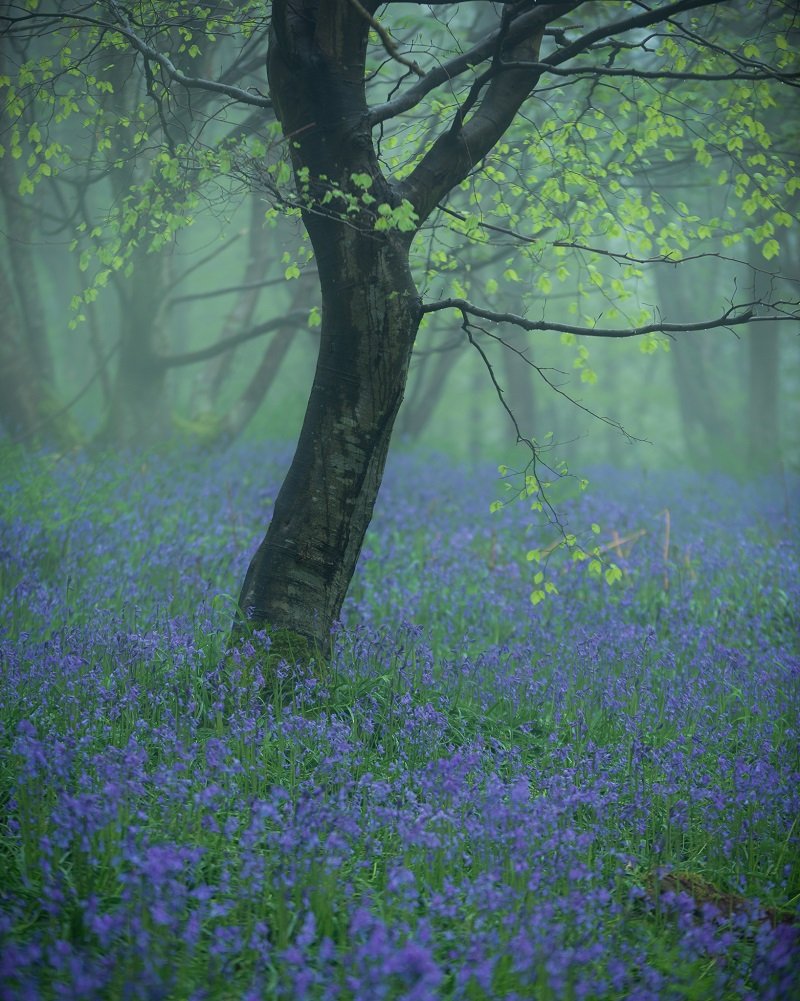
Mist helps to simplify an otherwise chaotic woodland scene into something more manageable and atmospheric.
When to Shoot in the Woods: Seasonal and Weather Scenarios
Timing matters more in forests than almost anywhere else. The same cluster of trees can look mundane at noon and otherworldly at dawn. Our team plans woodland shoots almost entirely around weather and season rather than location.
Seasonal Considerations
| Season | Key Features | Best Conditions | Primary Challenge |
|---|---|---|---|
| Spring | Bluebells, fresh green canopy, wildflowers | Early morning mist, overcast skies | Short bloom windows |
| Summer | Dense canopy, dappled light, lush undergrowth | Backlit canopy at sunrise/sunset | Harsh midday contrast |
| Autumn | Color variety, fallen leaves, warm tones | Still mornings, light fog | Peak color lasts only 1–2 weeks |
| Winter | Bare branches, frost, snow-covered paths | Low-angle sun, heavy frost | Reduced daylight hours |
Each season rewards patience. Our strongest woodland portfolio images came from revisiting the same locations repeatedly. That mirrors what we have always believed about shooting locally versus traveling — familiarity with a spot beats novelty almost every time.
Weather as a Creative Tool
The soft, diffuse lighting on overcast days eliminates distracting highlights in the forest and softens the whole scene.
Weather is the single biggest variable in woodland shooting. Here is how our team ranks conditions from best to worst:
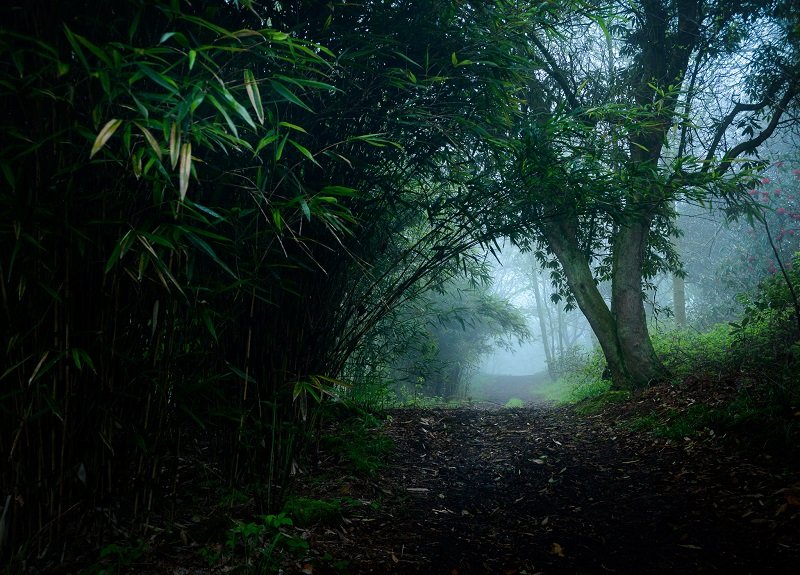
- Mist and fog — separates tree layers, adds depth, eliminates background clutter
- Overcast skies — soft diffused light, no harsh shadows, even exposure across the frame
- Light rain — saturates colors, adds mood, creates reflections on wet bark
- Broken cloud — sporadic light beams through canopy gaps can be dramatic but unpredictable
- Clear sun — extreme contrast, blown highlights, deep shadows — hardest to work with
Most people avoid rain. That is a mistake. Some of our most atmospheric woodland shots came from mornings when we were soaked through. Waterproof the gear and embrace it.
Forest Photography Tips and Tricks for Stronger Compositions
Composition in forests is fundamentally about simplification. The raw scene is almost always too busy. Every decision — focal length, angle, depth of field — should serve the goal of reducing visual noise while keeping what matters.
Leading Lines and Natural Frames
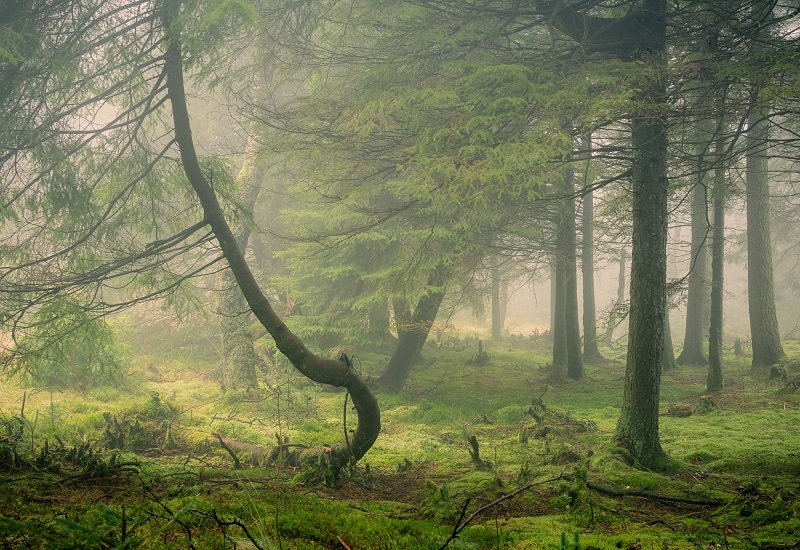
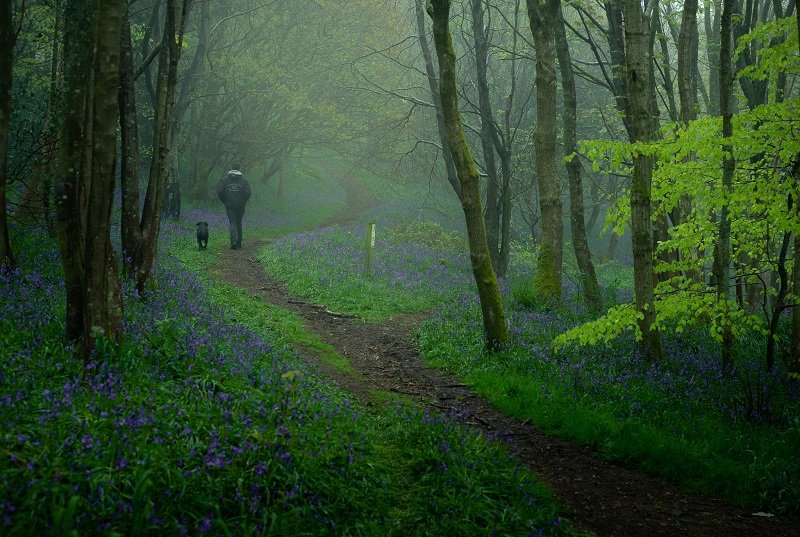
Pathways through the forest offer perfect leading lines to draw the viewer into the image.
Paths, streams, fallen logs, and rows of trunks all function as leading lines. Our team looks for these first when arriving at a new spot. Anyone wanting a deeper dive into these principles should check out our guide to photography composition, but the forest-specific points worth emphasizing are:
- Look down. Forest floors contain some of the best leading lines — root systems, fern rows, leaf patterns.
- Look up. Converging tree trunks shot from directly below create powerful vertical leading lines.
- Use overhanging branches as natural frames. A single low branch across the top third of the frame can anchor the whole image.
- Isolate a single distinctive tree. One twisted trunk among straight ones immediately becomes the focal point.
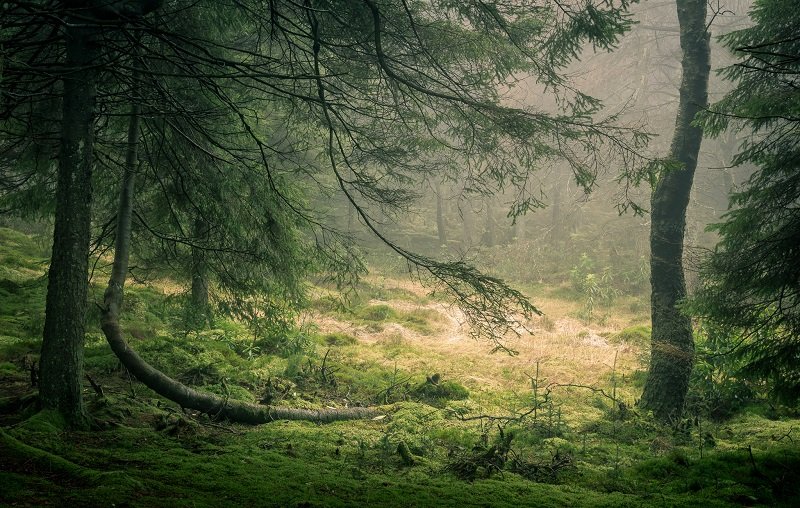
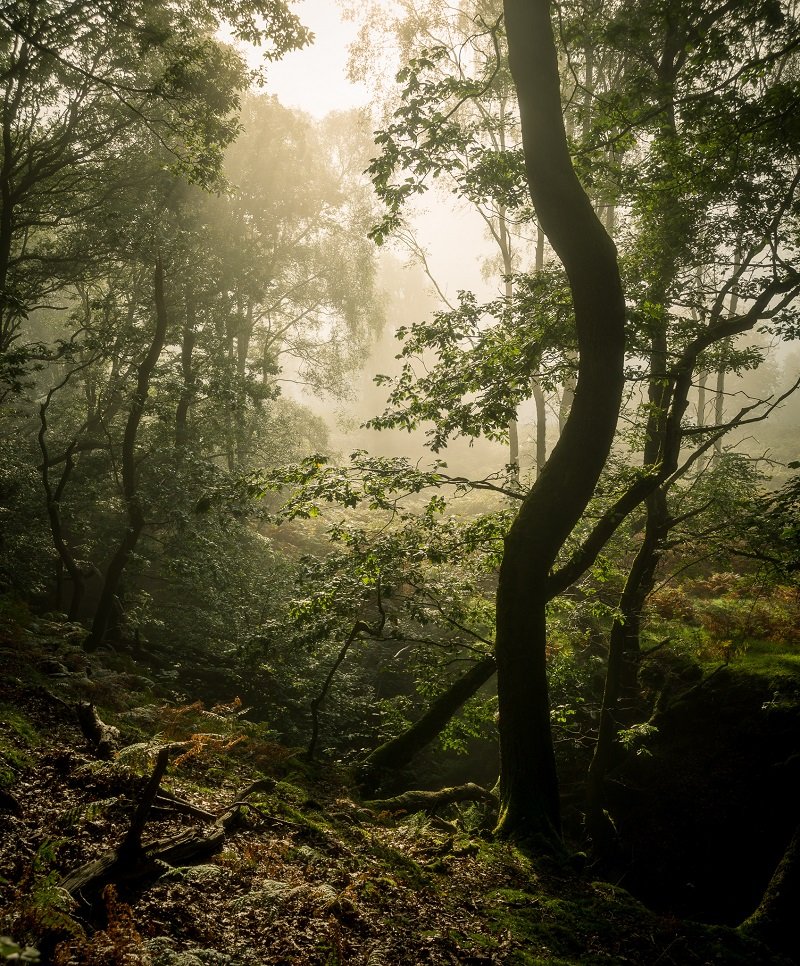
This twisted tree and low hanging branch is a perfect example of finding order within the chaos, and is paramount to forest photography.
Using Color Theory in Woodland Scenes
Forests are rich in complementary color opportunities. The classic orange-and-blue pairing shows up naturally in autumn woodland with blue sky peeking through. Green and magenta appear when wildflowers line a forest floor. Understanding these relationships — even at a basic level — helps when choosing white balance and when deciding which scenes to prioritize.

When color is not working in a scene, stripping it away entirely is a strong option. Black and white landscape photography thrives in forests because the genre relies on form, texture, and contrast — all things woodland scenes deliver in abundance.
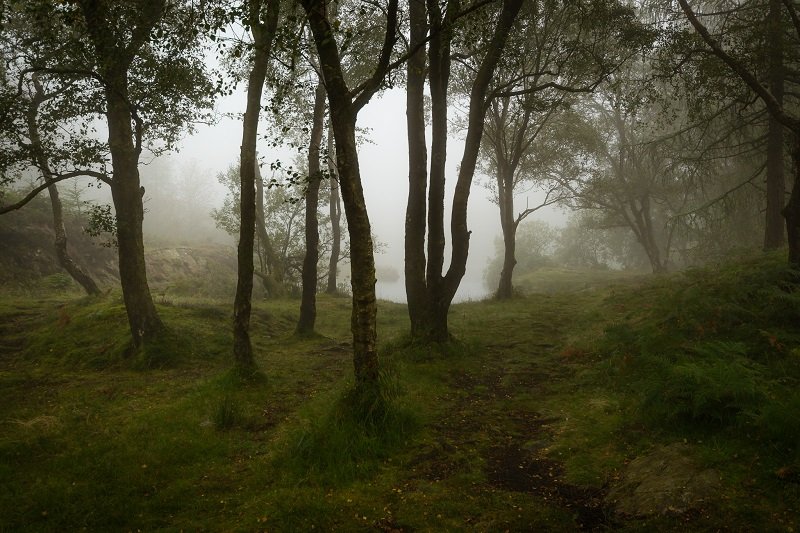
Mist is not just a nice bonus — it is the single most transformative condition for forest photography. Our team actively checks fog forecasts and will rearrange schedules around it. No other variable improves woodland images as consistently.
From First Outing to Advanced Techniques
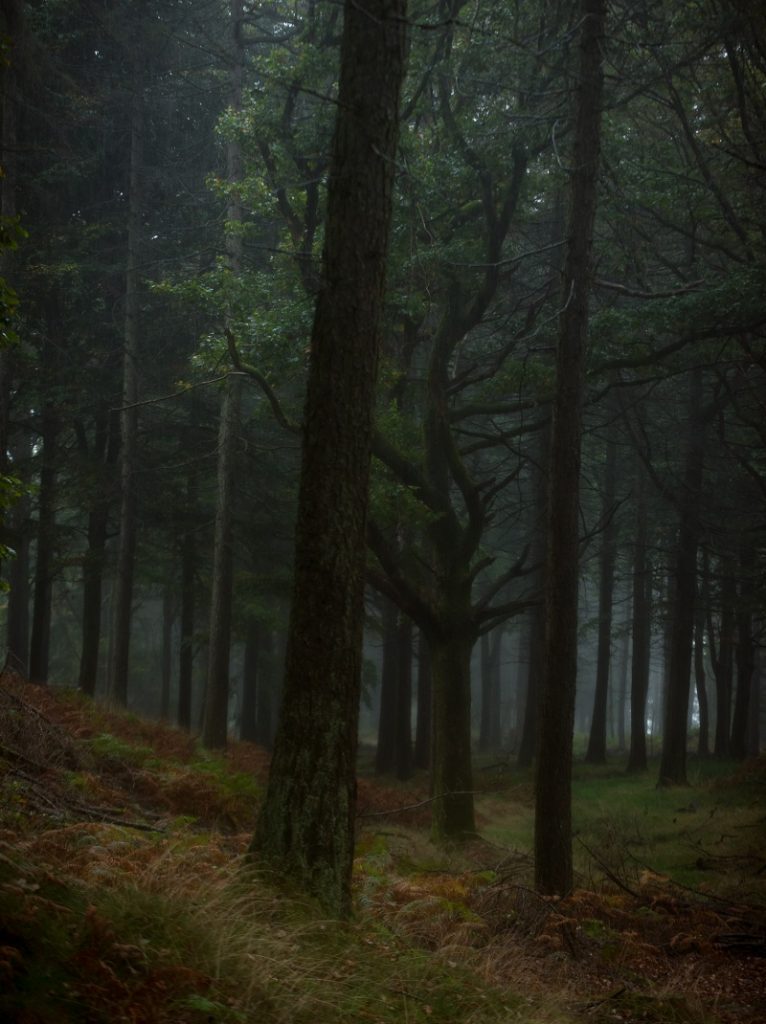
This collection of trees change dramatically throughout the year, and it took multiple visits to find the image that worked for me.
The gap between a beginner's forest shot and an advanced one usually comes down to patience and intentionality rather than technical skill. Here is how we see the progression.
Getting Started Right
Anyone new to woodland shooting should focus on these fundamentals first:
- Shoot on overcast days. Flat light is forgiving and lets beginners focus on composition without fighting exposure.
- Use aperture priority mode. Set f/8 to f/11 for sharpness across the frame. Understanding the exposure triangle is essential here.
- Slow down. Walk for 20 minutes before taking the first shot. Let the surroundings settle in. Most people shoot too quickly and leave with hundreds of mediocre frames.
- Shoot in RAW. Forest scenes have tricky dynamic range. RAW files give far more latitude in post. Our take on the RAW vs JPEG debate is unambiguous — always RAW for serious work.
- Start with vertical compositions. Trees are vertical subjects. It sounds obvious, but many beginners default to landscape orientation out of habit.
Leveling Up
Once the basics feel natural, these advanced techniques separate good from exceptional:
- Intentional camera movement (ICM). A slow vertical pan during a long exposure turns tree trunks into painterly streaks. We recommend starting around 1/4 second and experimenting from there.
- Focus stacking. Shooting at f/2.8 for background separation while keeping a foreground element sharp requires multiple focus points merged in post.
- Backlighting through canopy. Positioning the sun directly behind translucent leaves creates a glowing effect, but it demands careful spot metering to avoid blowing highlights.
- Infrared photography. Foliage reflects strongly in infrared, turning green canopy into bright white. A converted camera or IR filter opens up an entirely different creative dimension.
- Intimate landscape approach. Forget the grand vista. Focus on small scenes — a single fern frond, lichen on bark, dew on a spider web. These details are everywhere in forests and often overlooked.
Essential Gear for Woodland Shoots
Forest photography does not require exotic equipment. In our experience, most people overthink gear and underthink preparation. Here is what our team actually carries into the woods.
Lenses That Actually Matter
- 70–200mm f/2.8 or f/4 — our most-used woodland lens. Compression isolates tree groupings beautifully.
- 24–70mm f/2.8 — versatile for wider scenes, paths, and canopy-up shots.
- 100mm macro — essential for the intimate details that make forests special. Fungi, bark textures, and frost patterns all benefit from true macro capability.
Wide-angle lenses below 24mm rarely earn their place in the bag for forest work. They introduce too much visual chaos. Anyone debating camera bodies should read our DSLR vs mirrorless comparison — for woodland shooting specifically, mirrorless benefits like electronic viewfinders and silent shutter modes are genuinely useful.
Accessories Worth Carrying
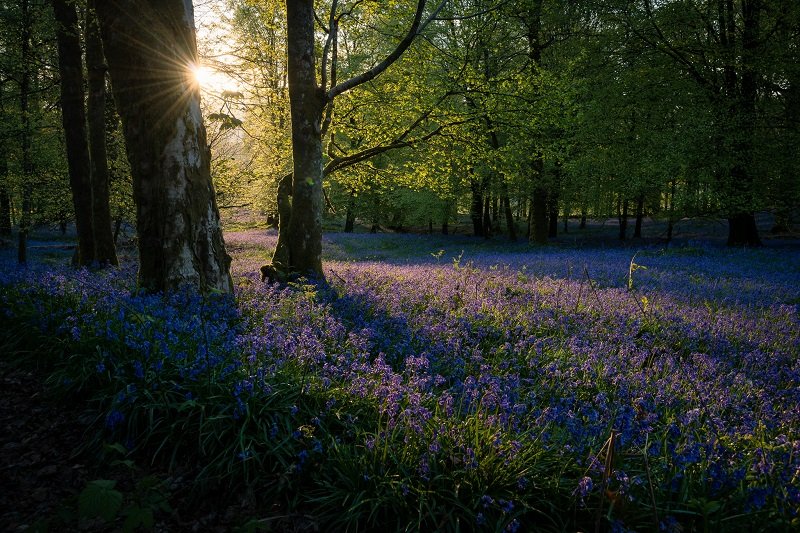
The elongated shadows in the dawn light enhances both the depth and atmosphere of this gorgeous spring morning.
- Sturdy tripod. Non-negotiable for low-light conditions under canopy. Uneven ground means a tripod with independently adjustable legs is preferable.
- Circular polarizer. Cuts glare off wet leaves and saturates greens. One of the few filters that genuinely matters for forest work.
- Lens cloth and rain cover. Moisture condenses on glass constantly in misty woodland. A microfiber cloth prevents ruined shots.
- Waterproof boots. Not camera gear, but anyone who has trudged through a boggy forest floor in trail shoes understands why we list this.
A temperate broadleaf forest floor can be surprisingly treacherous underfoot, especially after rain. Proper footwear is as important as any lens in the bag.
The Rewards and Challenges of Forest Photography
This was taken on one of the wettest mornings I've ever been out shooting in, and the rain softened the colours in addition to adding a sense of mystery to the image.
We believe in being upfront about what makes a genre difficult alongside what makes it worthwhile. Forest photography has clear strengths and genuine frustrations.
The rewards:
- Accessibility. No expensive travel required. Most people have viable woodland within an hour's drive.
- Year-round shooting. Every season offers distinct material, unlike genres that depend on specific conditions.
- Creative depth. The same woodland can yield hundreds of unique compositions across different visits, weather, and seasons.
- Meditative process. Forest photography demands slowing down, observing carefully, and being present. The experience itself is valuable beyond the images.
- Unique portfolio pieces. Strong woodland images stand out precisely because the genre is difficult — fewer photographers do it well.
The challenges:
- Compositional difficulty. Forests are visually noisy. Finding clean compositions requires more effort than most landscapes.
- Unpredictable light. Canopy cover shifts constantly. A composition that works one minute may not work five minutes later.
- Limited keeper rate. Expect fewer successful images per session compared to coastal or mountain photography.
- Gear hazards. Moisture, mud, and uneven terrain all threaten equipment. Rain covers and lens cloths are not optional.
- Difficult post-processing. Taming dynamic range and color casts from canopy-filtered light takes more editing skill than average.
The light burning through the leaves and the hint of mist in the background caught my attention, causing me to stop in my tracks and begin working on a composition.
The challenges are real, but they are also what makes a strong forest photograph so satisfying. Anyone who puts in the time — revisiting locations, studying light patterns, and refining their eye for order within chaos — will be rewarded with images that most photographers simply cannot produce.
The forest does not hand over its best images easily — but the photographers who show up in bad weather, revisit the same trees across seasons, and learn to see simplicity within chaos are the ones who walk away with something extraordinary.
 |
 |
 |
 |

About Alex W.
Alex is a landscape, equine, and pet photographer based in the Lake District, UK, with years of experience shooting in one of Britain's most photographically demanding natural environments. His work has been featured in Take a View Landscape Photographer of the Year, Outdoor Photographer of the Year, and Amateur Photographer Magazine — publications that reflect a serious, competitive standard of image-making. At Click and Learn Photography, he shares the camera settings, gear choices, and compositional techniques he has developed through real-world shooting and competition-level work.
You can Get FREE Gifts. Furthermore, Free Items here. Disable Ad Blocker to receive them all.
Once done, hit anything below
|
|
|
|