The Orton Effect – What is it and How to Create it in Photoshop
by Alex W.
Have you ever looked at a landscape photograph and wondered how the photographer achieved that ethereal, dreamlike glow that makes the image feel almost painterly? The answer is almost certainly the Orton Effect, and this orton effect Photoshop tutorial will walk you through every step of recreating it yourself. Named after photographer Michael Orton, who pioneered the technique using film sandwiches in the 1980s, this effect combines a sharp exposure with an overexposed, blurred version of the same image to produce a luminous quality that flat editing simply cannot replicate. Whether you shoot landscapes, portraits, or macro subjects, mastering the Orton Effect gives you a powerful creative tool that elevates your post-processing beyond basic adjustments.

The beauty of the digital Orton Effect is that it requires no special equipment or plugins — just Photoshop and a photograph you want to enhance. You can apply a subtle touch for a gentle warmth or push it further for a fantasy-style look that works brilliantly for autumn forests, misty mornings, and golden hour scenes. This guide covers everything from the basic technique to advanced refinements, so you can integrate it into your editing workflow with full creative control. For more in-depth editing techniques, browse our ultimate guides collection.
Contents
What You Need Before Starting
Software and Hardware Requirements
The Orton Effect is one of the most accessible advanced techniques in photo editing because it demands very little in terms of software or computing power. You need Adobe Photoshop — any version from CS6 onward supports every feature used in this tutorial, including Apply Image and Gaussian Blur. If you prefer to do your initial raw processing in Adobe Lightroom, you can prepare your exposure and white balance there before sending the file to Photoshop for the Orton treatment.
In terms of hardware, your existing setup is almost certainly sufficient. The effect involves duplicating layers and running blur filters, which are not particularly resource-intensive operations. If you are considering upgrading your editing machine, check out our guide to the best laptops for photographers for recommendations that handle Photoshop and Lightroom smoothly.
Choosing the Right Source Image
Not every photograph benefits equally from the Orton Effect, so selecting the right source image matters more than the technique itself. The best candidates share a few characteristics:
- Strong backlighting or side lighting that creates natural glow areas
- A mix of highlight and shadow regions with good tonal separation
- Natural subjects like forests, waterfalls, flower fields, or golden hour landscapes
- Properly exposed files — the effect amplifies brightness, so overexposed images will blow out

Advantages and Limitations of the Orton Effect
Where the Orton Effect Shines
The Orton Effect brings several distinct advantages to your post-processing toolkit that other adjustments simply cannot replicate through curves or saturation sliders alone. It creates a luminous quality that draws the viewer's eye into highlights and gives flat scenes a sense of depth and atmosphere.
- Adds emotional depth — the soft glow evokes mood in landscapes, making ordinary scenes feel cinematic
- Enhances color saturation naturally without the artificial look of a saturation slider
- Works non-destructively when applied on a duplicate layer with adjustable opacity
- Takes under two minutes to apply once you know the steps
- Pairs well with other techniques like strong compositions to create truly polished images
Where It Falls Short
The Orton Effect is not a universal fix, and applying it indiscriminately will hurt your images more than it helps them. It reduces fine detail through the blur component, which means images that rely on sharpness — such as architectural photography, product shots, or wildlife portraits — typically look worse with the effect applied globally.
| Subject Type | Orton Suitability | Recommended Opacity | Notes |
|---|---|---|---|
| Landscape (golden hour) | Excellent | 20–40% | Best with backlighting and warm tones |
| Forest / woodland | Excellent | 25–45% | Enhances light rays through canopy |
| Waterfall / river | Good | 15–30% | Complement with long exposure |
| Portrait | Moderate | 10–20% | Use masking to protect eyes and skin detail |
| Architecture | Poor | Avoid | Blur destroys structural lines |
| Wildlife | Poor | Avoid | Loss of fur and feather detail |
Step-by-Step Orton Effect Photoshop Tutorial
Preparing Your Image
Before you apply any Orton processing, you should complete your standard raw edits first, including exposure correction, white balance, and lens profile corrections. If you shoot in RAW — and you should — process your file in Lightroom or Adobe Camera Raw, then open it in Photoshop as a flattened image. Understanding your aperture settings during capture helps you predict how the blur will interact with your existing depth of field.
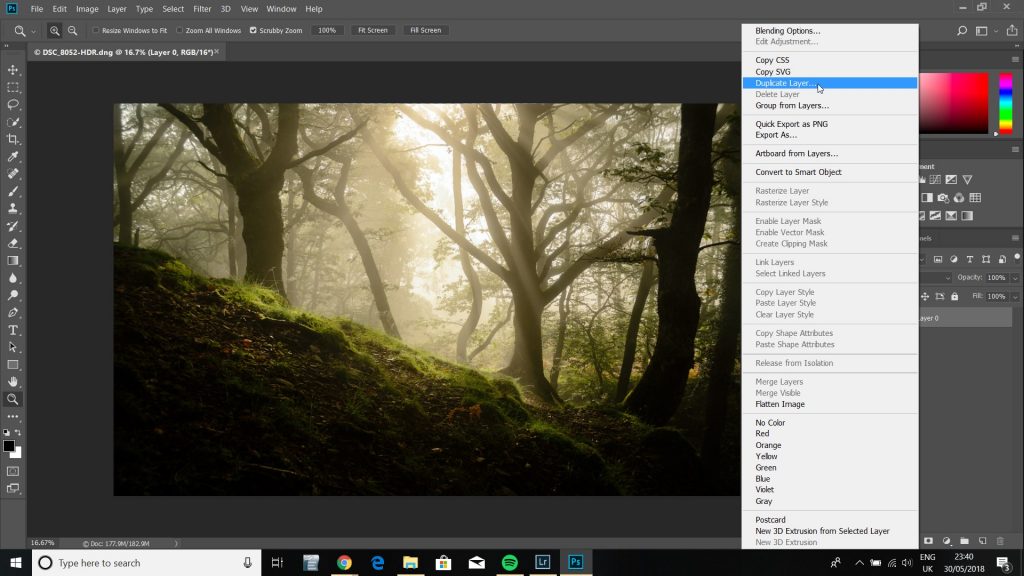
- Open your processed image in Photoshop
- Duplicate the background layer using Ctrl+J (or Cmd+J on Mac)
- Rename the duplicate layer to "Orton" for easy reference in your layers panel
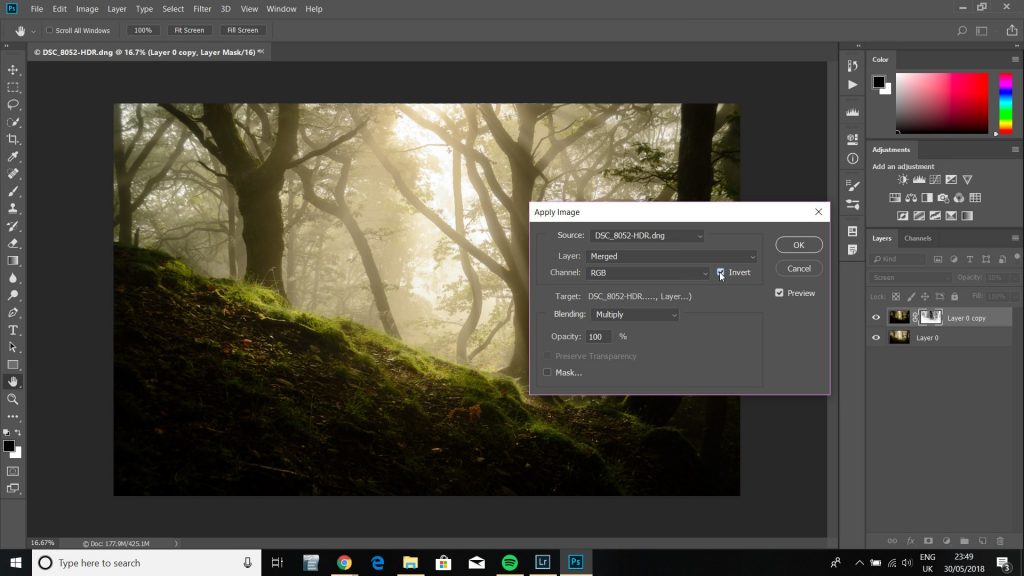
Using Apply Image for the Glow
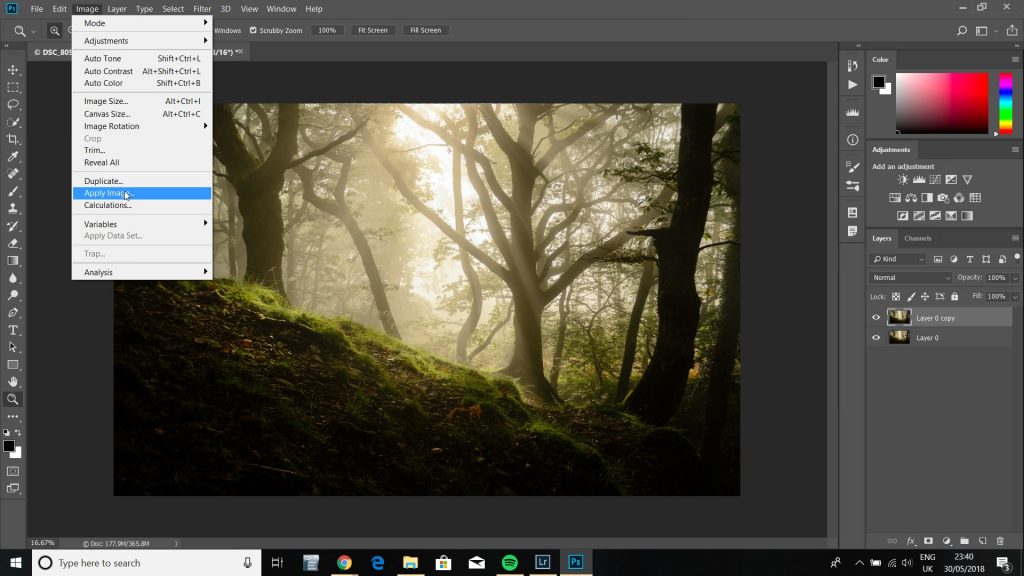
The Apply Image function is the core of the Orton technique, and it creates the characteristic brightness boost that separates this method from simply adding a blur layer. With your duplicated "Orton" layer selected, navigate to Image > Apply Image from the top menu bar.
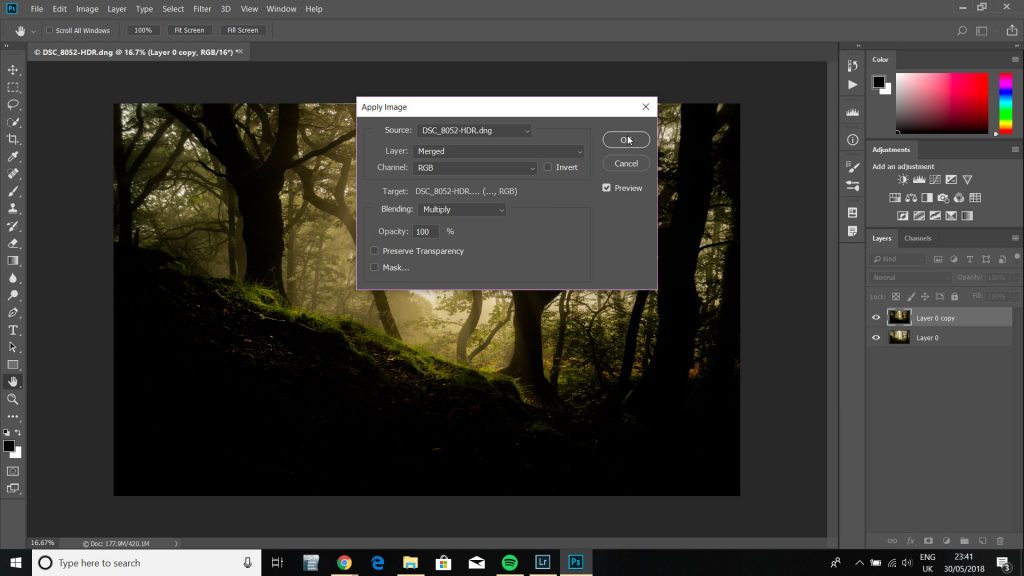
In the Apply Image dialogue box, configure the following settings to achieve the correct glow effect:
- Set the Source to your current document (it should default to this automatically)
- Set the Layer to "Merged" so it references the full composite image
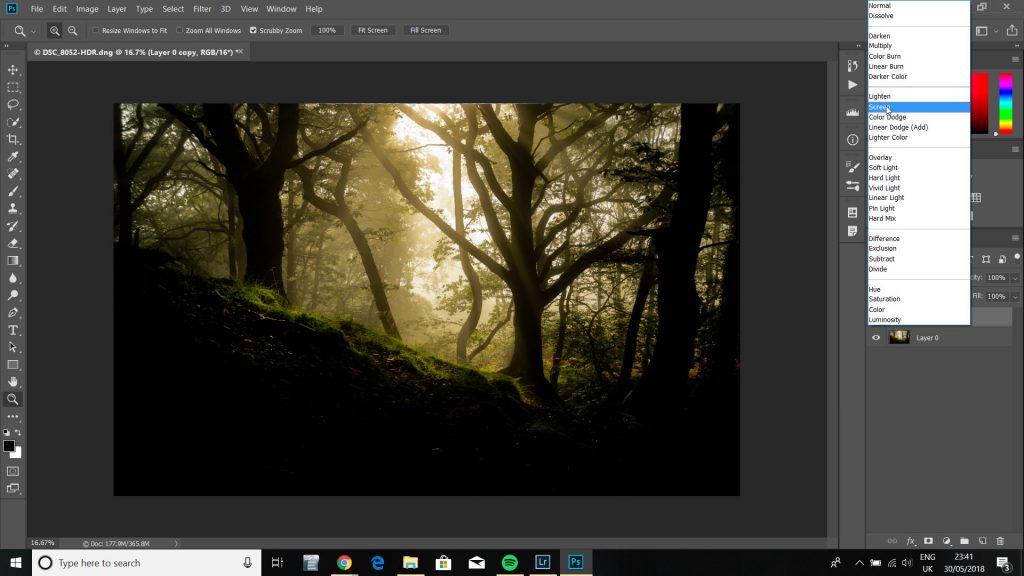
- Set the Blending mode to "Screen" — this is what creates the overexposed, luminous quality
- Leave Opacity at 100% for now — you will control the final intensity later through layer opacity
- Click OK to apply the settings
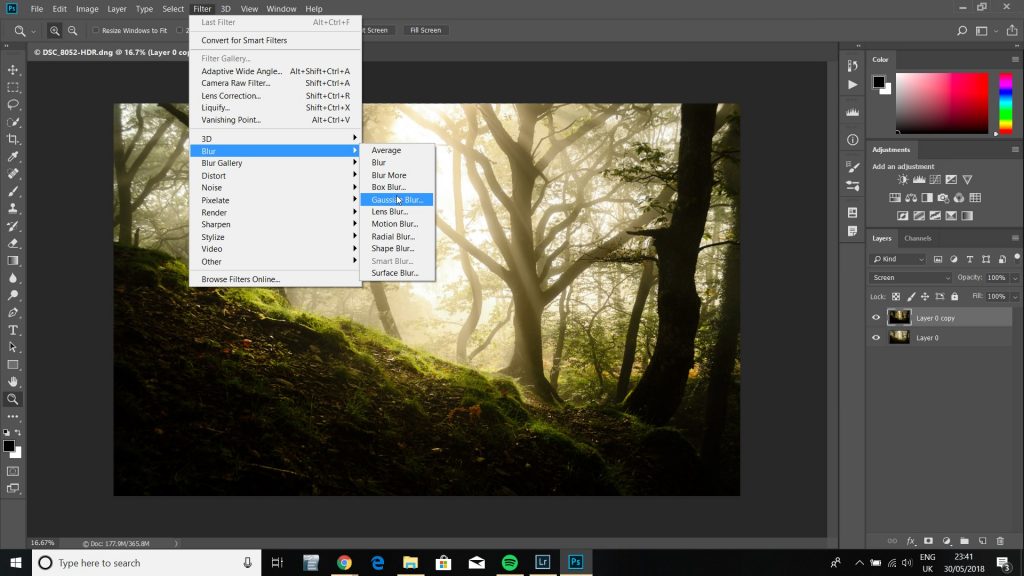
Adding Gaussian Blur
Your image now looks overexposed and bright, which is exactly what you want at this stage. The next step introduces the signature soft-focus quality by applying a Gaussian Blur to the brightened layer. Navigate to Filter > Blur > Gaussian Blur, and you will see a preview of the blur effect on your image in real time.
The radius value you choose depends on your image resolution and the intensity of the effect you want to achieve:
- For a subtle, professional look: use a radius between 15–25 pixels on a full-resolution image
- For a moderate Orton glow: try 25–40 pixels as your starting point
- For a heavy, painterly effect: push the radius to 40–60 pixels or higher
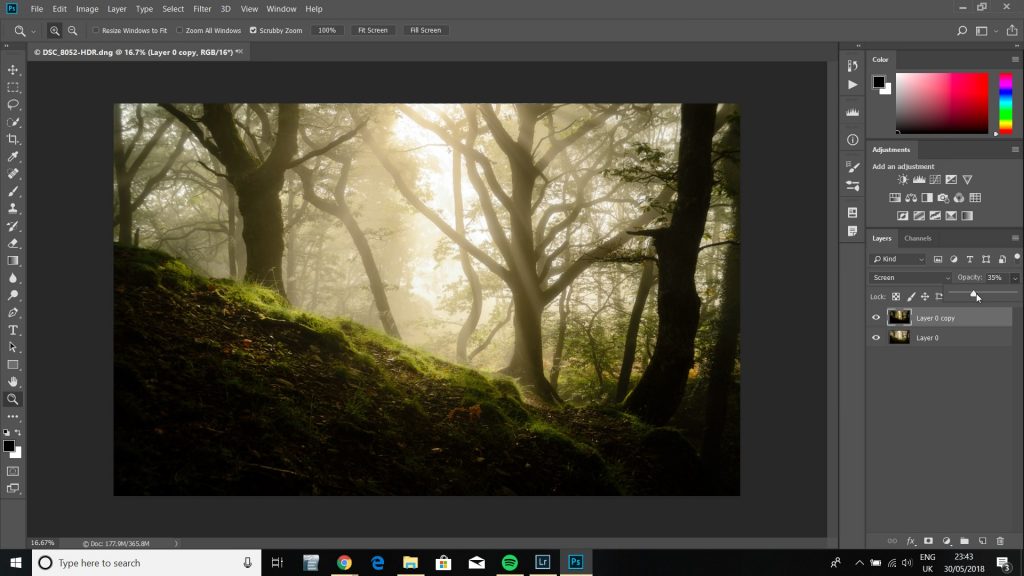
Fine-Tuning Opacity and Color
With both Apply Image and Gaussian Blur applied, your Orton layer is far too strong for most practical uses, and that is by design. You now control the final intensity by reducing the layer opacity in the Layers panel. Start at around 25–30% and adjust upward or downward until the glow enhances the scene without overwhelming it.
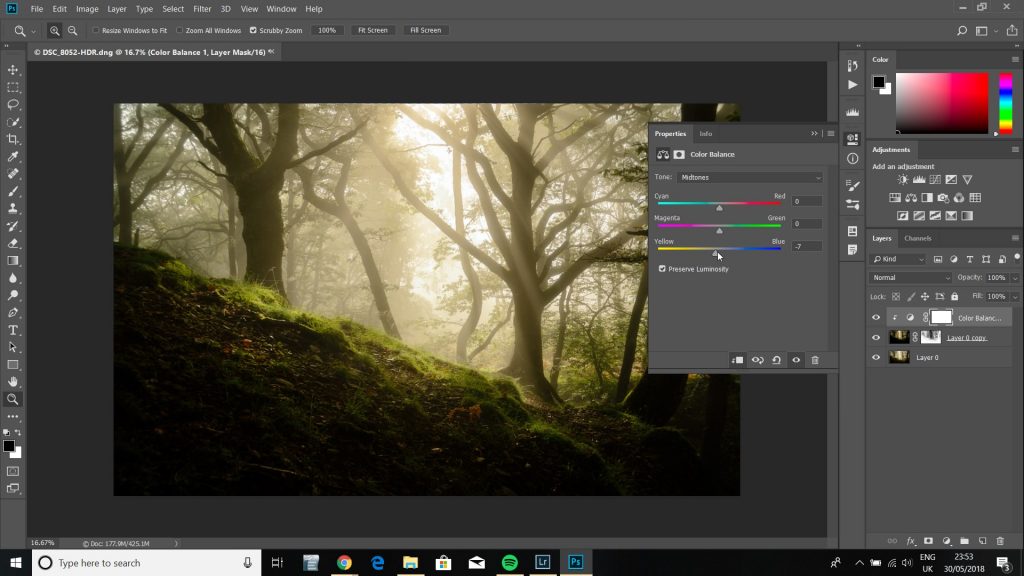
To refine the color temperature of the effect, add a Color Balance adjustment layer above the Orton layer and clip it so the adjustment only affects the glow. Right-click the Color Balance layer and select "Create Clipping Mask" to link it exclusively to the Orton layer below.
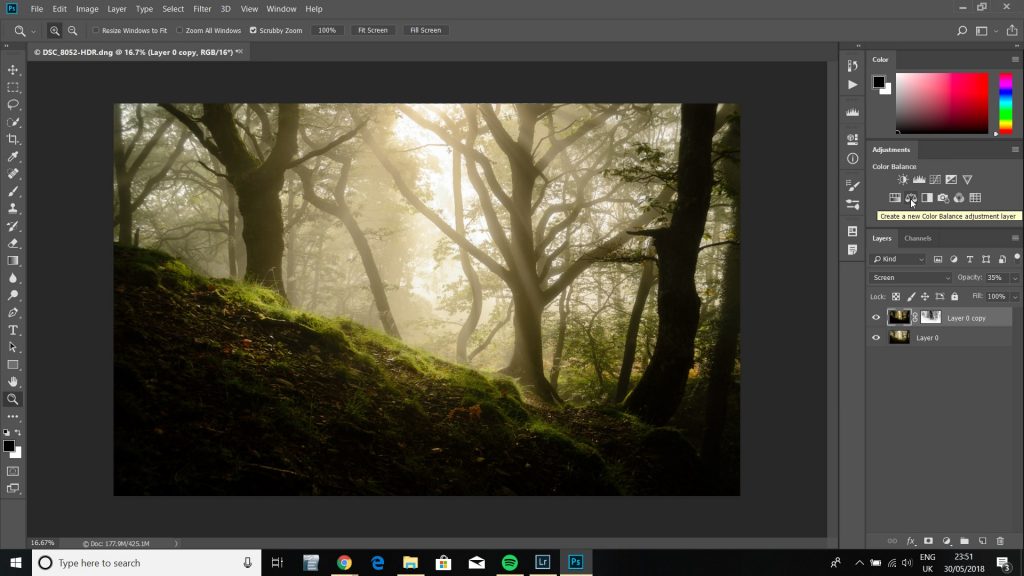

A subtle shift toward warmth in the highlights and midtones enhances the golden glow that makes the Orton Effect so appealing in landscape work. Move the Yellow-Red slider just a few points toward Red, and push the Cyan-Blue slider slightly toward Yellow for a natural-looking warmth.
Common Orton Effect Mistakes You Should Avoid
The Overcooking Problem
The single most common mistake photographers make with the Orton Effect is applying it too heavily, which turns a potentially beautiful photograph into a muddy, washed-out mess that screams "over-processed." Your goal is to create a glow that viewers feel rather than consciously notice, and that distinction is the difference between professional and amateur results.
Here are the warning signs that you have pushed the effect too far:
- Highlights appear completely blown out with no recoverable detail whatsoever
- The overall image looks hazy or foggy rather than luminous and inviting
- Text or fine details in the scene become completely unreadable at full resolution
- The colour saturation looks neon or garish instead of naturally enhanced
If you notice any of these symptoms, pull your Orton layer opacity back by at least ten percentage points and reassess the image at full screen. You can also toggle the layer visibility on and off rapidly to compare the before and after, which helps you judge the effect with fresh eyes rather than acclimatizing gradually to the glow.
Subjects That Don't Suit the Effect
Another persistent myth is that the Orton Effect works universally across all genres of photography, and this is simply not true. Street photography, documentary work, and any genre where sharpness conveys authenticity will suffer from the dreamy softness that defines the Orton look. Similarly, images captured in overcast or stormy conditions often lack the highlight contrast needed for the Screen blending mode to produce a compelling glow.
Building the Orton Effect Into Your Editing Workflow
Creating a Reusable Photoshop Action
Once you have dialled in the Orton Effect settings that work for your style, you should record the entire process as a Photoshop Action so you can apply it to future images with a single click. This saves you significant time when processing batches of landscape photographs from a single shoot, especially if you pair the action with consistent manual exposure settings in the field.
- Open the Actions panel via Window > Actions and click the "New Action" button
- Name it something descriptive like "Orton Effect – Subtle" and assign it to a function key for quick access
- Click Record, then perform every step: duplicate layer, Apply Image with Screen, Gaussian Blur at your preferred radius
- Set the layer opacity to your default starting point — you can always adjust this per-image afterward
- Click the Stop button to finish recording the action
You can create multiple actions with different blur radii and opacity settings, labeling them as "Subtle," "Moderate," and "Heavy" to match different shooting conditions and creative intentions quickly.
Selective Application With Masks
The most refined approach to the Orton Effect involves applying it selectively using layer masks rather than globally across the entire image. Add a black layer mask to your Orton layer by holding Alt (Option on Mac) and clicking the mask icon, which hides the effect completely. Then paint with a white brush at low opacity (15–25%) over the areas where you want the glow to appear — typically highlights, light rays, and background elements — while leaving foreground details, subjects, and sharp focal points untouched.
This selective technique is particularly powerful for astrophotography scenes where you want a gentle glow around star clusters without softening the landscape foreground. It also works beautifully in woodland photography where you want the light filtering through the canopy to glow while the tree trunks remain sharp and well-defined.
Frequently Asked Questions
Can you apply the Orton Effect in Lightroom without using Photoshop?
Lightroom does not have an Apply Image or layer-based blending mode equivalent, so you cannot recreate a true Orton Effect there. You can approximate a similar glow using the Dehaze slider set to a negative value combined with a slight clarity reduction, but the result lacks the luminous highlight quality that the Screen blend mode produces in Photoshop. For the authentic look, Photoshop remains the definitive tool for this technique.
What Gaussian Blur radius should you use for high-resolution images from modern cameras?
The blur radius scales with image resolution, so a 45-megapixel file from a camera like the Sony A7R series needs a higher radius than a 20-megapixel crop sensor image to achieve visually similar softness. As a general guideline, start with a radius equal to roughly 0.1% of your image's longest pixel dimension — so around 40–50 pixels for a 36MP file, and 25–35 pixels for a 20MP file — and adjust based on personal taste.
Does the Orton Effect work well with black and white photography?
The Orton Effect translates surprisingly well to black and white images because the glow emphasizes tonal transitions between light and shadow rather than relying on colour saturation. Apply the effect before your black and white conversion for the most natural result, as this preserves the luminosity information that the Screen blending mode generates from the original colour data.
Key Takeaways
- The Orton Effect combines a Screen-blended brightness boost with Gaussian Blur on a duplicate layer, and you control the final intensity entirely through layer opacity — start around 25% and adjust from there.
- Landscape, woodland, and golden hour scenes benefit most from the effect, while architecture, wildlife, and documentary subjects should be avoided entirely.
- Recording the technique as a Photoshop Action and applying it selectively with layer masks gives you a fast, non-destructive workflow that scales across entire photo shoots.
- The most common mistake is pushing the effect too far — if viewers notice the glow before they notice the subject, you need to reduce the opacity significantly.
 |
 |
 |
 |

About Alex W.
Alex is a landscape, equine, and pet photographer based in the Lake District, UK, with years of experience shooting in one of Britain's most photographically demanding natural environments. His work has been featured in Take a View Landscape Photographer of the Year, Outdoor Photographer of the Year, and Amateur Photographer Magazine — publications that reflect a serious, competitive standard of image-making. At Click and Learn Photography, he shares the camera settings, gear choices, and compositional techniques he has developed through real-world shooting and competition-level work.
You can Get FREE Gifts. Furthermore, Free Items here. Disable Ad Blocker to receive them all.
Once done, hit anything below
|
|
|
|