I still remember standing in a crowded market in Marrakech, camera in hand, completely overwhelmed. Vendors were shouting, colors were exploding in every direction, and I had no idea where to point my lens first. That trip taught me more about travel photography tips for beginners than any tutorial ever could — because I made every mistake in the book and came home with a memory card full of mediocre shots. Whether you're planning your first photo-focused trip or you've traveled before but want sharper results, this guide breaks down exactly what works, what doesn't, and how to stretch your gear budget. If you're just getting started with your camera, our photography beginners section has even more foundational resources to explore.
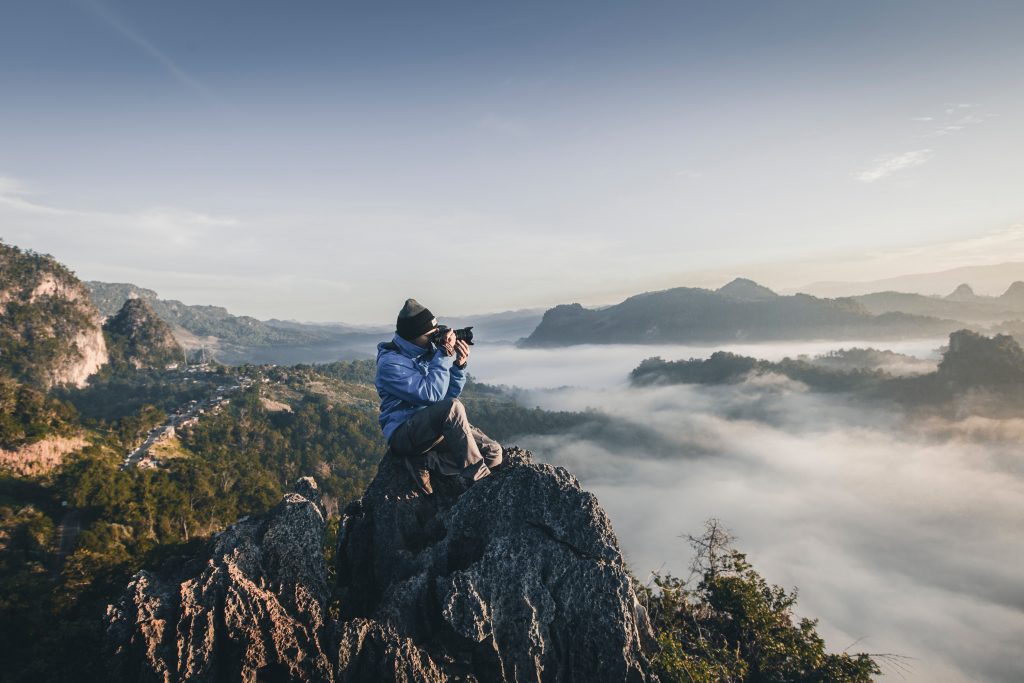
The good news is that travel photography doesn't require expensive gear or years of experience. It requires intention, a few core techniques, and the willingness to slow down and actually see what's in front of you. Below, you'll find a structured walkthrough covering composition fundamentals, common pitfalls, fast improvements you can make today, a realistic budget breakdown, and solutions for the problems that trip up most travelers behind the lens.
Contents
Foundations vs. Advanced Techniques: Where to Focus Your Energy
One of the biggest traps in travel photography is jumping straight to advanced techniques before nailing the basics. You don't need focus stacking or HDR bracketing to get stunning travel shots. You need solid fundamentals executed consistently.
The Beginner Essentials That Actually Matter
Start here. These are the skills that will improve 80% of your images immediately:
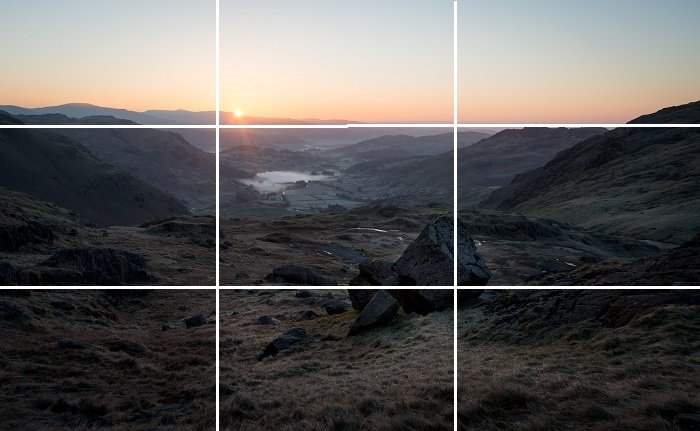
- Rule of thirds — Place your subject at the intersections of an imaginary 3×3 grid. Enable the grid overlay on your camera's LCD or viewfinder.
- Stable handheld technique — Tuck your elbows in, exhale before pressing the shutter, and brace against a wall or railing when shooting below 1/60s.
- Aperture priority mode — Shoot in A/Av mode. Set your aperture for depth of field and let the camera handle shutter speed. This single switch gives you creative control without full manual complexity.
- Shoot RAW — RAW files preserve all sensor data. You can recover blown highlights and crushed shadows that JPEGs throw away permanently.
- Clean your lens — Seriously. A microfiber cloth and a lens pen solve the majority of "why do my photos look hazy" complaints.
Advanced Moves Worth Learning Early
Once you're comfortable with the basics, these intermediate techniques will separate your travel photos from typical tourist snapshots:
- Leading lines — Use roads, rivers, fences, and architectural lines to draw the viewer's eye toward your subject. Our guide on using leading lines to improve your composition breaks this down in detail.
- Exposure compensation — Your camera's meter is easily fooled by bright skies or dark interiors. Dial in +1 or -1 EV to override the meter when the scene demands it.
- Back button focus — Separating focus from the shutter button gives you more control over when and where you lock focus, especially with moving subjects in street scenes.
- Bracketing for dynamic range — Shoot three exposures and blend them later. Useful for high-contrast scenes like temple interiors with bright doorways.
Travel Photography Mistakes That Sabotage Your Shots
You'll learn more from understanding what goes wrong than from memorizing rules. Here are the errors that consistently ruin otherwise promising travel photos.
Composition Errors You Don't Notice Until Later
- Centering everything — Placing your subject dead center creates static, lifeless compositions. Off-center placement adds tension and visual interest.
- Tilted horizons — Even a 2-degree tilt looks sloppy. Use your camera's built-in level or straighten in post.
- Too much sky — Unless the sky is dramatic, it's dead space. Tilt down and fill the frame with your actual subject.
- Ignoring the background — A beautiful portrait with a trash can behind the subject's head tells the wrong story. Move two steps to the left.
- Never shooting vertical — Tall buildings, narrow streets, and waterfalls often demand portrait orientation. Force yourself to rotate the camera for at least 30% of your shots.
Pro tip: Before you press the shutter, scan the edges of your frame. If anything distracting is creeping in from the border, recompose. It takes two seconds and saves hours of cropping in post.
Gear and Settings Missteps
- Leaving ISO on auto in manual mode — Auto ISO undermines your exposure control. If you're shooting manual, set ISO deliberately.
- Overpacking lenses — Carrying four lenses means you'll spend more time swapping glass than shooting. A versatile 24-70mm or 18-135mm covers 90% of travel scenarios.
- Not formatting your memory card — Deleting files individually fragments the card. Format it in-camera before each trip for reliable writes.
- Skipping the backup — One corrupted card and your entire trip is gone. Carry a portable SSD or use a phone-to-cloud backup workflow each night.
Quick Wins: Travel Photography Tips for Beginners Who Want Faster Results
You don't need weeks of practice to see dramatic improvement. These adjustments produce visible results on your very next shoot.
Chase the Light, Not the Landmarks
Light quality matters more than the subject itself. According to the golden hour photography principle, the hour after sunrise and before sunset produces warm, directional light that flatters virtually every subject.
- Schedule your landmark visits for golden hour — not midday.
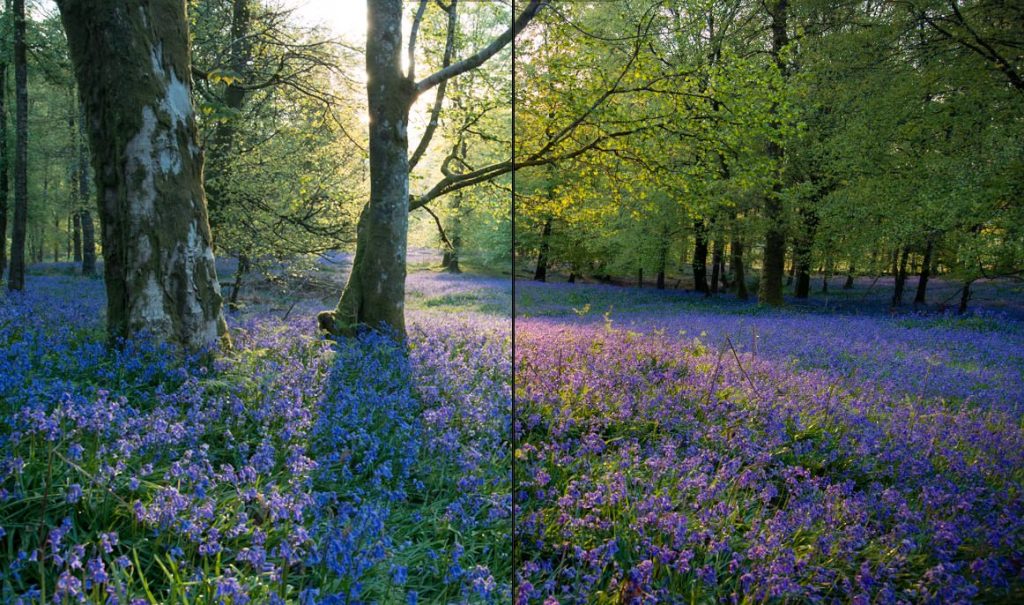
- Overcast days are a gift for portrait and street photography. The clouds act as a giant softbox, eliminating harsh shadows.
- Blue hour (20-30 minutes after sunset) gives you moody cityscapes with balanced ambient and artificial light.
- If you're stuck shooting at noon, look for open shade — doorways, awnings, or tree canopy — and place your subject there.
Tell a Story in Every Frame
The difference between a snapshot and a photograph is narrative. Every strong travel image answers a question: What is this place? What does it feel like to be here? What's happening right now?
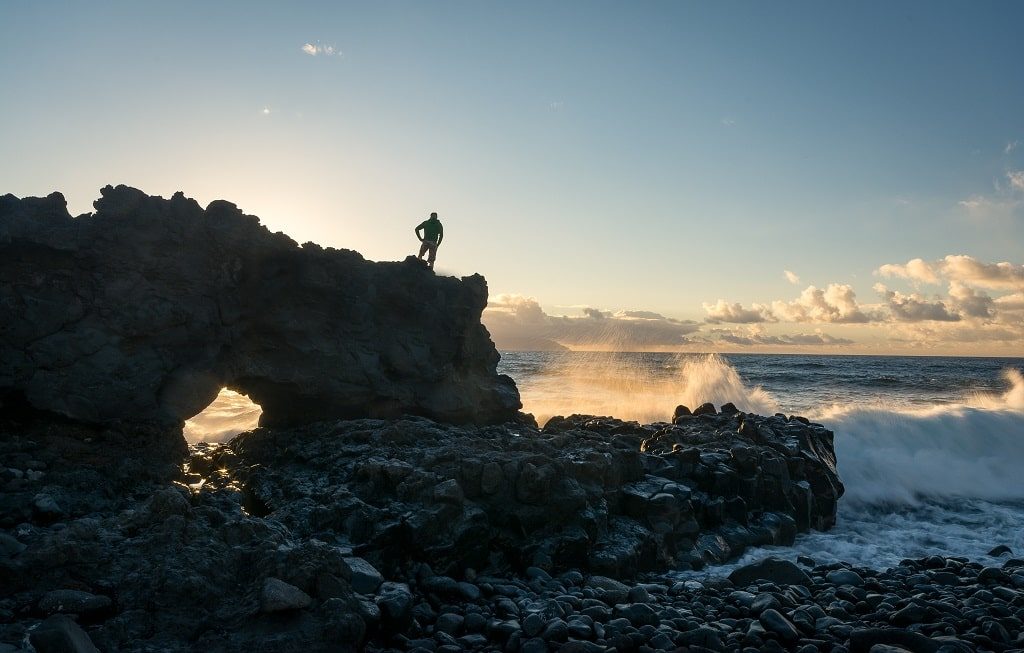
- Include people — Empty landscapes are beautiful, but a human figure adds scale and emotion. Even a silhouette in the distance transforms the image.
- Capture details — Shoot the peeling paint on a doorway, the spices in a market stall, the worn cobblestones underfoot. These close-ups anchor your story in specifics.
- Shoot sequences — Don't take one photo and move on. Shoot wide, medium, and tight. Give yourself editorial options for building a visual narrative later.
- Layer your foreground — Place an interesting element in the foreground to create depth. A flower, a railing, a local menu board — anything that frames the scene behind it.
For destination-specific inspiration, check out our list of travel photography destinations worth visiting to start planning your next shoot.
Travel Photography Gear on a Budget
Gear anxiety stops more beginners than lack of talent does. Here's the truth: you can produce professional-quality travel photos without spending thousands. The table below breaks down realistic costs at three experience levels.
Budget Breakdown by Experience Level
| Item | Beginner ($300–$700) | Intermediate ($700–$1,500) | Advanced ($1,500–$3,000+) |
|---|---|---|---|
| Camera body | Used mirrorless (Sony a6000, Canon M50) | Mid-range mirrorless (Fujifilm X-T30, Sony a6400) | Full-frame mirrorless (Sony a7 III, Canon R6) |
| Lens | Kit 18-55mm | 18-135mm or prime + zoom combo | 24-70mm f/2.8 + 70-200mm f/4 |
| Tripod | Tabletop or budget aluminum ($20–$40) | Carbon fiber travel tripod ($100–$200) | Peak Design or Gitzo ($250–$400) |
| Storage | 64GB SD card + phone backup | 2× 128GB cards + portable SSD | Multiple cards + 1TB SSD + cloud sync |
| Accessories | Lens cloth, camera strap | ND filter, spare battery, rain cover | CPL + ND filters, L-bracket, cleaning kit |
| Editing software | Free (Darktable, RawTherapee) | Lightroom Classic ($10/mo) | Lightroom + Photoshop ($20/mo) |
Where to Save and Where to Spend
Not all gear investments are equal. Here's where your money makes the biggest difference:
- Spend on glass — A sharp lens on a budget body outperforms a mediocre lens on an expensive body every time. Prioritize lens quality over megapixels.
- Save on tripods initially — A $30 aluminum tripod gets you started. Upgrade to carbon fiber when you're sure you'll use it regularly.
- Spend on a good bag — Your camera bag protects your entire investment. Look for weather resistance, quick access, and comfortable straps for all-day walks.
- Save on filters — You need a UV filter for lens protection and possibly a circular polarizer. Skip the rest until you have a specific use case.
- Save on camera bodies — Buy one generation old. The used market for mirrorless cameras is excellent, and last year's sensor is still incredibly capable.
Fixing Common Problems in the Field
No matter how well you prepare, you'll face challenges on location. Here's how to diagnose and solve the most frequent travel photography problems without panicking.
Dealing with Harsh Midday Light
Midday sun is the enemy of flattering photos. The light comes from directly overhead, creates deep shadows under eyes and noses, and blows out highlights. But you can't always avoid it — sometimes noon is the only time you have at a location.
- Find open shade — Step under an archway, awning, or tree canopy. The light is still bright but dramatically softer.
- Use fill flash — A burst of flash at -1 EV fills in harsh shadows on faces without looking artificial.
- Shoot into the light — Backlit subjects create dramatic silhouettes. Expose for the sky and let the foreground go dark.
- Go abstract — Midday sun creates strong geometric shadows. Shoot the patterns on the ground rather than fighting the light on faces.
- Convert to black and white — Harsh contrast that looks terrible in color often works beautifully in monochrome.
Sharp Shots with Moving Subjects
Street scenes, markets, festivals, and wildlife all involve motion. Blurry subjects kill otherwise strong compositions.
- Raise your shutter speed — For walking subjects, use 1/250s minimum. For fast action, go to 1/500s or higher.
- Bump your ISO — Modern cameras handle ISO 1600-3200 with minimal noise. A sharp shot with slight grain beats a blurry shot at ISO 100.
- Use continuous autofocus — Switch from AF-S (single) to AF-C (continuous). Your camera will track moving subjects instead of locking on a single point.
- Enable burst mode — Shoot 3-5 frame bursts during peak action. Pick the sharpest frame later.
- Pan with the subject — Match your camera movement to the subject's direction at a slower shutter speed (1/30s–1/60s). The subject stays sharp while the background blurs, conveying motion.
For more ways to level up your overall technique, our guide on becoming a better photographer with 10 practical tips covers both technical and creative growth.
Frequently Asked Questions
What camera settings should I use for travel photography?
Start with aperture priority mode, auto ISO capped at 3200, and RAW file format. Set your aperture based on the scene: f/8–f/11 for landscapes (maximum sharpness), f/2.8–f/4 for portraits and street scenes (shallow depth of field). This setup handles 90% of travel situations while keeping you in creative control without full manual complexity.
Do I need an expensive camera for good travel photos?
No. A used entry-level mirrorless camera like the Sony a6000 or Canon M50 paired with a decent kit lens produces excellent travel images. The photographer's eye, timing, and understanding of light matter far more than sensor size or megapixel count. Invest in learning composition and light before upgrading gear.
How do I photograph people in other countries without being intrusive?
Ask permission first — a smile and a gesture toward your camera is universally understood. Learn "may I take your photo" in the local language. Offer to show the person the photo on your LCD afterward. Avoid photographing children without parental consent, and respect anyone who declines. Some cultures consider photography of certain subjects disrespectful, so research local customs before your trip.
How many photos should I take per day while traveling?
Quality matters more than quantity, but a reasonable target is 100–300 frames per full shooting day. The key is to be intentional: slow down, compose carefully, and resist the urge to rapid-fire at every scene. You'll spend less time culling and end up with a higher percentage of keepers. Budget 15–20 minutes each evening to back up and do a quick first pass.
Key Takeaways
- Master the fundamentals first — rule of thirds, aperture priority mode, and shooting in RAW will improve your travel photos more than any gear upgrade.
- Chase golden hour light and look for open shade at midday; lighting is the single most important factor that separates stunning travel shots from forgettable snapshots.
- Invest in a quality lens before upgrading your camera body, and don't be afraid to buy used gear — last-generation mirrorless cameras are more than capable.
- Slow down, tell a story with each frame, and back up your photos every night — intentional shooting and data safety are habits that pay off on every trip.
 |
 |
 |
 |

About Alex W.
Alex is a landscape, equine, and pet photographer based in the Lake District, UK, with years of experience shooting in one of Britain's most photographically demanding natural environments. His work has been featured in Take a View Landscape Photographer of the Year, Outdoor Photographer of the Year, and Amateur Photographer Magazine — publications that reflect a serious, competitive standard of image-making. At Click and Learn Photography, he shares the camera settings, gear choices, and compositional techniques he has developed through real-world shooting and competition-level work.
You can Get FREE Gifts. Furthermore, Free Items here. Disable Ad Blocker to receive them all.
Once done, hit anything below
|
|
|
|