Mountain landscape photography: 7 tips to improve your mountain photography
by Alex W.
Humanity has pushed the limits of adventure throughout history. It’s how we got to where we are today, and it’s why we continue to push limits and explore new boundaries. It’s in our nature to explore and survive in hostile environments, and as photographers it’s in our nature to try to capture these environments in the most evocative way possible.
Our mountain photography tips will help you do just that.
Whether you’re trekking the Himalayas or hiking closer to home, the mountains draw us in with the promise of breathtaking views and epic experiences. The elation of reaching the summit is always worth the lung-busting ascent and this feeling keeps us coming back time and time again.
Anybody can take a quick phone shot of a stunning mountain view, but creating truly gorgeous mountain photography is a different story. Our mountain landscape photography tips should set you well on your way though.
Anyway, enough philosophical rambling. Let’s get to it:
Contents
7 Mountain photography tips
1. Dress for the worst
Remember that old saying, “Prepare for the worst and hope for the best”?
Well, that’s an adage you really should be following every time you head out into the mountains. By nature they are inhospitable and hostile and they can create entire weather systems of their own that change in the blink of an eye.
Do not underestimate them.
Even relatively modest mountains carry very real danger, whether it’s steep cliff-faces, inclement weather or terrain that’s difficult to navigate.
My rule of thumb is that I always take equipment suitable for the worst conditions I might realistically face. Even if it’s a glorious summer’s day I’ll pack some waterproof clothes just in case the heavens decide to open. They add very little weight to my overall pack and, well, better off prepared than dead, right?
Safety aside, you’re far more likely to be able to focus on your photography if you’re not freezing cold and soaked to the skin.
Here’s some things to consider when out photographing the mountains:
- Footwear – By far the most important piece of equipment from a comfort perspective. A good set of hiking boots or trail running shoes are worth their weight in gold, while a hike up a mountain in Converse can turn an invigorating day out into an afternoon of torture followed by days of blister management.
- Waterproofs – A pair of waterproof trousers and a thin waterproof jacket are always in my bag, no matter what season it is.
- Warm clothes – It’s no secret that it gets colder the higher up you get. It’s roughly a 10 degree Celsius decrease in temperature for every 1,000 metres you climb (or 5 degrees Fahrenheit for every 1,000 feet). Add the likely wind chill factor into the equation and it makes sense to pack some extra warm clothes to keep you comfortable on the summit.
- Navigation – Always take a physical map and compass on your outings. Phone batteries can die or GPS signal can be lost.
- Survival – No need to go crazy here, but I keep a small survival kit like the one below in my bag. It includes an emergency blanket, a whistle, a compass, a small pocket knife, a flint and everything else I need in case of emergency. I also take a headlamp, which is handy for those post-sunset hikes back to the car.
-

Gifts for Teenage Boys Christmas Stocking Stuffers for Teen...
- 🎅 REDUCE GAMING TIME – Advancement in technology comes with an increase in the number of hours most teenage boys spend on their screens, gaming, and scrolling the internet. Our survival kit for outdoors will help you reduce this screen time significantly and help the teen boys learn valuable life skills
- 🎅 STOCKING STUFFERS for TEEN BOYS – When looking to Christmas the ideal gift to your teen boy gifts age 14 and up, him, boyfriend, look no further than our outdoor survival kit for men that makes it possible for him to enjoy some quality time outdoors interacting with nature
Rating:

2. Travel light
Hiking up into the mountains is hard work already, so don’t have to make it harder for yourself by loading all your worldly possessions on your back.
Camera bodies and lenses may seem insignificant in weight on their own, but if you add a full-frame DSLR plus three pro-level lenses to your backpack it’s already a pretty bulky haul. Add all your hiking gear and potentially camping gear to the scenario and things start to get unbearable.
The solution? Either limit what camera gear you take with you or downsize your kit. I did the latter, switching from a hefty Nikon D810 to a Fujifilm X-series system that is under half the weight of my previous kit. That switch has helped me get back out into the mountains more and made the hike up to a lofty camping spot much more tolerable.
If you are looking at downsizing your kit, take a look at our best beginner mirrorless cameras and best Micro Four Thirds camera guides.
Another big difference you can make is by taking a smaller and lighter travel tripod rather than a bulky full size offering. You can check out our tripod buying guide here, or take a look at my personal favorite the Vanguard VEO 2 carbon fiber.
-

Vanguard VEO2GO235CB Carbon Fiber Travel Tripod with Ball...
- Inverted 5 section carbon fiber legs that fold for compact carrying and rubberized twist leg locks-new open to click feature. Also, easy to clean disassemble and reassemble if needed
- Sturdy ball head T-50 with large ergonomic knobs, separate pan lock optimized to support working loads up to 8. 8 pounds and Arca compatible quick release plate - QS-64
Rating:
Camera equipment aside, you can always buy lighter hiking and/or camping gear such as jackets, tents, sleeping bags and even water systems. I use a Sawyer mini water filtration system so I don’t have to carry litres of water up a mountain when I’m camping overnight.
Of course, the lighter and smaller you go the more expensive things get.
3. Plan for the light
We all know how important light is in landscape photography and I’ve written a huge article on planning and preparing for landscape photography, but there are extra variables to consider in mountain photography.
Unless you’re set up on the very summit of the highest mountain in the vicinity, there’s a good chance that the terrain around you will be varied and the mountainous environment can and will block light at certain times of the day.
For example, if you set up for sunrise on the valley floor the light might not reach you for a good few hours due to being blocked by the surrounding mountains. That’s a very simple example, but you get the point.
All is not lost, though. Apps like Photopills and The Photographer’s Ephemeris let you pinpoint exactly when the light will hit a certain point. It takes some learning, but their respective tutorials are really great at explaining how to use the advanced features.
There’s also another very elegant and simple solution: Just set off earlier. More time in the mountains taking photos and watching the light change is never a bad thing.
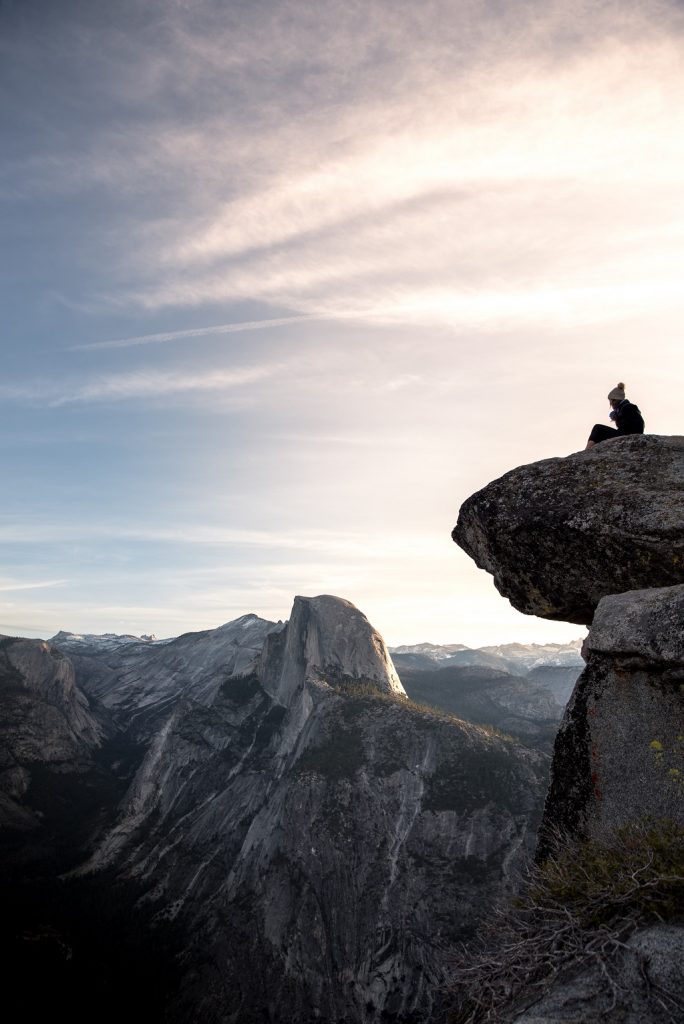
4. Add scale
Mountains are, by their very nature, absolutely massive. And generally speaking you want them to look massive in your images.
Simply taking a photo of a mountain and nothing else can see that enormity you want to convey fall flat. There’s no point of reference to show the viewer just how big that piece of rock is.
So what do you do? Add a reference point and create that sense of scale.
All you need is to include something of known size to the image. It can be a tree, a house, a person or whatever else is around. It just needs to be something that is a known quantity in terms of size. Sure, a Giant Redwood and a Silver Birch vary in size a lot, but when put next to a mountain both of them look tiny.
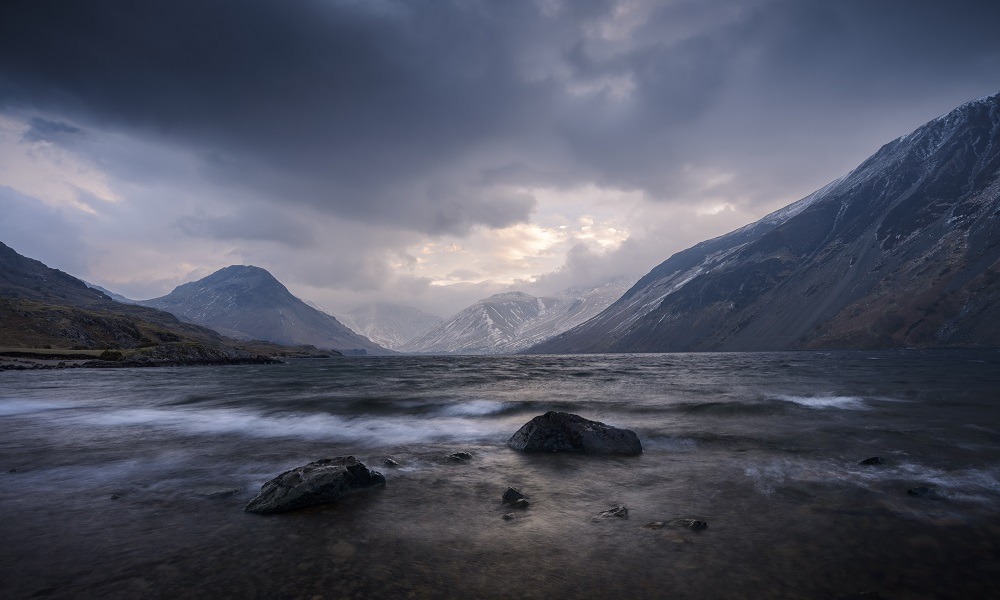
5. Work with the conditions
We’ve already discussed how quickly conditions can change in the mountains, and now that we know how to stay safe in these conditions it’s time we started to actually use them to our advantage.
Mountains are wild and hostile and overwhelming, and that should be conveyed in your images. Sure, warm golden light and a pretty candyfloss sky is lovely, but that doesn’t always have to be the way.
You know what else makes a great image? An ancient slab of granite standing defiant in the face of ceaseless wind and rain and snow. A towering behemoth emerging from a veil of swirling clouds.
Use these inclement conditions to your advantage and capture the true essence of mountain landscape photography and you may well come away with a truly unique and powerful image.
If you want more tips for photography in ‘bad’ weather check this out.
6. Zoom in
Wide-angle views of mountainous landscapes are great. There’s no denying that and I certainly won’t try to convince you otherwise.
That archetypal landscape image of towering mountains reflected in a crystal clear lake is a timeless classic, but as always there is plenty of room outside the box to explore.
Get out that telephoto lens and start playing around with perspective, depth and layers.
Generally speaking you want to head to higher ground when shooting the mountains with a telephoto lens. If you’re higher than the subject you’re shooting it tends to become more prominent in the image, and shooting with the valley floor below as the background opens up some unique compositional options.
Here’s where I like to play with light and shade a lot, either by waiting until the light is hitting the subject and leaving the background in relative darkness or waiting for the light to illuminate the background and leave my subject in the shadows. This light/dark contrast brings the minute details in the image come to the forefront.
You can also use a telephoto lens to really emphasise the size of the mountains by zooming in until they dominate the entire frame, or you can photograph the beautiful receding layers of distant mountains.
Basically, the possibilities are endless with a telephoto lens!
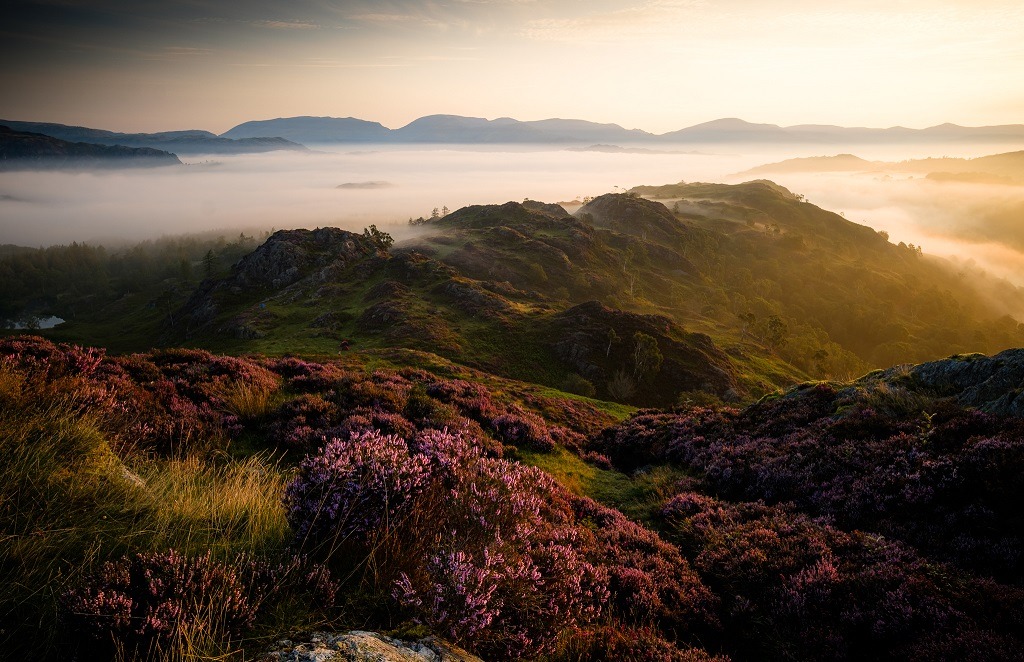
7. Utilize the foreground
That being said, there is plenty of room in the mountains for the more traditional vein of landscape photography.
This sort of photography is especially well suited to the valley floors where there is often an abundance of interesting foreground material and the breathtaking backdrop of the mountains.
Subjects such as flowers, trees and lakes are perfect for drawing the viewer in to the image, and leading lines work especially well due to the background mountains carrying so much visual weight.
This is where a high quality wide-angle lens, such as those in our landscape photography lenses buyer’s guide, come into play and where some other techniques such as focus stacking can be helpful.
Also, when using wide-angle lenses, try to ensure the camera isn’t tilted backwards when photographing mountains. This causes a shift in perspective that basically makes the mountains look smaller in the frame. Keep the camera level or tilt it forward and the mountains become slightly more prominent.
More from Click and Learn Photography:
- Ultimate Guide to landscape photography ebook
- F-Stop chart and infographic
- 11 best external hard drives for photographers
- Best cameras for landscape photography
 |
 |
 |
 |

About Alex W.
Alex is the owner and lead writer for Click and Learn Photography. An avid landscape, equine, and pet photographer living and working in the beautiful Lake District, UK, Alex has had his work featured in a number of high profile publications, including the Take a View Landscape Photographer of the Year, Outdoor Photographer of the Year, and Amateur Photographer Magazine.
Thoughts on "Mountain landscape photography: 7 tips to improve your mountain photography"
|
|
|
|
Learn Photography
You can Get FREE Gifts. Furthermore, Free Items here. Disable Ad Blocker to receive them all.
Once done, hit anything below
|
|
|
|